 |
C-Menu 0.2.9
A User Interface Toolkit
|
|
C-Menu 0.2.9
A User Interface Toolkit
|
Click the link below to access the C-Menu Documentation:
C-Menu is a powerful C-based suite of programs that you can use to create a front-end infrastructure for applications. It includes Menu, Form, Pick, View, lf (list files), C-Keys, and RSH. Howver, the C-Menu examples rely on software that may not be included in all OS distributions. You may very well already have some or all of these tools installed.
Because Rust's Cargo, is generally the easiest to use, and most dependable, the installation methods described in this document use Cargo wherever practical. You may prefer to use another package manager, and most Distro Package Managers are exceptional. If so, please refer to the documentation for that package manager for installation instructions.
This guide will walk you through the installation process for Rust and some of the most useful tools that complement C-Menu.
Not all of these applications are written in Rust. Ghostty is written in Zig and Neovim is written in C. I havent listed the terminal emulators, Kitty or Alacritty, but I have used both and they are excellent terminal emulators. I have all three installed on my desktop. I use Ghostty most because it lives up to the ethos of Rust. It's solid, fast, and reliable.
The ability to span the two worlds of C and Rust is far more valuable than being proficient in either language, and one computer language is never enough.
By using C-Menu now, and better yet, contributing to the C-Menu project, you can gain first-hand knowledge of the transition to Rust, shape the future of the tool, and add software migration expert to your skill set.
C-Menu is written in C, but there are many amazing tools written in Rust that can augment your experience using C-Menu. Even if you never plan to write code in rust, the Cargo package manager that comes with Rust is worth the effort to install Rust. You will notice immediately that Cargo is the easiest and most reliable way to install Rust-based tools and their dependencies. Below are instructions on how to install Rust and some of my favorite Rust-based tools.
So much for the preamble. Let's jump in.
Run the following in your terminal, then follow the onscreen instructions.
For more detailed instructions, visit
the official Rust installation page
After installation, ensure that your environment is set up correctly by running:
You can verify the installation by checking the Rust version:
This should display the installed Rust version, confirming that Rust is successfully installed on your system.
You can update Rust and Cargo at any time by running:
Eventually, if there is enough interest in C-Menu, it will be ported to Rust. The plan is to thoroughly test and debug the C version, and incrementally incorporate Rust-like coding paradigms into the C codebase. Once the C version is stable and feature complete, we begin the porting process, we will begin refactoring C-Menu to use more modular code structures and rust-like paradigms that will facilitate the eventual port to Rust.
Come along with us on this exciting journey. If you already know Rust, we could use your help. If you don't know Rust, you can learn with us. You can contribute to R-Menu's evolution, and get involved in the Rust community. Add Rust to your CV or Resume.
And, then you can say, you were a part of the team that created R-Menu. 😀
Bat is a popular Rust-based tool that serves as a cat clone with syntax highlighting. It's easier to install and accommodates a variety of file types not addressed by Tree-Sitter. To install Bat, use the following commands based on your operating system:
After installing Rust, you can install Bat using Cargo, Rust's package manager:
After installation, you can verify that Bat is installed correctly by running:
This should display the installed Bat version, confirming that Bat is successfully installed on your system.
Ripgrep is a modernized and powerful replacement for grep. It is amazingly fast and incorporates many features not available in grep.
To install Ripgrep, you can use the following commands depending on your operating system
After installing Rust, you can install Ripgrep using Cargo, Rust's package manager:
After installation, you can verify that Ripgrep is installed correctly by running:
This should display the installed Ripgrep version, confirming that Ripgrep is successfully installed on your system.
To install lsd, a modern replacement for 'ls' with colorful output and additional features, you can use the following commands based on your operating system:
After installing Rust, you can install lsd using Cargo, Rust's package manager:
After installation, you can verify that lsd is installed correctly by running:
This should display the installed lsd version, confirming that lsd is successfully installed on your system.
A word of caution here, "lsd" in a different context, is an acronym for a powerful hallucinogenic drug. Don't tell your grandmother you use lsd without explaining that it's "ls Deluxe", a file listing utility, and not the "LSD" she remembers from her college days at UC Berkeley. 😎
Highlighted text is more pleasing to most, but there is more to it than mere aesthetics. Highlighting can improve code readability and comprehension, making it easier to identify syntax errors, keywords, and other important elements in the code. This can lead to increased productivity and reduced errors when working with code.
Currently, there is no shortage of software for highlighting, and most are easy enough to install and use. Here are a few popular options:
GNU's Source Highlight is a widely used and very capable tool. It works well with a large number of programming languages. It works better with some than others.
Pygments, is another popular syntax highlighter written in Python. Pygments also offers a wide variety of language support and customization options.
I have found the Rust-based tool, bat, to perform spectacularly in some applications, but not so well in others. It's a relatively new tool, so you will have to be patient with a few glitches in the edge cases.
Lastly, there is Tree-Sitter, which is a powerful and efficient parsing library that can be used for syntax highlighting and code analysis. It deserves it's own section. Keep reading.
To put it mildly, Tree-Sitter is a game-changer when it comes to parsing and analyzing source code. It provides a robust and efficient way to build incremental parsers for programming languages, enabling advanced features like syntax highlighting, code folding, and more. Tree-Sitter is widely adopted in various code editors and IDEs, making it an essential tool for developers who work with code on a regular basis.
The syntax highlighting provided by Tree-Sitter is top-notch, offering precise and context-aware highlighting that enhances code readability and understanding. It can handle complex language constructs and edge cases that traditional syntax highlighters often struggle with.
In a phrase, it'll knock your socks off! 😮

Tree-Sitter works with Neovim, C-Menu, and many other editors and pagers to provide advanced syntax highlighting and code analysis features.
To install Tree-Sitter, you can use the following commands depending on your operating system.
After installing Rust, you can install Tree-Sitter using Cargo, Rust's package manager. Cargo install is designed for programs, and the tree-sitter package consists of libraries, so it has to be installed as a dependency. Insert a line in the Dependency section of any Cargo.toml and type "cargo add tree-sitter".
After installation, you can verify that Tree-Sitter is installed correctly by running:
This should display the installed Tree-Sitter version, confirming that Tree-Sitter is successfully installed on your system.
To install Tree-Sitter-CLI, a command-line interface for Tree-Sitter, you can use the following commands based on your operating system:
After installing Rust, you can install Tree-Sitter-CLI using Cargo, Rust's package manager
After installation, you can verify that Tree-Sitter-CLI is installed correctly by running:
This should display the installed Tree-Sitter-CLI version, confirming that Tree-Sitter-CLI is successfully installed on your system.
To install Tree-Sitter parsers for various programming languages, you can use the following commands based on your operating system:
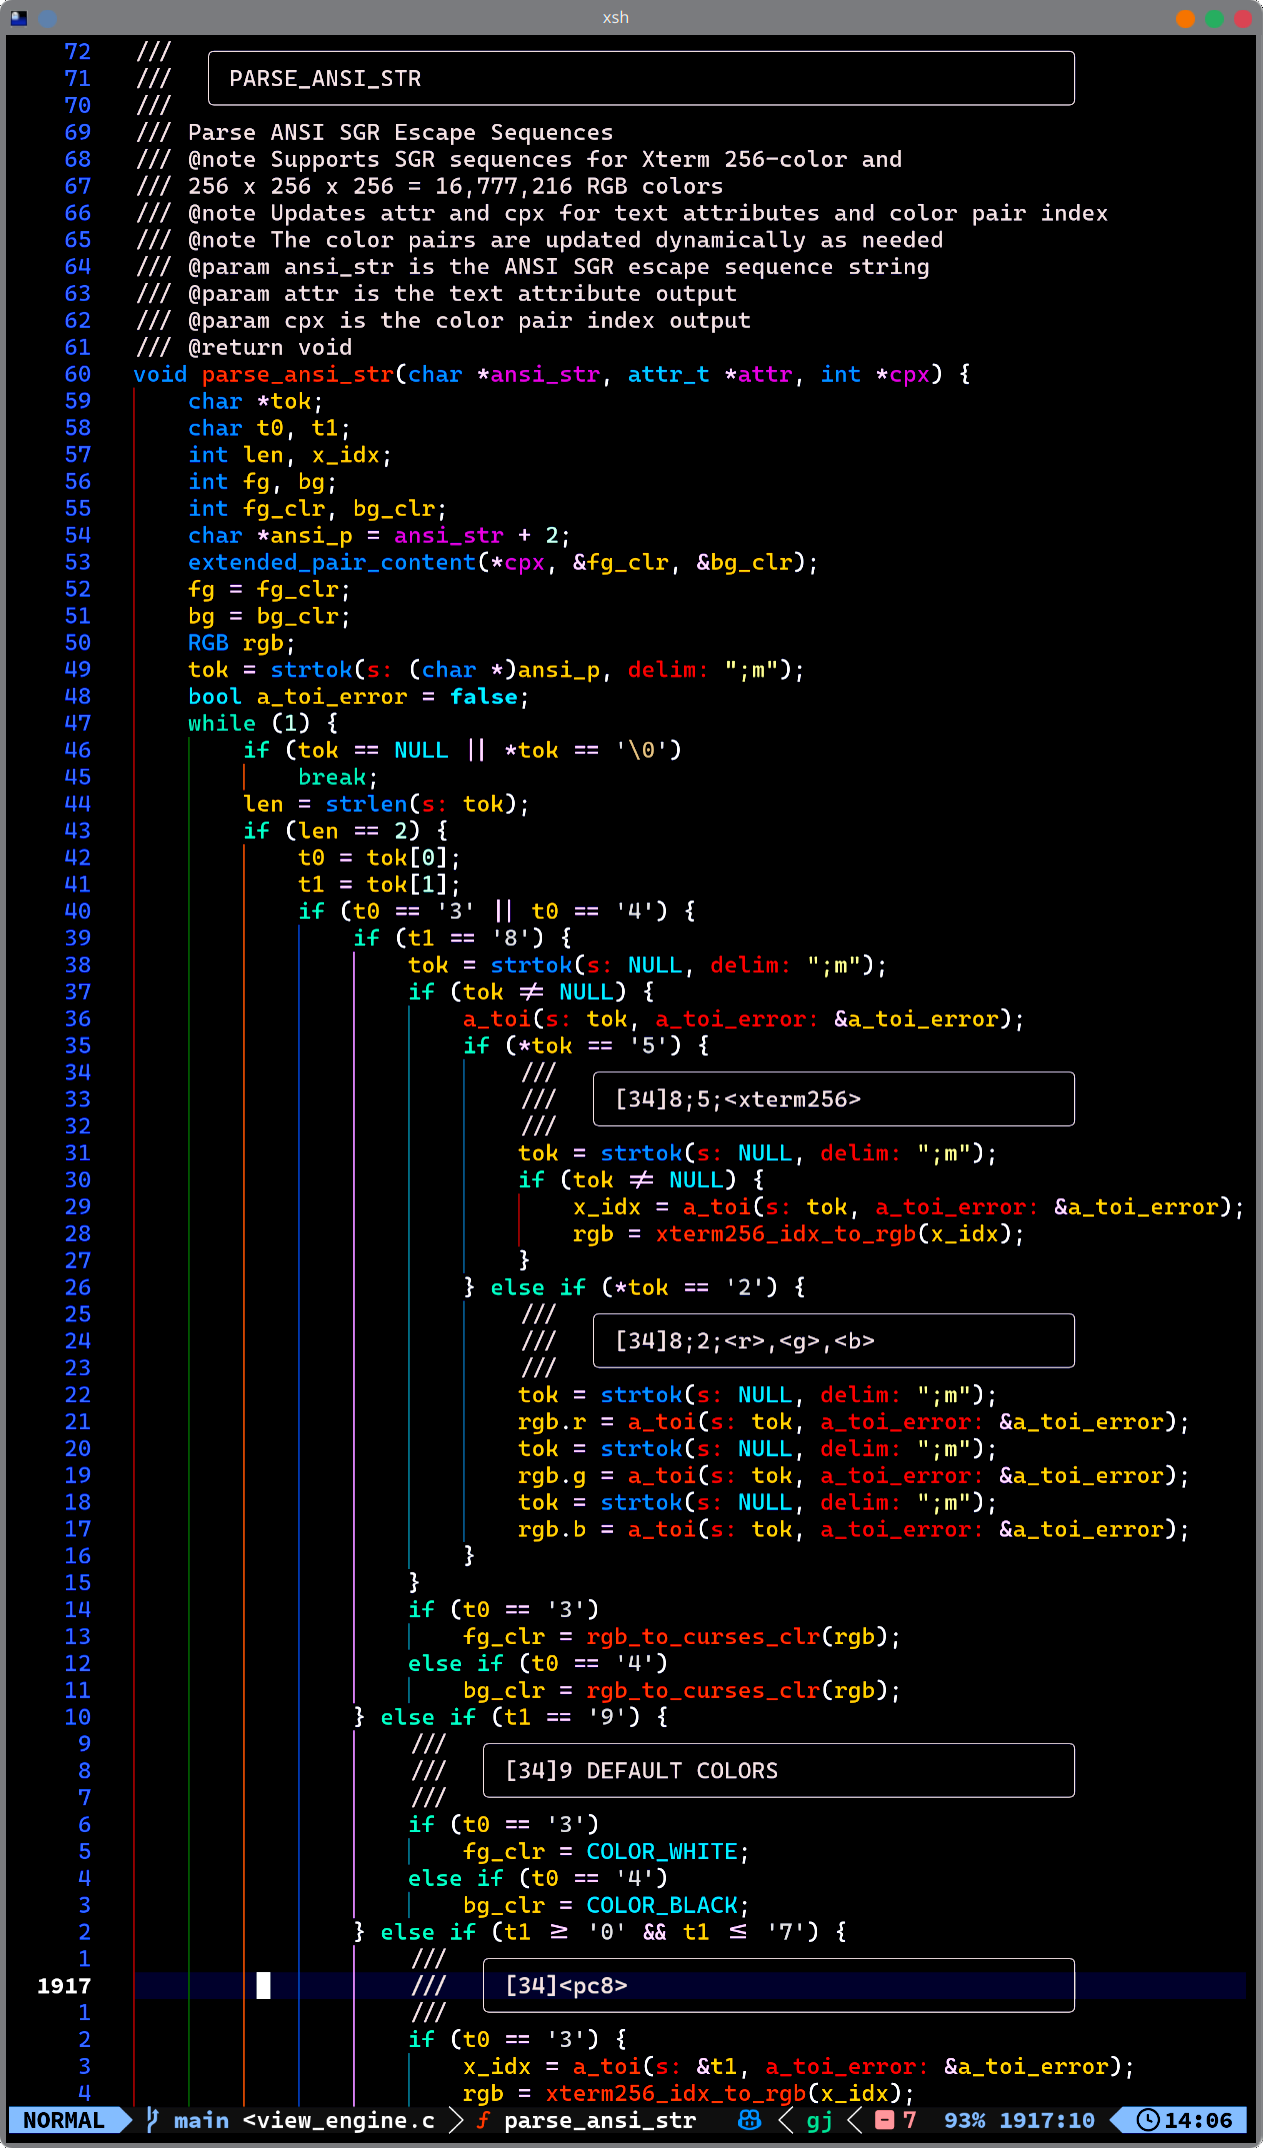
After installing Rust, you can install Tree-Sitter parsers using Cargo, Rust's package manager. As always, I highly recommend installing only the parsers you need. Here are some examples:
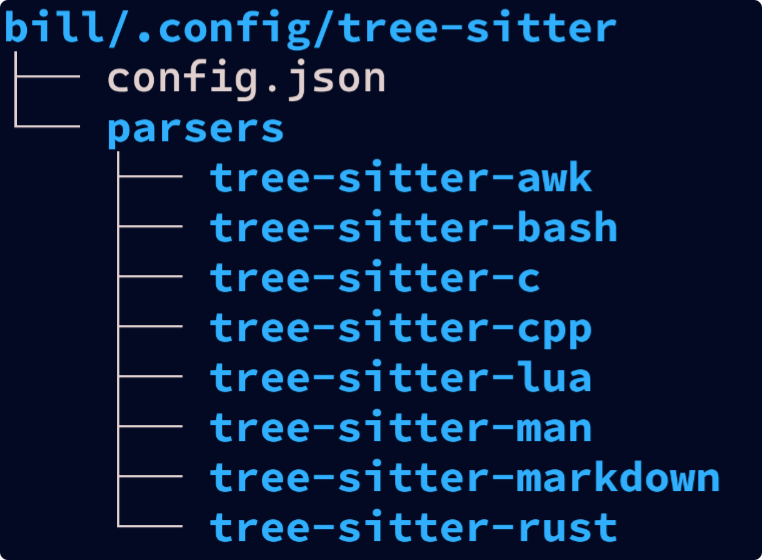
I installed my tree-sitter parsers in the following directory structure:
The config.json file contains configuration settings for Tree-Sitter. You will find a sample config.json file in the tree-sitter directory of thie repository.
The parsers directory contains the installed Tree-Sitter parsers for different programming languages.
To let Tree-Sitter know where to find your custom parsers, you need to specify the parser directories in the config.json file. Tree-sitter will automatically look in ~/.config/tree-sitter. Here's an example of how to do this:
Below is an example file arrangement for Tree-Sitter parsers and configuration files. ~/.config/tree-sitter/parsers contains the installed Tree-Sitter parsers.
You can also configure a custom color scheme in the config.json file if you like. Here's mine:
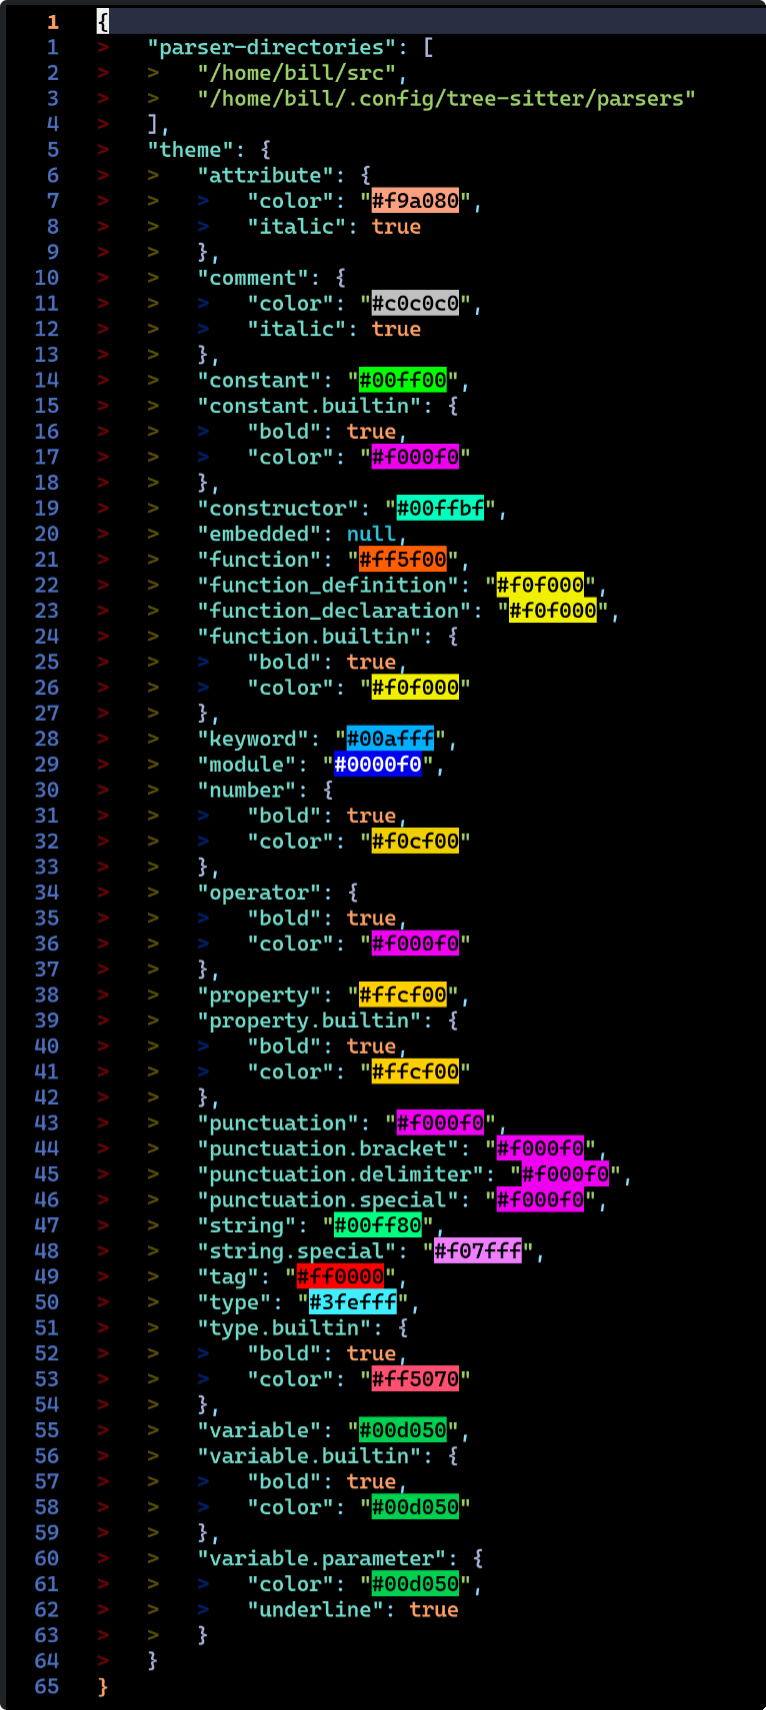
The ~/tree-sitter/config.json distributed with tree-sitter uses the 256 color xterm palette, but you can also use HTML style six digit hex numbers as shown above. Refer to the Tree-Sitter documentation for more details on configuring the color scheme.
Note: I find it much easier to use the six-digit hex color codes when configuring Tree-Sitter colors. This way, I can easily match the colors used in my terminal emulator and other applications. The 256 color xterm palette can be limiting and may not provide the exact colors I want for syntax highlighting. Using hex codes gives me more flexibility and allows for a more consistent color scheme across my development environment. They are also more intuitive to work with since they directly represent RGB values.
After installation, you can verify that the Tree-Sitter parser for your chosen language is installed correctly by running:
This should display the installed Tree-Sitter parser version for your chosen language, confirming that it is successfully installed on your system. Replace <language> with the specific programming language you want to install the parser for, such as python, javascript, rust, etc.
To put it bluntly, nothing compares with Tree-Sitter for syntax highlighting and code analysis. Once you start using it, you'll wonder how you ever lived without it.
To test Tree-Sitter, you can use the following command:
This command will parse the specified source file and output the syntax tree to the terminal. You can use this command to verify that Tree-Sitter is working correctly and tosee how it parses different programming languages. Replace <source-file> with the path to a source code file in a programming language for which you have installed a Tree-Sitter parser. For example, if you have installed the Tree-Sitter parser for Python, you can test it with a Python source file like this:
This will output the syntax tree for the example.py file, allowing you to see how Tree-Sitter parses the Python code. You can test it with source files in other programming languages as well, depending on which Tree-Sitter parsers you have installed.
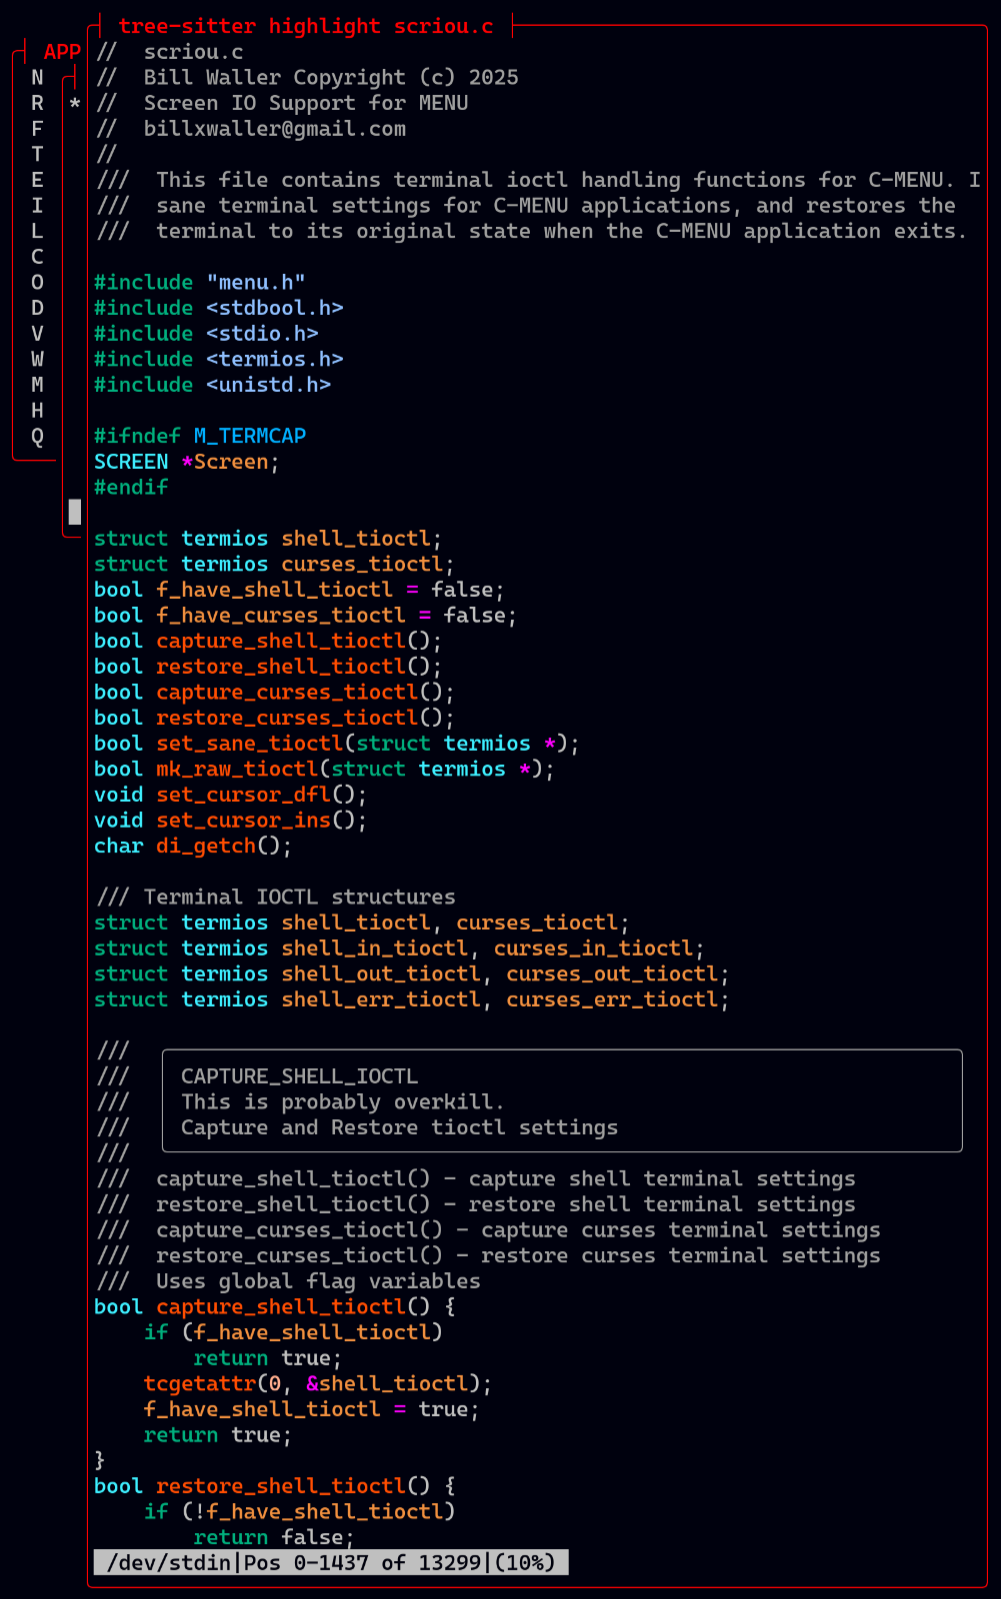
To test Tree-Sitter's syntax highlighting capabilities, you can use it in conjunction with a compatible code editor or pager that supports Tree-Sitter. For example, if you are using Neovim, you can enable Tree-Sitter-based syntax highlighting by configuring Neovim to use the installed Tree-Sitter parsers. Once configured, open a source code file in Neovim, and you should see enhanced syntax highlighting based on the Tree-Sitter parsing of the code.
Or type:
Even if you are an experienced programmer, Rust is not an easy language to learn. The ownership model and borrow checker are unique concepts that require a different way of thinking about memory management and data lifetimes. If you are new to programming, Rust can be even more challenging because it requires a solid understanding of programming fundamentals.
However, with dedication and practice, anyone can learn Rust. There are many great resources available online, including the official Rust documentation, tutorials, and community forums. Additionally, there are many books and courses that can help you learn Rust from scratch.
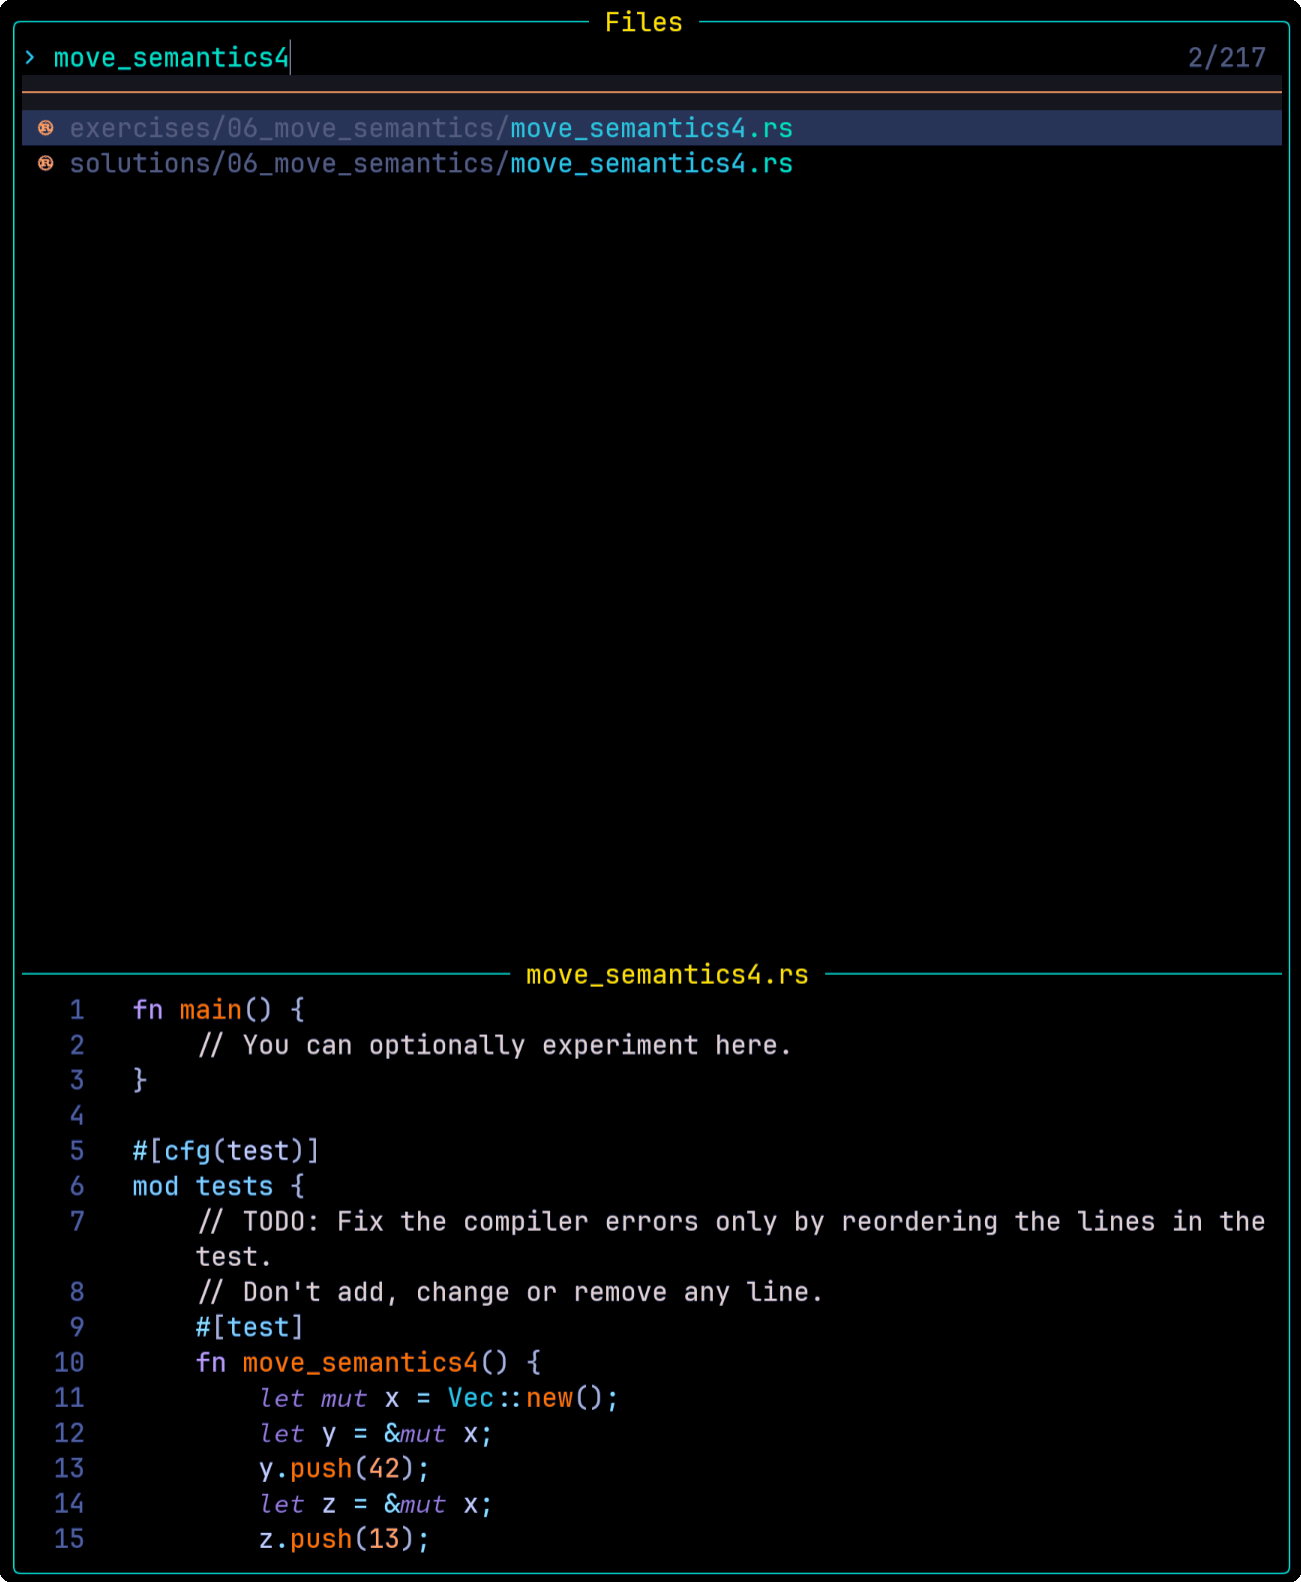
Start with the Rust Book, and concurrently do the exercises in Rustlings. Rustlings is an invaluable companion to the Rust Book.

I consider Vim/Neovim not just essential, but indispensable. I loved vim and used it for many years. I can't say whether Vim or Neovim is better because both have evolved to provide competitive features. I can say, for me, Neovim plugins seem more accessible, and it has everything I want.

To use custom_highlights.lua, you can copy it to your nvim config directory. For example, if your nvim config directory is located at ~/.config/nvim, you can run the following command:
and add the following line to your init.lua file:
from ChatGPT
The GitHub profile for the user "Norcalli" (Ashkan Kiani), a core developer on the Neovim project, can be found at Norcalli.
This developer has created several popular Neovim plugins in Lua, including:
[nvim-colorizer.lua]: A high-performance, dependency-free plugin that highlights color codes in your buffer.
nvim.lua: A Lua module providing useful shortcut/magic methods for mappings.
profiler.nvim: A profiling tool for Neovim.
typeracer.nvim: A Neovim game to practice typing speed.
nvim-terminal.lua: A high performance filetype mode for Neovim leveraging conceal and highlights.
nvim-base16.lua: A programmatic Lua library for setting base16 themes in Neovim.
neovim-plugin: A Lua library to help standardize the creation of Lua-based Neovim plugins.
Add colorizer.lua containing the following code to lua/plugins directory:
from ChatGPT
Folke Lemaitre, known as "folke" on GitHub, is a prominent developer in the Neovim community, most recognized as the author of the popular plugin manager lazy.nvim and the comprehensive Neovim configuration framework LazyVim.
He has developed a suite of widely used Neovim plugins, including:
lazy.nvim: A modern plugin manager known for its powerful UI, automatic caching, bytecode compilation for fast startup times, and focus on easy configuration.
LazyVim: A full-featured Neovim setup powered by lazy.nvim, designed to be easily customizable and extended.
which-key.nvim: A plugin that helps users remember keymaps by showing available keybindings in a popup as they type.
noice.nvim: A highly experimental plugin that completely replaces the UI for messages, the command line, and the popup menu.
trouble.nvim A utility for pretty display of diagnostics, references, quickfix lists, and more to help manage code issues.
flsh.nvim: A plugin that enhances code navigation with search labels, improved character motions, and Treesitter integration.
tokyonight.nvim: A plugin that provides a distraction-free coding environment by focusing on the active window.
Folke's contributions are significant in shaping the modern Neovim experience, particularly by leveraging Lua for more powerful and efficient configurations and plugins. Many of his projects can be explored on his GitHub profile or the Dotfyle community page.
Lazyvim is a Neovim configuration that is designed to be fast, minimal, and easy to use. It comes with a set of pre-configured plugins and settings that enhance the Neovim experience. Lazyvim is highly customizable, allowing users to tailor their Neovim setup to their specific needs.
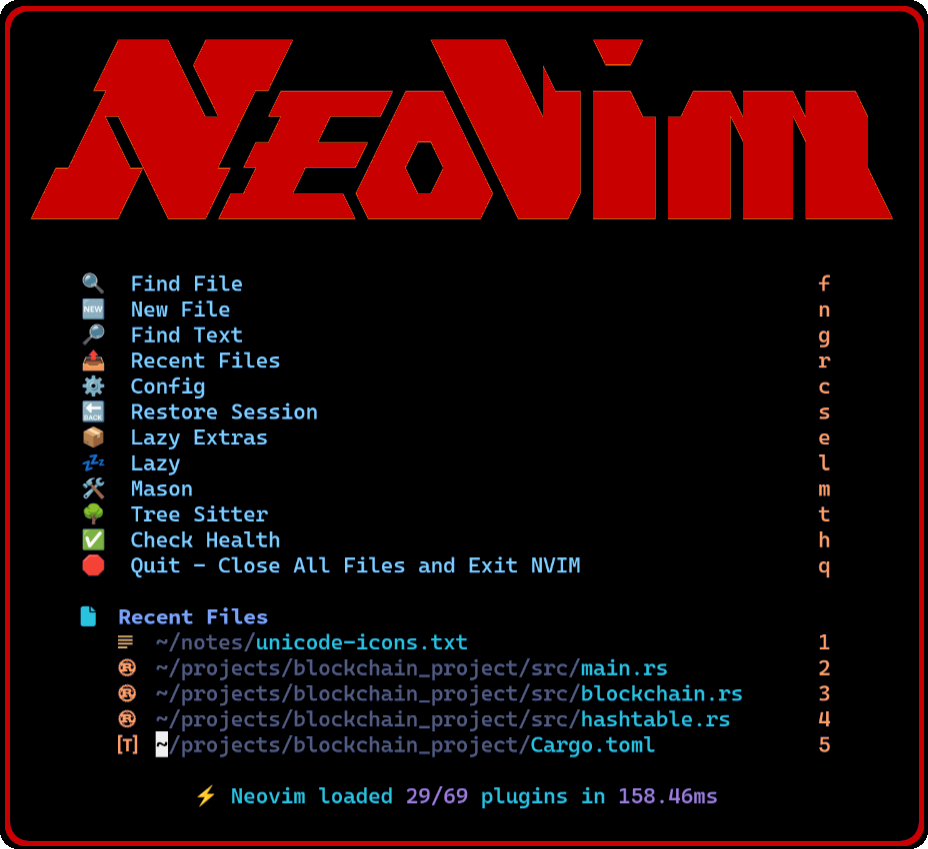
Snacks is a Neovim plugin that provides a collection of useful snippets and utilities for Neovim users. One of the features of Snacks is the ability to display a slick Neovim logo in the splash screen when Neovim starts up.
You will find a copy of this Unicode Art in the C-Menu root directory under:
configs/nvim/lua/plugins/snacks.lua
I don't know who created this particular Neovim Unicode Art, but it has been shared widely in the Neovim community and is often used as a splash screen for Neovim configurations. It is possible that the original creator of this logo is unknown or that it was created by multiple people over time. One clue is that it exclusively uses the Unicode code points listed below:
You may have noticed that all but the first code points are in the Private Use Area of Unicode, which means they are not assigned to any specific character and can be used for custom purposes. This is a common practice in ASCII Art and Unicode Art to create unique designs without relying on standard characters. If anyone knows the original creator of this logo, please let me know so I can give them proper credit.
Once you have Snacks.nvim installed, you can enable the Neovim logo in the splash screen by configuring the plugin settings. The logo will be displayed when you start Neovim, providing a visually appealing welcome screen.
The image below shows the Neovim logo in the splash screen of Neovim when using Snacks.nvim:
To install Neovim and Lazyvim, follow the instructions on the Lazyvim website
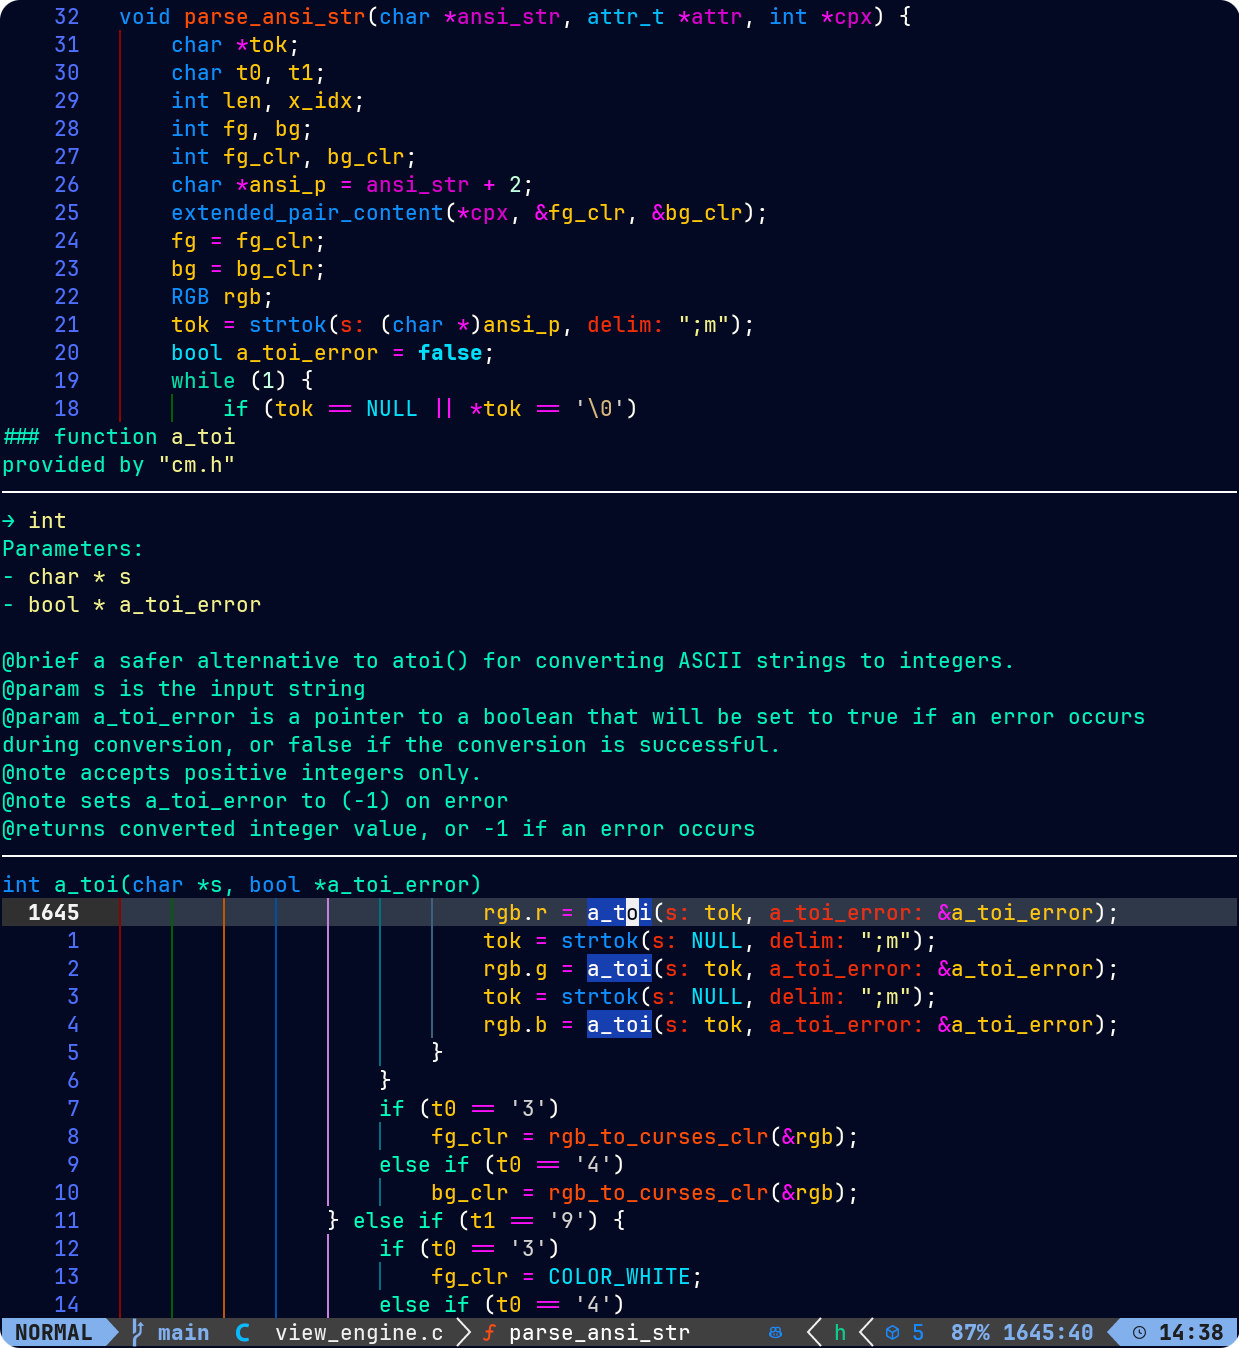
Neovim can be linked to the C-Menu API to provide an enhanced editing experience when working with source code files in C-Menu. By configuring Neovim to use the C-Menu API, you can take advantage of Neovim's powerful editing features while working within the C-Menu environment.
For example, you want to use one of the C-Menu API functions, but you don't remember the exact syntax. Just type the function name in Neovim, move the cursor over the function name, and press Shift-K. You will get a pop-up documenting the function parameters, data types, and signature as below:
Ghostty is a terminal emulator that is designed to be fast, lightweight, and highly customizable. It is built with Zig and leverages modern technologies to provide a smooth and efficient terminal experience. Ghostty supports features such as GPU acceleration, ligatures, and a wide range of customization options.
To install Ghostty, you can use the following commands based on your operating system:
After installing Rust on Linux, you can install Ghostty using Cargo, Rust's package manager:
After installation, you can verify that Ghostty is installed correctly by running:
What you see below may not be essential for development projects, but it demonstrates Neovim, Ghostty, and Lazyvim working together in harmony to provide great flexibility.
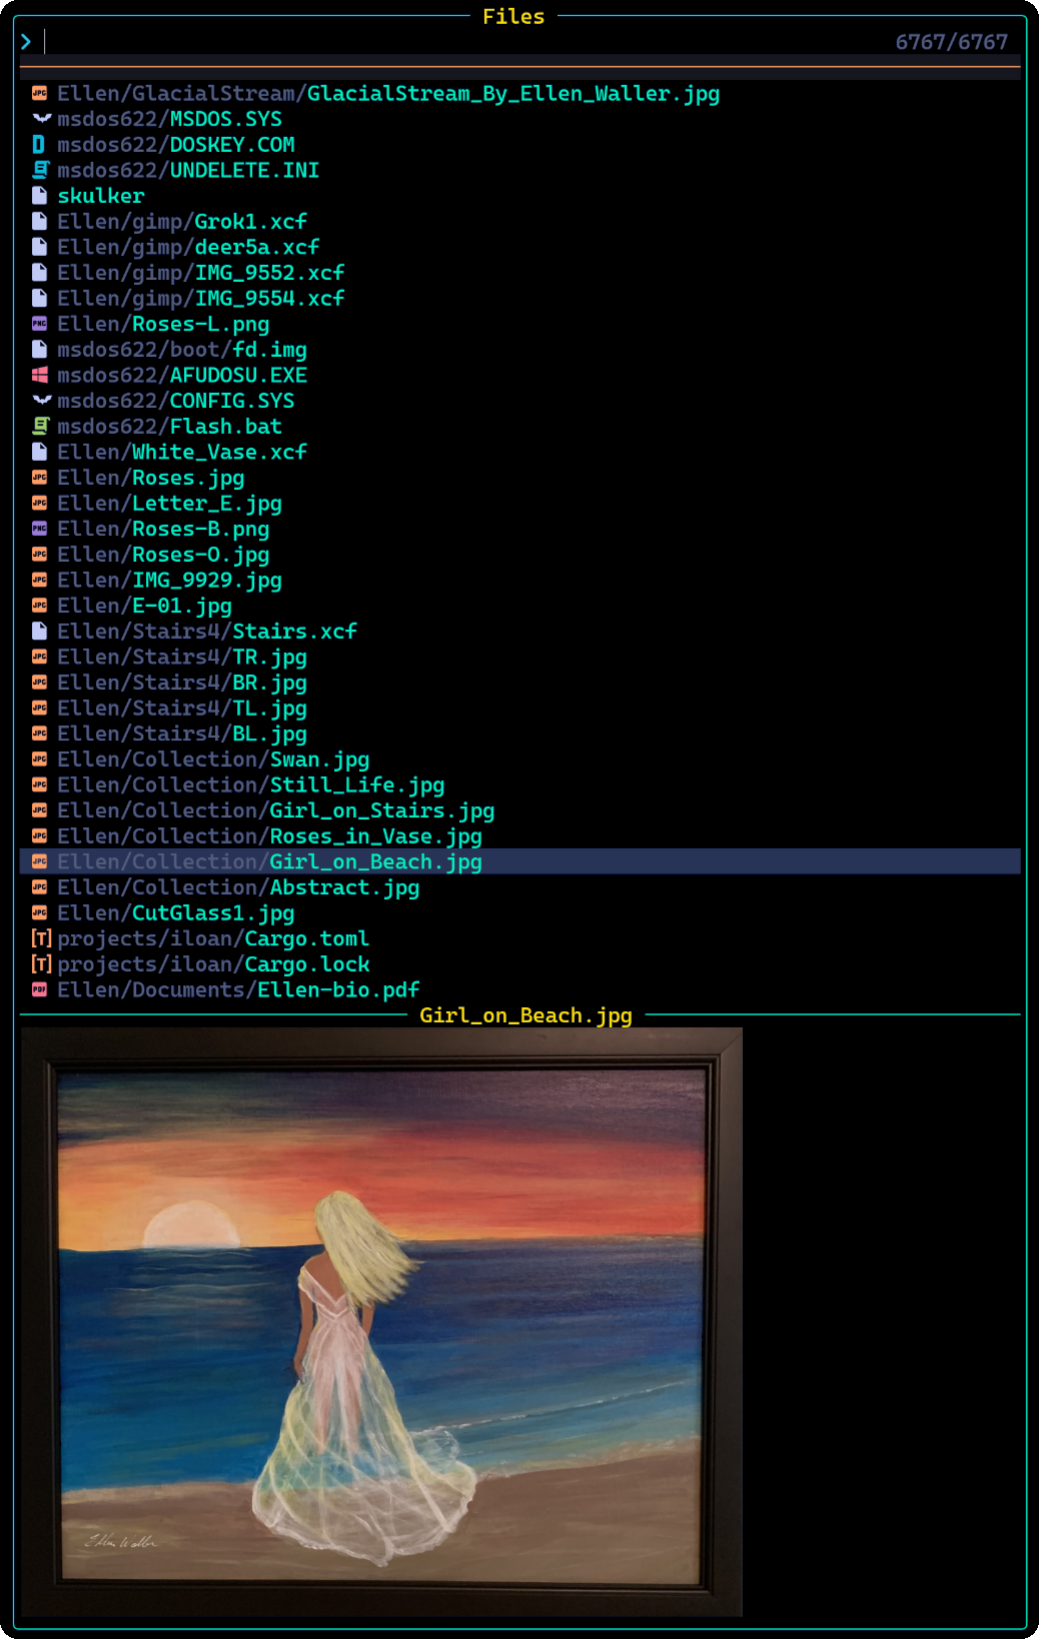
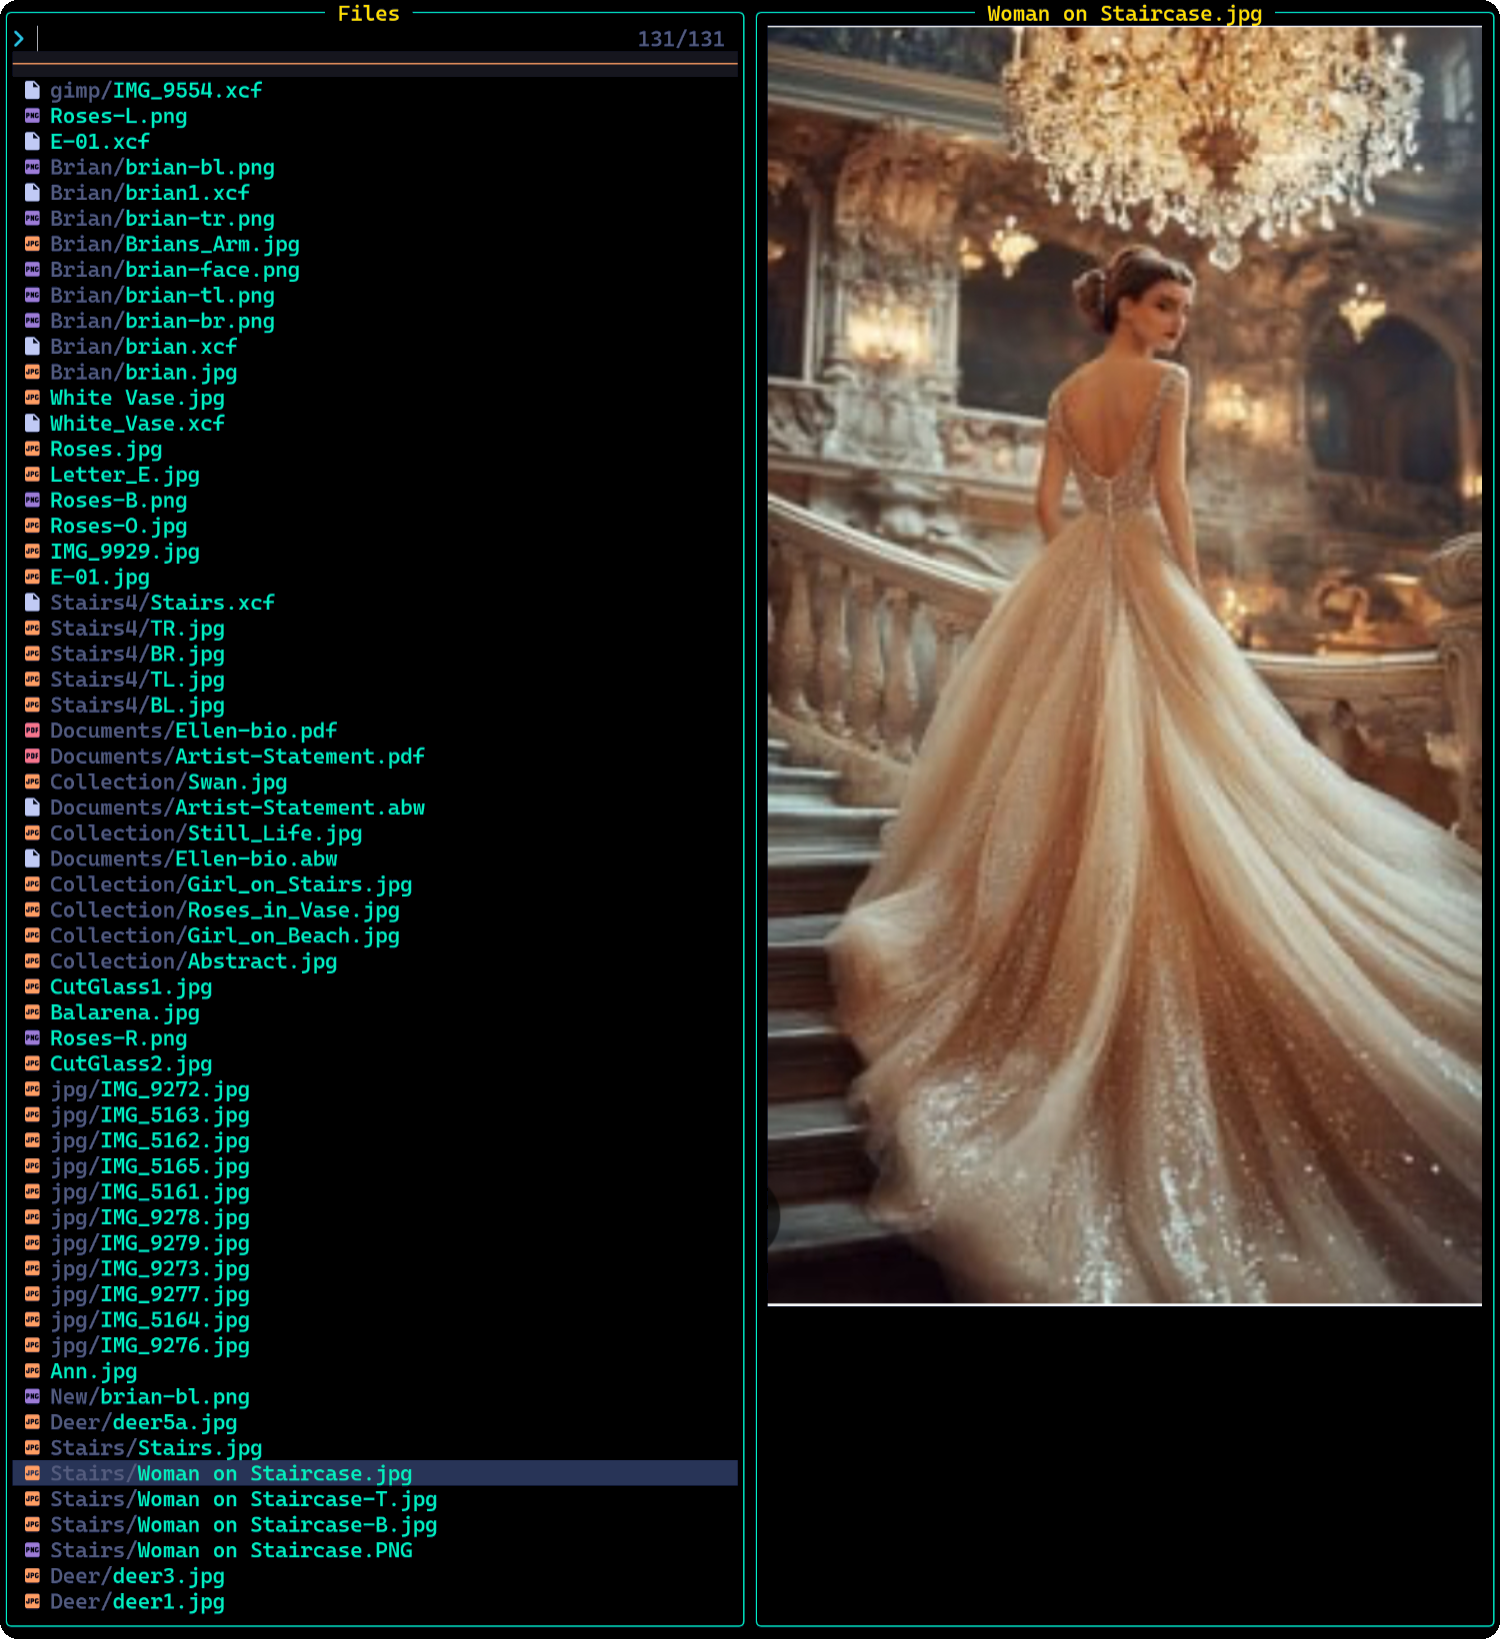
This feature is actually quite useful when searching for a particular source file among many files in a large project. You can quickly preview files without opening them fully in Neovim.
This document describes some useful configurations for C-Menu and terminal emulators. These configurations are optional but recommended for a better user experience.
If you have had problems with the bash executable distributed with your OS, you may want to download the bash source distribution and build your own bash executable. There are many reasons why you might want to do this, including security concerns, bugs in the bash version provided by your OS, or the need for a specific feature that is not available in your OS's bash version.
After building your own bash executable, you should consider renaming it to something other than "bash". For example, you might name it "jcalc", "mmdb", or "xmlock", something that will blend in with a ps listing. This is especially important if you are using a system where the default bash executable is known to have security vulnerabilities or other issues.
There are horror stories about systems that have been compromised because the bash executable was exploited. In one instance, an OS update overwrote the bash executable with one that would only start in restricted mode. It wouldn't even allow running executables from /bin and /sbin. By using a custom-named bash executable, you can reduce the risk of such exploits and mistakes. You can leave the original bash executable intact as a backup.
The following shell commands are sourced by xsh, bash, and sh.
This snippet, stolen from bashfaq #24 prepends directories to PATH if the directories exist and aren't already in PATH. It also defines two convenience functions, xx and mm, to start a root shell and the menuapp, respectively. It sets the default shell to xsh if available, otherwise bash.
It sets a shorter delay for curses escape sequences
and configures a colorful prompt with red for root and green for normal users.
The configurations herein are not required to run the C-Menu system, but provided as an example of how to customize the terminal emulator to your liking. You may want to modify the font, font size, window dimensions, colors, and other settings to suit your preferences.
Regardless of which terminal emulator you use, you might want tile the terminal windows side by side to maximize the use of screen real estate. For example, if you use KDE, you can edit ~/.config/kwinrc. Under the [Windows] section you will find Placement. Set it to Smart or MinimalOverlapping depending on your version of KDE to enable tiling of windows. You can also set the following options to prevent windows from maximizing when dragged to the top of the screen, and to allow windows to be dragged to the current desktop when dragging them from another desktop.
If you don't already have a patched font, you may want to install JetBrains Mono. It is a free, open-source, monospaced font designed for developers. It includes a large number of programming ligatures and is optimized for readability on screens of all sizes.
The JetBrains Mono font is available from:
Also check out Nerd Fonts for other patched fonts that include programming ligatures and icons.
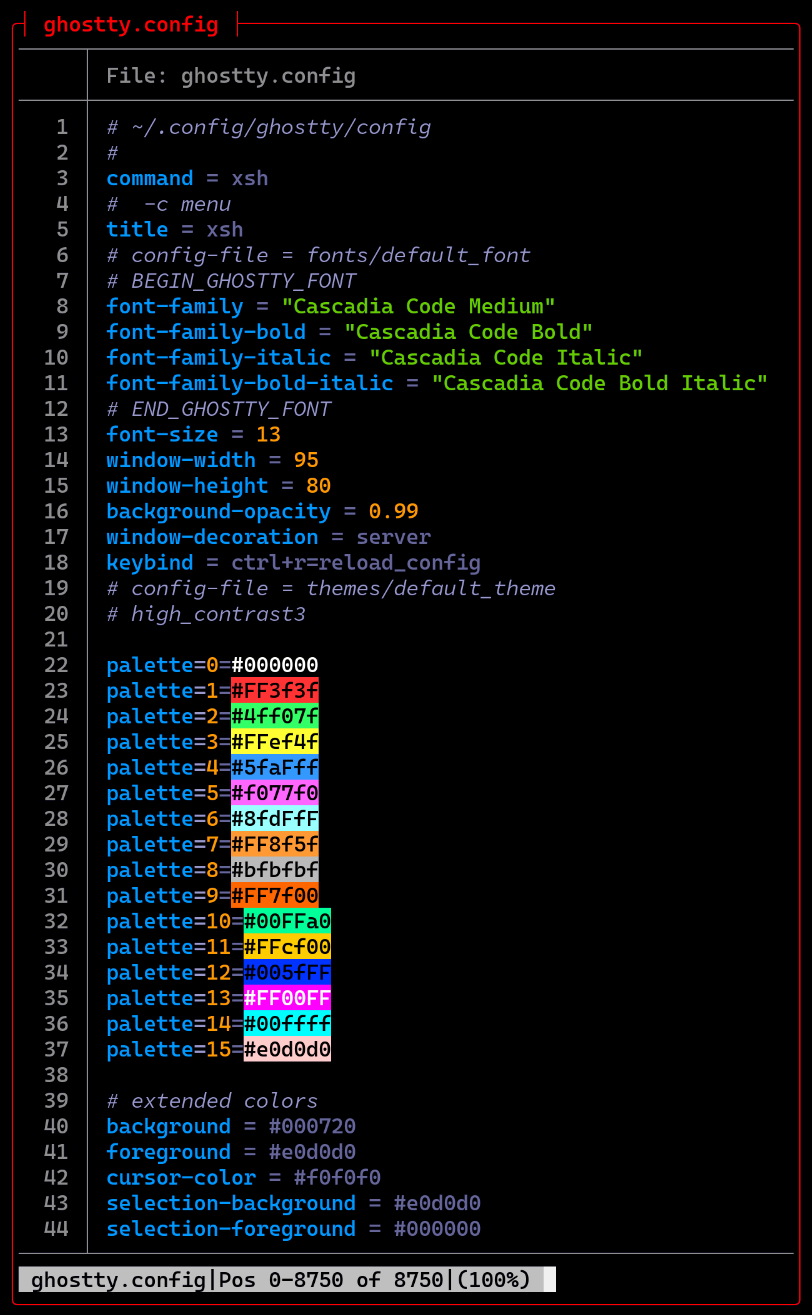
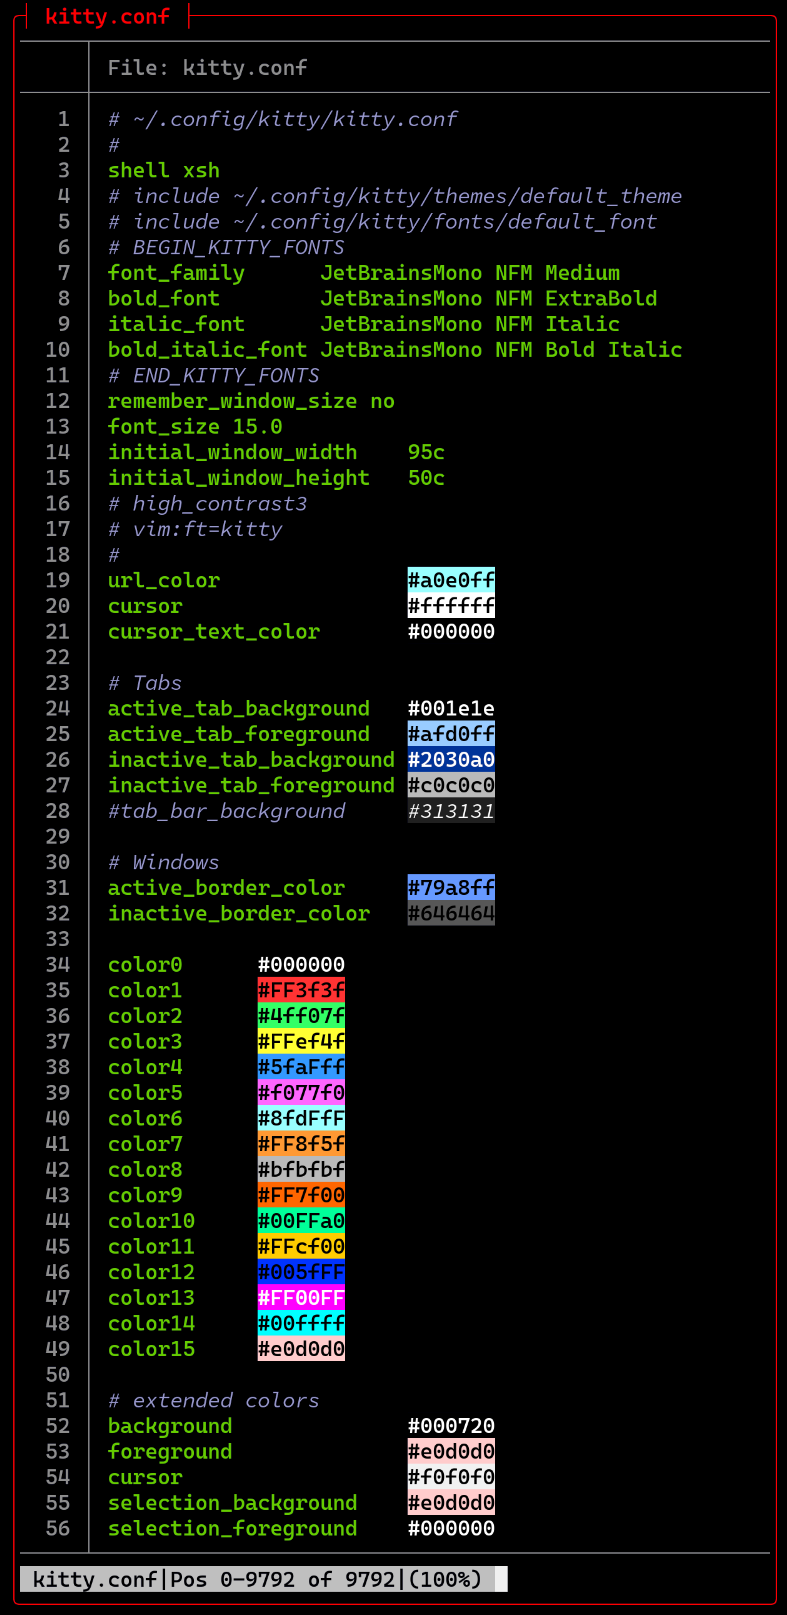
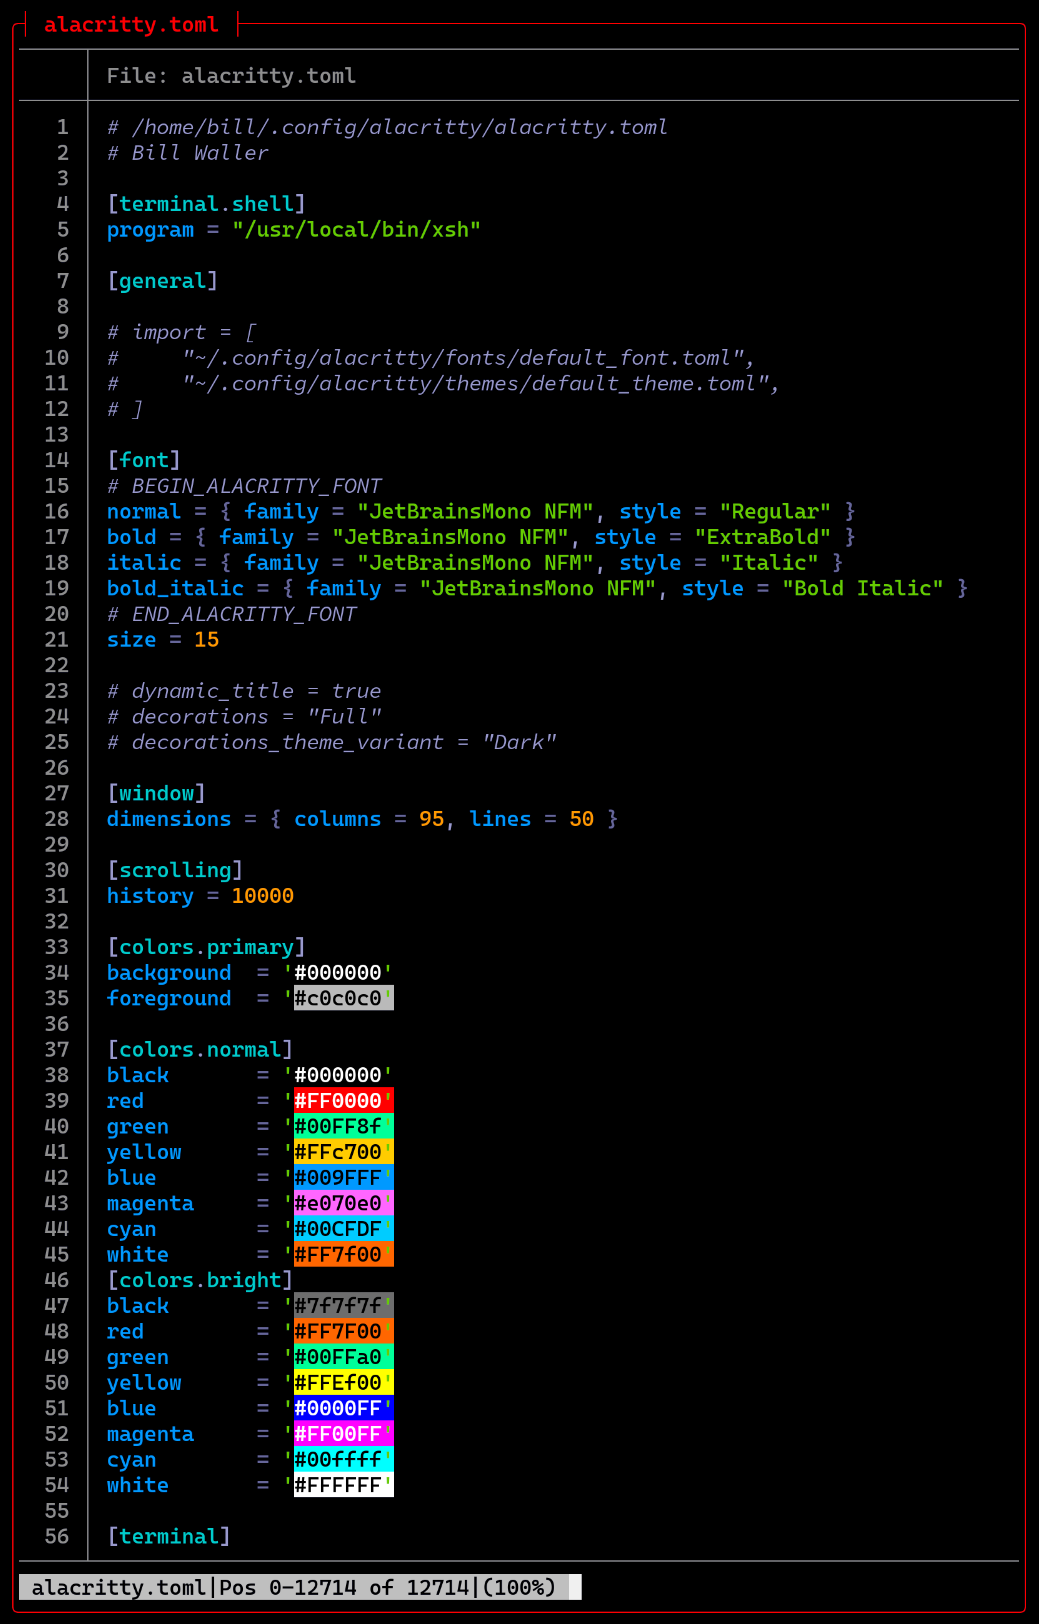
The standard color palette is rather drab, so you may want to include a more colorful palette such as the high contrast palette below.
This configuration was designed for a dark terminal background and a resolution of 3840x2160 (4k). You may want to adjust the font size and window dimensions for your own display. The window dimensions are specified in character cells. For example, a window-width of 95 means 95 character cells wide. The actual pixel width of the window will depend on the font size and the font used.
You can find the following configurations in C-Menu/configs, or:
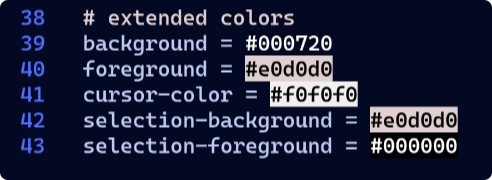
Note: You can see that Colorize.awk failed to highlight the six-digit hex color codes on the last five lines above. That's because Colorize.awk was designed to highlight six hex digits immediately following the '#' symbol. In this case, "bat", for some reason inserted ansi codes after the '#' symbol, and before the six hex digits, so Colorize.awk didn't recognize them as hex color codes. This is an edge case that I haven't yet addressed in Colorize.awk, but there is a solution.
I opened ghostty.config with neovim and it highlighted the six-digit hex color code correctly. It's always good to have multiple tools in your toolbox. 😀
For more information on Rust and its tools, you can visit the following resources:
If you are interested in learning Rust, I highly recommend the Let's Get Rusty YouTube channel. It offers a wide range of tutorials and videos on Rust programming, covering topics from beginner to advanced levels. The channel is well-known for its clear explanations and practical examples, making it an excellent resource for anyone looking to learn Rust.
Let's Get Rusty YouTube Channel
Folke is a prominent developer in the Neovim community, known for creating popular plugins such as lazy.nvim and LazyVim. His contributions have significantly shaped the modern Neovim experience, particularly by leveraging Lua for more powerful and efficient configurations and plugins. Many of his projects can be explored on his GitHub profile or the Dotfyle community page.
The Rust Programming Language Book
By following the above instructions, you can easily install Rust and various Rust-based tools to enhance your C-Menu experience. Enjoy coding with these powerful tools!
