
Table of Contents
C-Menu Desktop Files
You may find it useful to create desktop files to start C-Menu by clicking a desktop icon. You will find desktop files to start C-Menu in Ghostty, Kitty, and Alacritty in the C-Menu/example_configs/Desktop directory.
Each of these desktop files have two modified lines, Exec and Icon. The Exec line is the command that is executed when you click the desktop icon. You can substitute your choice of icons for Decision.svg.
Icon=/usr/share/pixmaps/Decision.svg Exec=alacritty -e menu
The script, install_desktop.sh, in the C-Menu/example_configs/Desktop directory, will copy these desktop files to your local applications directory, or you can modify it to copy them to a different location. You can also create your own desktop files using the examples as a templates.
C-Menu bashrc Configuration
This sample bashrc almost certainly contains settings that are not appropriate for your system. It is provided as a reference only. You should carefully review and modify this file to suit your specific needs and environment.
Do NOT blindly copy this file to your $HOME/.bashrc
It is recommended to back up your existing .bashrc before replacing it with any of the contents in the following snippets.
Use at your own risk.
#!/bin/bash
.bashrc
shellcheck disable=SC2155
shellcheck source=/dev/null
The lines beginning with shellcheck are to prevent false positives from the shellcheck linter.
The line above sets the Internal Field Separator (IFS) to only a newline character. This prevents word splitting on spaces and tabs, which can lead to unexpected behavior in scripts and commands.
Shell Logging
To activate shell startup logging, create a file named .shelllog in your home directory. Each time a shell starts, it will append a log entry to /var/log/shell.log
export BASHRC=1
unset BASHLOG
if [ -f "$HOME"/.shelllog ]; then
export BASHLOG="1"
fi
this_file="$HOME"/.bashrc
ShellLog() {
if [ "$BASHLOG = "1" ] && [ -w /var/log/shell.log ]; then
echo "$(rfc3339)" "$this_file" "$1" else >>/var/log/shell.log;
else
return 1;
fi
}
Prepend Path
This technique for managing the PATH environment variable is from bashfaq #24. It's elegant and efficient. Usage: prepend_path /some/directory It checks if the directory is already in PATH. If not, it prepends it to PATH.
pp() {
case ":${PATH}:" in
*:"$1":*) ;;
*)
PATH="$1:$PATH"
;;
esac
}
PATH=/usr/bin:/bin:/usr/sbin:/sbin
for P in /usr/local/sbin \
/usr/local/bin \
/usr/lib64/qt6/bin \
/usr/lib/qt6/bin \
"$HOME"/.local/bin \
"$HOME"/.cargo/bin \
/usr/local/bin/zig-0.15.2 \
"$HOME"/menuapp/bin; do
[ -d "$P" ] && pp "$P"
done
export PATH
WARNING: /usr/bin/view is generally a link to vim, which will obscure C-Menu View if /usr/bin preceedes $HOME/menuapp/bin in your PATH environment variable.
If you use the prepend path function above and have $HOME/menuapp/bin early in your PATH, you should be fine. In the abovew example, it is first in the PATH because it was prepended last.
If you have issues starting C-Menu View by typing "view" at the shell prompt, examine your PATH environment variable.
Helpful C-Menu Environment Variables
export CMENU_SRC=/usr/local/src/cmenu/src
export CMENU_HOME="$HOME"/menuapp
Security Through Obscurity
Having a shell with an obscure name can be beneficial. Using xsh, or some other alias reduces visibility and vulnerability to some automated attacks and even well-meaning, but misguided distributors who, in an unknown set of circumstancs, might turn on shell restrictions for common shells like bash.
export SHELL=bash
which xsh >/dev/null 2>&1 && export SHELL=xsh
RSH Helpers
xx and x are convenience functions for starting and exiting a root shell using rsh.
xx() {
if file "$HOME"/menuapp/bin/rsh | grep setuid >/dev/null 2>&1; then
"$HOME"/menuapp/bin/rsh
else
if file /usr/local/bin/rsh | grep setuid >/dev/null 2>&1; then
/usr/local/bin/rsh
fi
fi
}
Exit functions that suppress output.
x() { exit >/dev/null 2>&1; }
q() { exit >/dev/null 2>&1; }
Privilege Indicator Shell Prompts
A green prompt for normal users, red for root. You can customize this prompt or use whatever prompt you like, but an obvious indicator of privilege level is highly recommended.
This is a very minimal prompt, but serves the purpose of indicating privilege level. You can customize it to include more information if you like, but be careful not to make it too cluttered or slow to render. The key is to have a clear visual indicator of whether you are running as root or a normal user, to help prevent accidentally running commands with elevated privileges.
The inclusion of \W in the prompt is a common practice to show the current working directory, which can be helpful for context. If you want the full directory, use \w (lower case). The color coding (green for normal users and red for root) provides an immediate visual cue about the privilege level of the shell session. You can even make it hot-pink if you want it to be really annoying. The key is to have a clear and distinct visual indicator of privilege level, to help prevent accidental misuse of root privileges.
export PS1="\[\e[1;32m\]\u@\h(\l)\W->\[\e[0m\] "
export XUSER="$(id -un)"
[ "$XUSER" = "root" ] && export PS1="\[\e[1;31m\]\u@\h(\l)\W->\[\e[0m\] "
Terminal and Editor Settings
export TERM=xterm-256color
export TTYPATH="$(dirname "$(tty)")"
export EDITOR=nvim
clear() {
tput clear
}
stty ixany
set -o vi
export MANPAGER="nvim +Man!"
export MANWIDTH=80
which less >/dev/null 2>&1 && export PAGER=less
## -----------
VIEW_FAKE=false
FILE=$(which view)
if [ -L "$FILE" ] && [ -e "$FILE" ]; then
LINKTO=$(readlink "$FILE")
if [ "$LINKTO" = "vi" ] || [ "$LINKTO" = "vim" ]; then
ShellLog "$FILE is a symbolic link to vim"
VIEW_FAKE=true
fi
fi
if [ "$VIEW_FAKE" = "false" ]; then
which view >/dev/null 2>&1 && export PAGER=view
export PAGER=$(which view 2>/dev/null)
fi
GDB Debugging Setup
This is useful when debugging programs that require user input
which sleep >/dev/null 2>&1 && s() {
TTY=$(tty)
/bin/grep -v "inferior-tty" "$HOME"/.gdbinit >/tmp/.gdbinit.$$ 2>&1
echo "set inferior-tty $TTY" >>/tmp/.gdbinit.$$
mv /tmp/.gdbinit.$$ "$HOME"/.gdbinit
echo "sleeping"
sleep 50000
}
which gdb >/dev/null 2>&1 && gdb() { /usr/bin/gdb --silent "$@"; }
If You Can't Stop Typing "vi"
which nvim >/dev/null 2>&1 && vi() { nvim "$@"; }
C-Menu Startup with "mm"
You must prepend $HOME/menuapp/bin to your PATH before (meaning earlier in the .bashrc script) defining the following function.
. "$HOME"/menuapp/bin/cmenu_path
which menu >/dev/null 2>&1 && mm() {
menu "$@"
}
. "$HOME"/.nvim_appname
kk() { cd /usr/local/src/cmenu/src || return; }
Curses Escape Delay
I use a local computer, so 50ms works fine for me. If you have a slow connection you may need to set this to 300 or 500. The default is 1000.
export ESCDELAY=200
export ESCDELAY=50
Use lsd instead of ls
PREFER_LSD=1
if [ "$PREFER_LSD" = "1" ]; then
which lsd >/dev/null 2>&1 && ls() { /usr/bin/lsd "$@"; }
else
which ls >/dev/null 2>&1 && ls() { /bin/ls --color=auto "$@"; }
fi
Locale Settings
If you are in the US, you probably want to set this locale.
export LC_ALL="en_US.UTF-8"
System Specific Environment Variables
Customize these settings for your system.
export JAVA_HOME=/usr/lib64/jvm/java-21-openjdk-21
export NODE_PATH="$HOME"/node_modules
export PKG_CONFIG_PATH=/usr/lib64/pkgconfig:/usr/lib/pkgconfig:/usr/share/pkgconfig:/usr/local/lib/pkgconfig:/usr/local/lib64/pkgconfig
export python3_host_prog=/usr/bin/python3
export XDG_CONFIG_HOME="$HOME"/.config
export XDG_DATA_HOME="$HOME"/.local/share
export CARGO_HOME="$HOME"/.cargo
export RUSTUP_HOME="$HOME"/.rustup
export LLVM_LIB_DIR=/usr/lib64
export MASON="$HOME/.local/share/lazyvim/mason"
C-Menu Configuration
Set the environment variable CMENURC to the path of your C-Menu configuration file. This file is read by C-Menu at startup and contains various settings that control the behavior and appearance of C-Menu. You can customize these settings to suit your preferences and needs. Below is an example of a C-Menu configuration file.
# ~/.minitrc
cols=0
lines=0
begx=0
begy=0
begy=0
help=false
black=#00020f
red=#ff0000
green=#00d07f
yellow=#ffba00
blue=#0080ff
magenta=#f000f0
cyan=#00dfff
white=#c0c0c0
bblack=#000930
bred=#ff7f00
bgreen=#00ff87
byellow=#ffff00
bblue=#00afff
bmagenta=#ff00ff
bcyan=#00ffff
bwhite=#ffffff
bg_color=black
fg_color=white
bo_color=red
red_gamma=2.20
green_gamma=2.20
blue_gamma=2.20
gray_gamma=2.20
brackets=
cd_mapp_home=false
f_at_end_clear=true
f_at_end_remove=false
f_erase_remainder=true
fill_char=_
f_ignore_case=false
f_squeeze=false
f_stop_on_error=true
tab_stop=4
prompt_type=long
prompt_str=
cmd=
cmd_all=
provider_cmd=
receiver_cmd=
title=
select_max=0
black=#00020f
bg=#000000
abg=
mapp_spec=main.m
help_spec=
in_spec=
out_spec=
mapp_data=~/menuapp/data
mapp_help=~/menuapp/help
mapp_home=~/menuapp
mapp_msrc=~/menuapp/msrc
mapp_user=~/menuapp/user
Terminal Configurations
Please adjust these terminal configurations for your system. In particular, you should pay attention to the screen dimensions, which I have set to 95 columns and up to 80 lines. Make sure you have the specified fonts installed on your system, or change the font settings to match fonts you do have.
Ghostty
# ~/.config/ghostty/config
#
command = xsh
# -c menu
title = xsh
# config-file = fonts/default_font
# BEGIN_GHOSTTY_FONT
font-family = "Cascadia Code Medium"
font-family-bold = "Cascadia Code Bold"
font-family-italic = "Cascadia Code Italic"
font-family-bold-italic = "Cascadia Code Bold Italic"
# END_GHOSTTY_FONT
font-size = 13
window-width = 95
window-height = 80
background-opacity = 0.99
window-decoration = server
keybind = ctrl+r=reload_config
# config-file = themes/default_theme
# high_contrast3
palette=0=#000000
palette=1=#FF3f3f
palette=2=#4ff07f
palette=3=#FFef4f
palette=4=#5faFff
palette=5=#f077f0
palette=6=#8fdFfF
palette=7=#FF8f5f
palette=8=#bfbfbf
palette=9=#FF7f00
palette=10=#00FFa0
palette=11=#FFcf00
palette=12=#005fFF
palette=13=#FF00FF
palette=14=#00ffff
palette=15=#e0d0d0
# extended colors
background = #000720
foreground = #e0d0d0
cursor-color = #f0f0f0
selection-background = #e0d0d0
selection-foreground = #000000
Kitty
# ~/.config/kitty/kitty.conf
#
shell xsh
# include ~/.config/kitty/fonts/default_font
# BEGIN_KITTY_FONTS
font_family JetBrainsMono NFM Medium
bold_font JetBrainsMono NFM ExtraBold
italic_font JetBrainsMono NFM Italic
bold_italic_font JetBrainsMono NFM Bold Italic
# END_KITTY_FONTS
remember_window_size no
font_size 15.0
initial_window_width 95c
initial_window_height 50c
# include ~/.config/kitty/themes/default_theme
# high_contrast3
#
url_color #a0e0ff
cursor #ffffff
cursor_text_color #000000
# Tabs
active_tab_background #001e1e
active_tab_foreground #afd0ff
inactive_tab_background #2030a0
inactive_tab_foreground #c0c0c0
#tab_bar_background #313131
# Windows
active_border_color #79a8ff
inactive_border_color #646464
color0 #000000
color1 #FF3f3f
color2 #4ff07f
color3 #FFef4f
color4 #5faFff
color5 #f077f0
color6 #8fdFfF
color7 #FF8f5f
color8 #bfbfbf
color9 #FF7f00
color10 #00FFa0
color11 #FFcf00
color12 #005fFF
color13 #FF00FF
color14 #00ffff
color15 #e0d0d0
# extended colors
background #000720
foreground #e0d0d0
cursor #f0f0f0
selection_background #e0d0d0
selection_foreground #000000
Alacritty
# /home/bill/.config/alacritty/alacritty.toml
# Bill Waller
[terminal.shell]
program = "/usr/local/bin/xsh"
[general]
# import = [
# "~/.config/alacritty/fonts/default_font.toml",
# "~/.config/alacritty/themes/default_theme.toml",
# ]
[font]
# BEGIN_ALACRITTY_FONT
normal = { family = "JetBrainsMono NFM", style = "Regular" }
bold = { family = "JetBrainsMono NFM", style = "ExtraBold" }
italic = { family = "JetBrainsMono NFM", style = "Italic" }
bold_italic = { family = "JetBrainsMono NFM", style = "Bold Italic" }
# END_ALACRITTY_FONT
size = 15
# dynamic_title = true
# decorations = "Full"
# decorations_theme_variant = "Dark"
[window]
dimensions = { columns = 95, lines = 50 }
[scrolling]
history = 10000
[colors.primary]
background = '#000000'
foreground = '#c0c0c0'
[colors.normal]
black = '#000000'
red = '#FF0000'
green = '#00FF8f'
yellow = '#FFc700'
blue = '#009FFF'
magenta = '#e070e0'
cyan = '#00CFDF'
white = '#FF7f00'
[colors.bright]
black = '#7f7f7f'
red = '#FF7F00'
green = '#00FFa0'
yellow = '#FFEf00'
blue = '#0000FF'
magenta = '#FF00FF'
cyan = '#00ffff'
white = '#FFFFFF'
Tree-Sitter
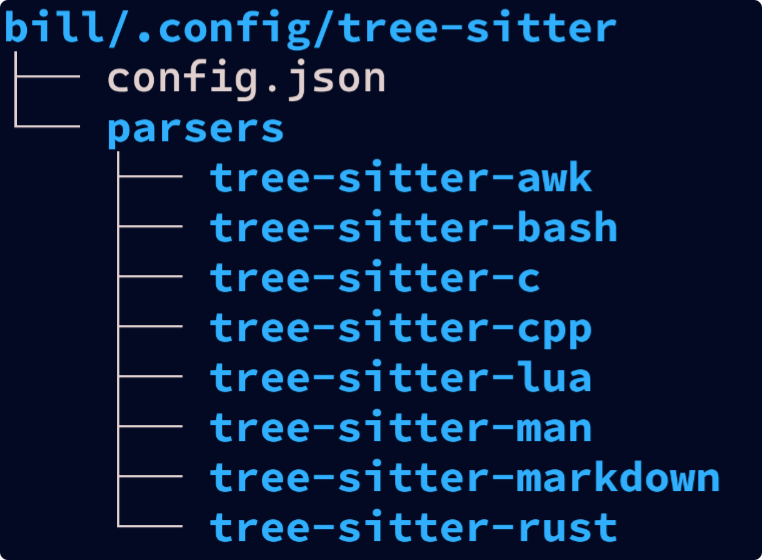
Before you can use Tree-Sitter-CLI, you will need to install the parsers for your file types. Below an example layout for parser installation.
Tree-Sitter Configuration
Tree-Sitter config.json
{
"parser-directories": [
"/home/bill/src",
"/home/bill/.config/tree-sitter/parsers"
],
"theme": {
"attribute": {
"color": "#f9a080",
"italic": true
},
"comment": {
"color": "#a0a0a0",
"italic": true
},
"constant": "#00b0ff",
"constant.builtin": {
"bold": true,
"color": "#f000f0"
},
"constructor": "#00ffbf",
"embedded": null,
"function": "#ff4f00",
"function_definition": "#f07070",
"function_declaration": "#70b0f0",
"function.builtin": {
"bold": true,
"color": "#d070ff"
},
"keyword": "#00b07f",
"module": "#0000f0",
"number": {
"bold": true,
"color": "#ffaf90"
},
"operator": {
"bold": true,
"color": "#ff00ff"
},
"property": "#00b0ff",
"property.builtin": {
"bold": true,
"color": "#ff4f00"
},
"punctuation": "#f000f0",
"punctuation.bracket": "#f000f0",
"punctuation.delimiter": "#f000f0",
"punctuation.special": "#f000f0",
"string": "#90c0ff",
"string.special": "#f07fff",
"tag": "#ff0000",
"type": "#3fefff",
"type.builtin": {
"bold": true,
"color": "#ff5070"
},
"variable": "#f09040",
"variable.builtin": {
"bold": true,
"color": "#00d050"
},
"variable.parameter": {
"color": "#00d050",
"underline": true
}
}
}
