 |
C-Menu 0.2.9
A User Interface Toolkit
|
|
C-Menu 0.2.9
A User Interface Toolkit
|
**_NEW_** C-Menu Form In Depth
Click the link below to access the C-Menu Documentation:
The C-Menu is a versatile and user-friendly User Interface Toolkit suitable for a wide variety of applications. This guide provides detailed instructions on how to use and customize the C-Menu to fit your needs.
To begin, follow these steps:
To enable root access features, you need to install the RSH (Remote Shell) program with setuid root permissions. This allows certain menu items to execute commands with root privileges.
NOTE: The warnings below do not apply if you choose to install RSH without setuid and setgid permissions, or if your system is secure, behind a firewall, and not shared with other users. In that case, you can enjoy the convenience of RSH without the associated risks. However, if you are sharing a system with other users, it is crucial to understand the security implications.
WARNING: Do not install RSH unless you understand the security implications of setuid root programs. RSH allows users to execute commands with root privileges, which can pose significant security risks if not managed properly.
You can place C-Menu files anywhere you like, so long as you configure your system accordingly. However, for a first-time install, it will be much easier to use the suggested default configuration. These instructions will assume the default and give you some pointers on how you can modify the layout to suit your objectives. These instructions will serve as an example of one way to install C-Menu.
First, edit your .bashrc or .zshrc and prepend the C-Menu binary directory onto your path:
Optionally, you can set some other environment variables that will help with your C-Menu setup. CMENU_SRC will come in handy if you plan to develop C-Menu.
After copying the menuapp directory to your home directory, you are ready to start C-Menu. But before you do, let's take a moment to look at some of the safety features that are included with RSH, and how to install them.
If you installed C-Menu with root privileges, you will have an incredibly useful, but potentially dangerous tool, RSH, installed on your system. That's one reason I like to install it in my home directory, where I can control access to it. RSH is a setuid root program that allows users to execute commands with root privileges. If you share a system with other users, you must mitigate the risks associated with RSH. It won't do much good to close the barn door after the horse has escaped. If you aren't sure that you have the necessary precautions in place, it would be better not to install rsh at all. Here are some precautions you should take:
Also, please read the section on RSH safety below to understand the safety features that are included with RSH and how to use them effectively.
The output is as follows:
You can see when each rsh session was started and exited, and if there were any SSH errors. This can help you keep track of your use of RSH and ensure that you are using it responsibly. Personally, I only thought I was being ultra-careful until I audited my own usage.
To use RSH, assuming you have it installed with setuid root permissions, you need to make sure the sshd service is running on your system and that you have an ssh key pair set up for authentication. You will need to add your public key to the ~/.ssh/authorized_keys file on the host where you want to execute commands with root privileges. This allows you to authenticate securely when using SSH.
You can install these features in your "$HOME"/.bashrc by copying the content of "$HOME"/menuapp/bashrc_cmenu to your "$HOME"/.bashrc. I don't use zsh, so perhaps someone will want to create a zshrc_cmenu file that can be sourced from .zshrc. If you do, please share it with me and I'll include it in the next release.
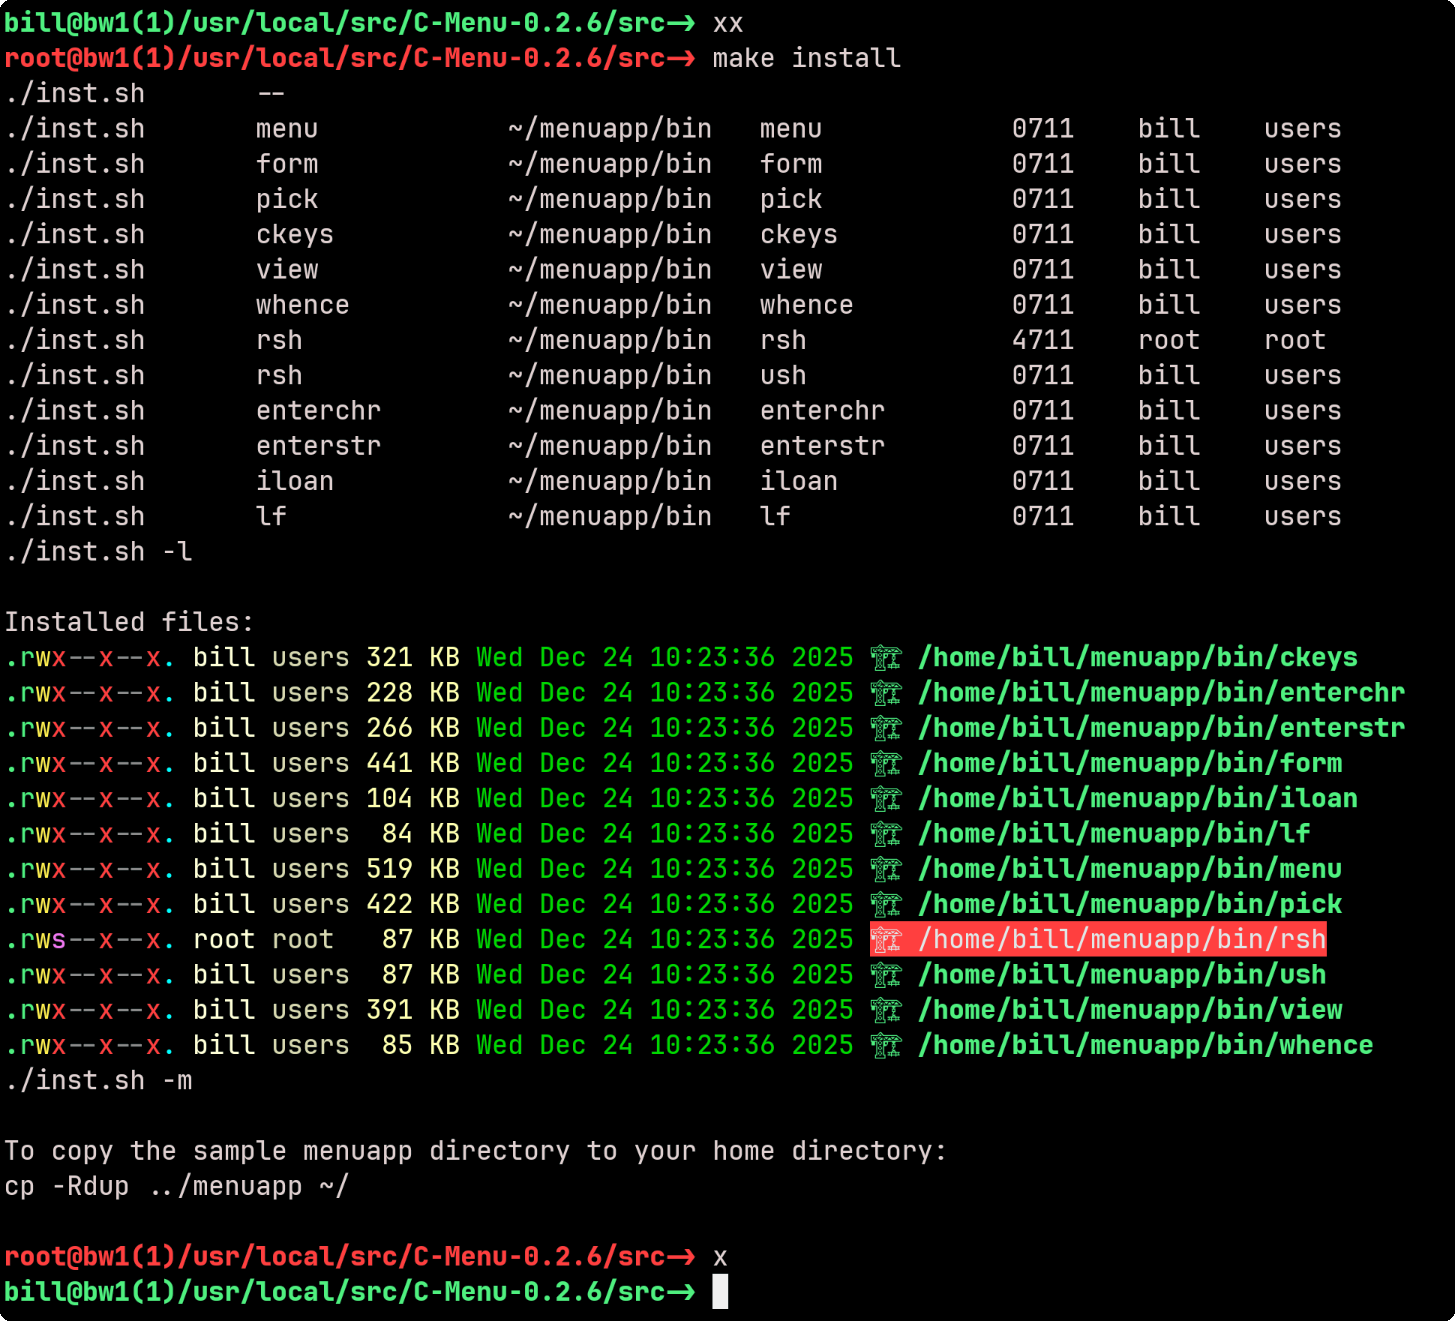
Of course, you should never copy anything to your .bashrc or .zshrc without first reading it and understanding what it does. The bash functions, "fn xx()" and "fn x()" are designed to make it easy to enter and exit a root shell. Once you have RSH installed, you can "xx" to enter a root shell, and "x" to exit it. The red shell prompt will serve as a constant reminder that you are operating with elevated privileges, so be mindful of it and don't linger any longer than necessary.
I am sure you are way beyond the point of needing to be reminded about the dangers of running commands with root privileges. It probably wreaks of a guilty conscience and associated trauma, and there could be a reason for that. It's far better to learn from my mistakes than yours.
Note: the following listing uses "lsd" by default, and may not look the same on your system if you do not have "lsd" installed with patched fonts. You can modify the "Makefile" to use "ls" instead.
Once RSH, "xx", and "x" are installed, subsequent make install processes will appear as follows:
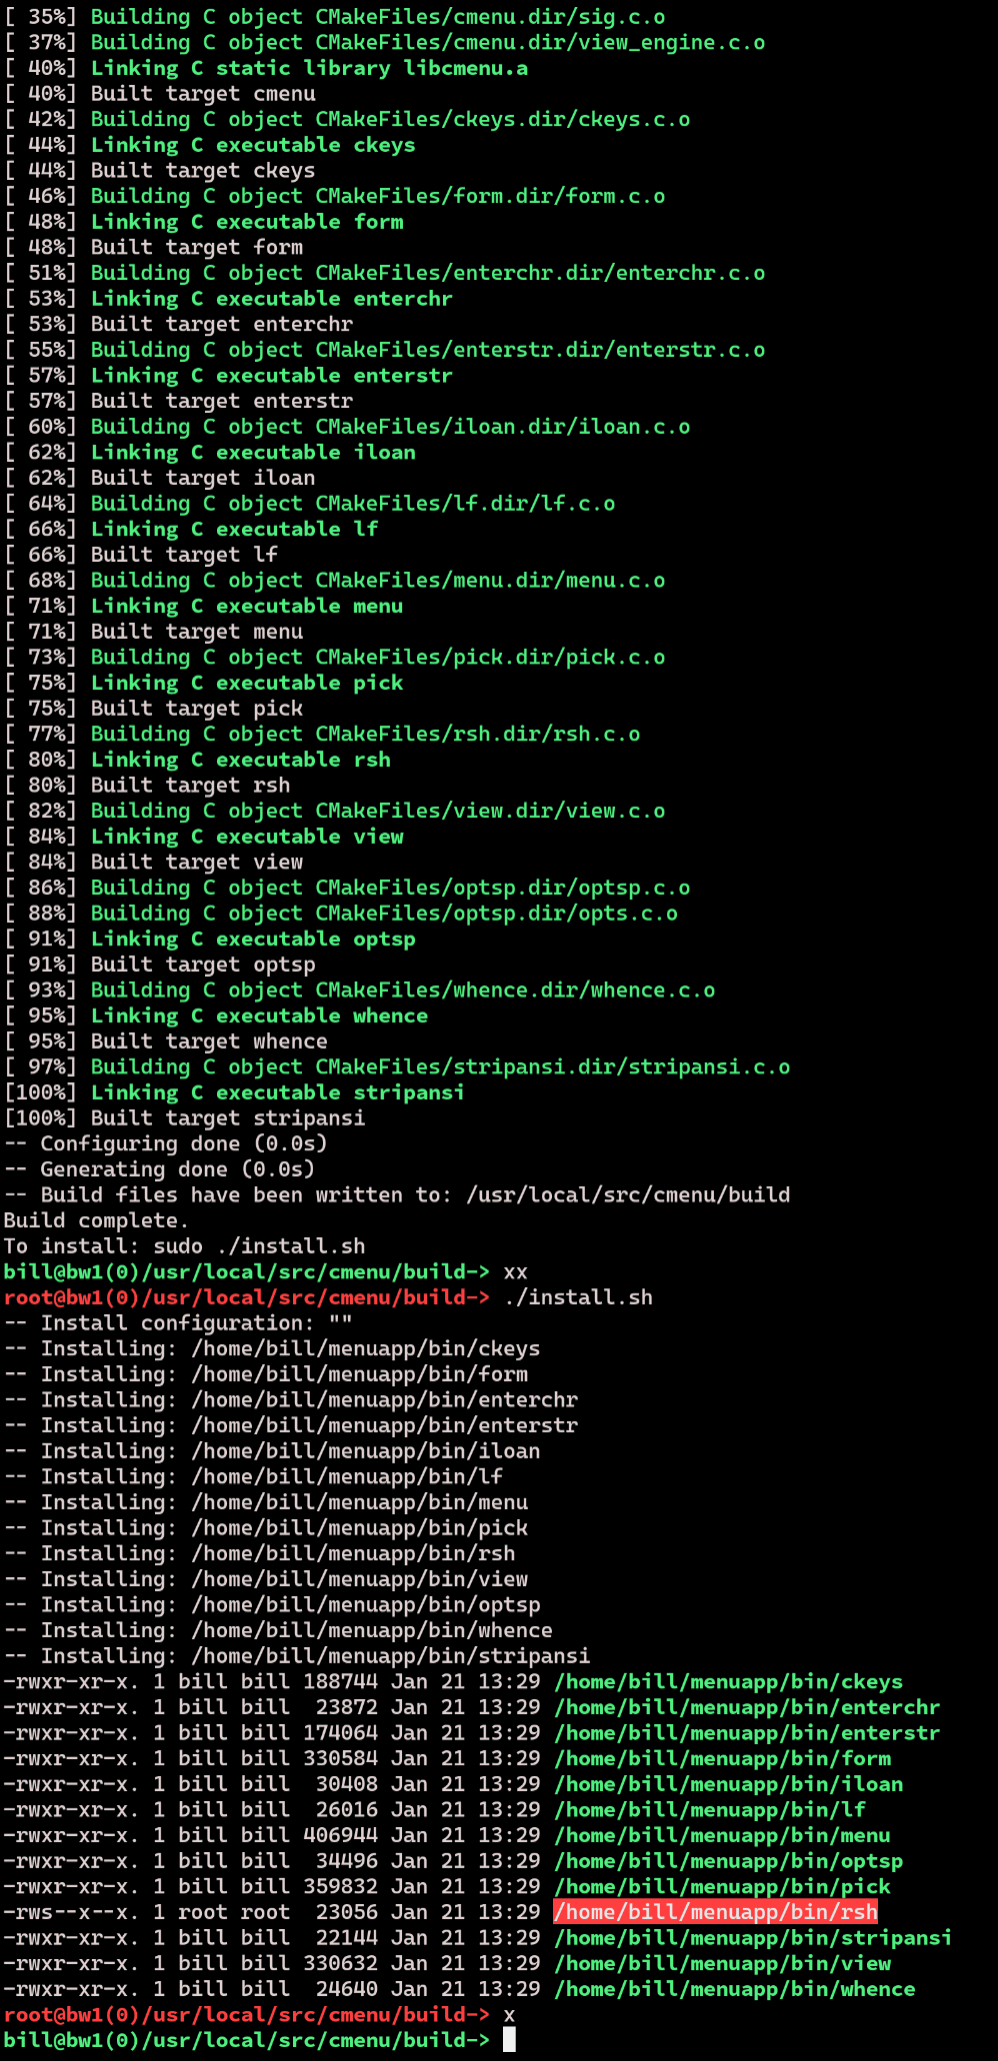
Here's another example with the C-Make build. You will notice that the compilation portion of make is executed without root privileges, while the installation portion is executed with root privileges. This is a safer approach, as it minimizes the amount of code that runs with elevated privileges.
When finished, take some time to explore the ~/menuapp directory to familiarize yourself with its features.
To start C-Menu, simply run the following command in your terminal:
This will launch the C-Menu interface, where you can navigate through the menu items and execute commands as needed. You can also specify a menu description file to use with the -d option:
C-Menu can be configured using a configuration file located at ~/.minitrc. This file allows you to customize various aspects of C-Menu, such as the default menu description file, the default editor, and other settings. You can edit this file with any text editor to suit your preferences.
You don't necessarily need to use ~/.minitrc as your configuration file. You can specify an alternate configuration file by setting the environment variable, CMENURC, to the path of the desired configuration file. For example:
See Cmenu Options for a list of available configuration options and their descriptions.
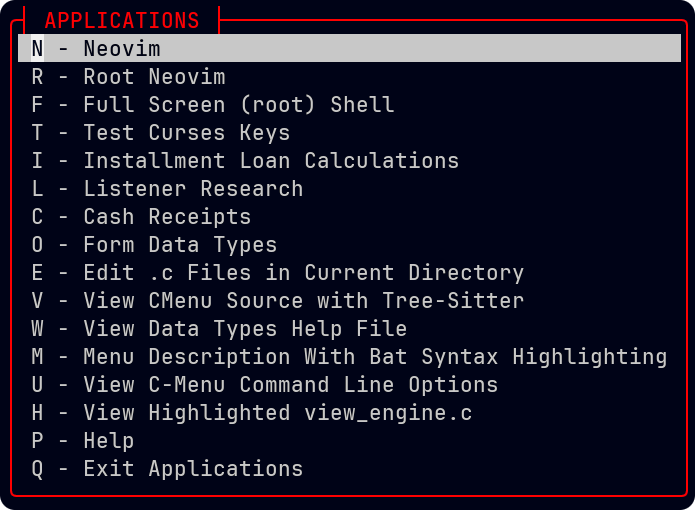
C-Menu parses a menu description file, which contains text lines to display and command lines, which are essentially operating system commands.
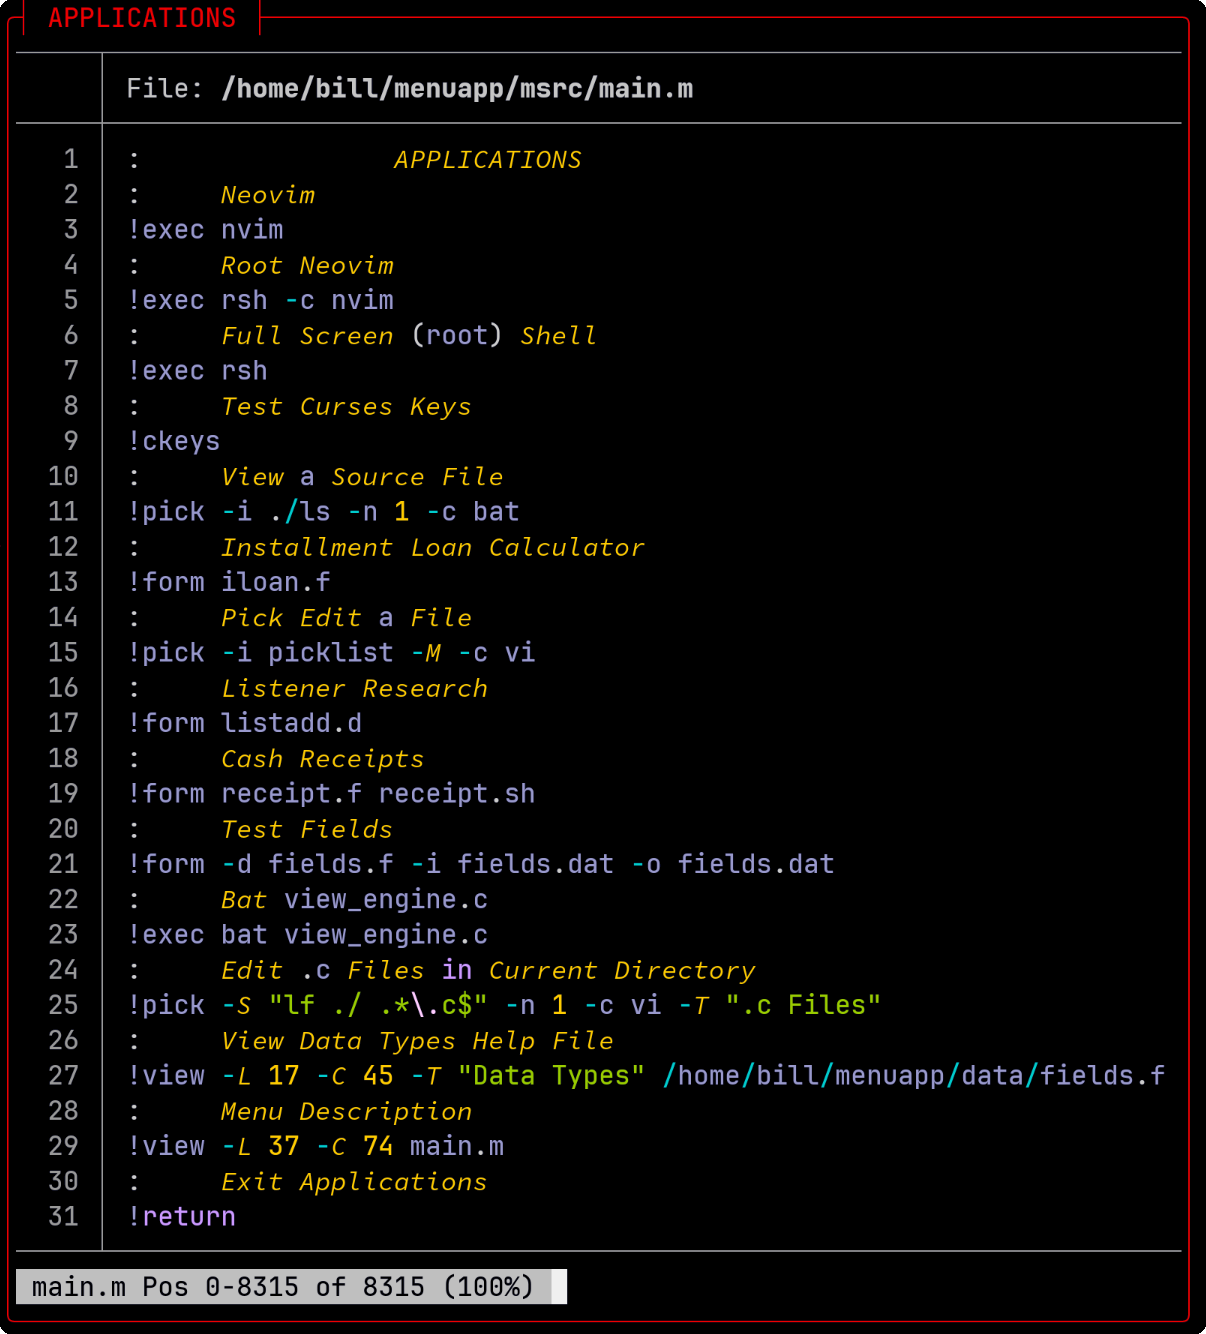
In this example, "Neovim" is a menu item that, when selected, will execute the command nvim. The user can select it by clicking on "Neovim" or by typing the corresponding letter assigned to it.
Form is a utility that provides the user with a way to enter and edit information in a structured format.
Form can take its input from file, standard input, or an external executable. A description file, which might be named myform.f, contains the layout and content of the form.
When started, form parses the description file and displays the form according to the specifications. It then reads from the specified input source and populates the on-screen form fields with the data. If no input source is specified, the form will be displayed with empty fields ready for user input.
The cursor will be positioned at the first input field, and the user can navigate through the form using the arrow keys or other designated navigation keys. The user can enter or edit the field data, and upon submission, the form will optionally output the entered data to a file, standard output, or an external executable for further processing.
The user can navigate through the form fields, enter data, and when ready, use the F10 key to submit the form. Upon submission, form can:
- write the form data to a specified file

- write the form data to standard output (stdout)

- execute an external command with the form data as input

- provide form data to an external command via a pipe

- provide form data to an external command via command-line arguments
In the image below, Form is configured to use '_' as the fill character, which gives the user a visual cue of the field length.
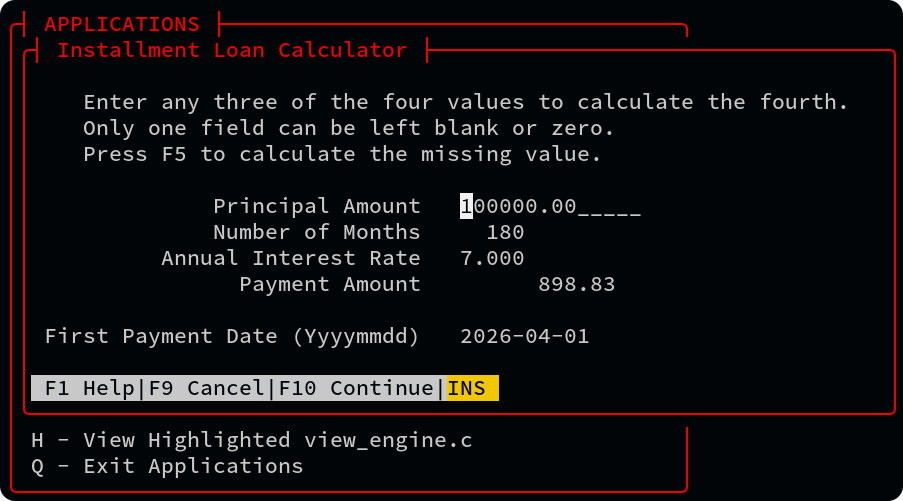
The default field entry mode is overwrite, which can be toggled to insert by pressing the insert key, or clicking the "INS" label in they chyron. When Form is in insert mode, the "INS" label will be highlighted.
If the field is a decimal numeric type, then only numbers and a single decimal point can be entered.
In overwrite mode, each character entered will replace the existing character at the cursor position. In insert mode, characters will be inserted at the cursor position, pushing existing characters to the right. The user can toggle between these modes as needed while filling out the form. Insert mode is not effective when the field is full.
When entering times or dates, don't enter punctuation, just numbers. When you press tab or enter to accept the field, Form will convert the input to the appropriate format. For example, if you enter "20240601" in a date field, Form will convert it to "2024-06-01" when you move to the next field.
Each field has a display mode and an edit mode. In display mode, formatted numbers are right-aligned and text is left-aligned. In edit mode, fields are left-aligned. The cursor is initially positioned at the first character of the field.
When finished entering or editing a field, the user can press the Tab key to move to the next field, or Shift+Tab to move to the previous field. Pressing Enter will also move to the next field. However, the tab and enter keys work differently depending on the setting of the configuration flag, "f_erase_remainder". When set to true, pressing the enter key will accept the field and erase any remaining characters to the right of the cursor, while pressing tab will move to the next field without erasing any characters. When "f_erase_remainder" is set to false, pressing the enter key will accept the field without erasing any characters.
When finished entering or editing the form, the can press F10 to continue with submission.
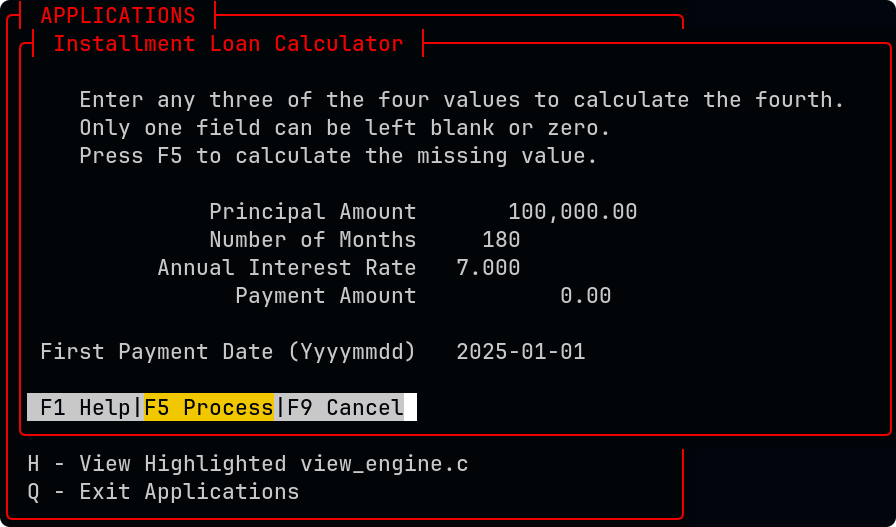
Notice, in the above image, the Number of Months has been changed from 120 to 180. The user pressed enter in the Payment Amount field giving it a value of 0.
When the User pressed F10, the chyron changed, adding a command "F5 Process", which is highlighted with a yellow background as a clue to the user that it is the next logical step.
The user presses F5 or clicks on the "F5 Process" label, and with no flickering or disruption of the screen, the Payment Amount is instantly calculated and the Payment Amount field is updated. The chyron changes again, adding "F5 Edit" and "F10 Commit" commands.
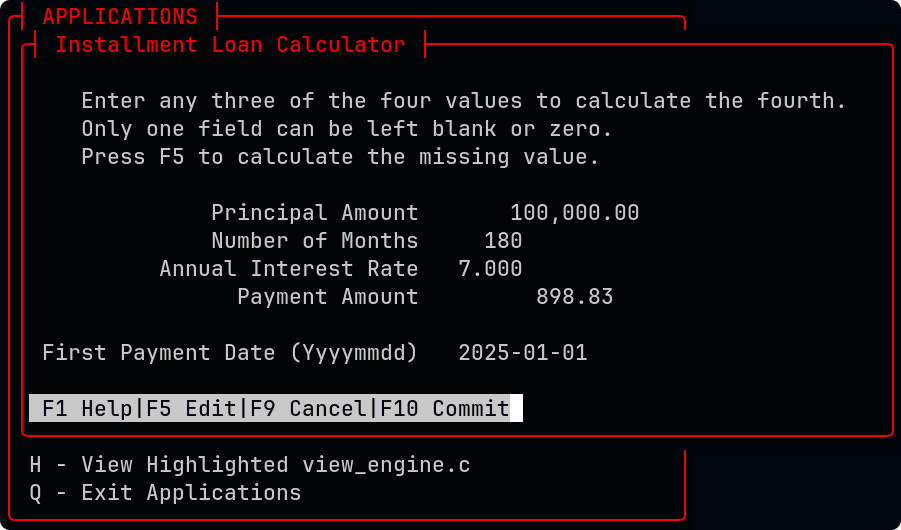
The user can try another calculation by pressing the "F5 Edit" key or "F10 Commit" to have Form dispatch the final data according to the configuration.
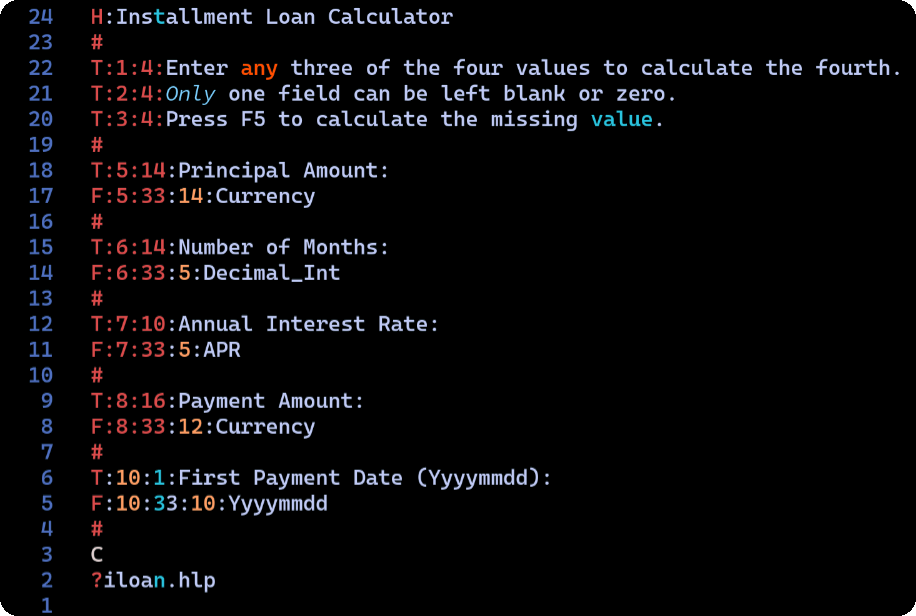
Form will look for a file with the same name as the form but with a .hlp extension. It will search in the current directory and then in the menu help directory, ~/menuapp/help.
The ":" character is used as a delimiter in the fields above, but any character that is placed immediately after the line designator (H, T, F, ?) can be used as a delimiter. For example, the following two lines are equivalent:
String: Any text Decimal_Int: Integer number Hex_Int: Hexadecimal integer Float: Floating point number Double: Double precision floating point number Currency: Currency amount APR: Annual Percentage Rate Yyyymmdd: Date in YYYYMMDD format Hhmmss: Time in HHMMSS format
Data types determine the format of displayed data. Of course, all data is initially a text string, but Form converts numeric data to internal numeric binary according to the datatype specified.
WARNING: For applications that require extreme accuracy, such as banking, financial, or scientific applications, none of the data types currently available in Form are recommended. The plan is to add 128-bit BCD support via decNumber or rust-decimal in a future release.
The Field Format Specifiers can be any combination of upper and lower case, and new types can be easily added by modifying the source code.
The number of fields in the Form structure is currently set to a maximum of 100, and the maximum field length is set to 1024, but this can be easily modified in the source code if needed.
C-Menu Pick is a utility that allows users to create and to manage pick lists for selection within the C-Menu system, or stand-alone. It can be used to present a list of options for the user to choose from.
Pick does not have a description file, but instead takes its input from standard input (stdin) or a file. Each line of input represents a separate pick item. The user can select an item by clicking on it or moving the cursor to highlight it and pressing the space bar to toggle it on or off. The number of items that can be selected is configurable by a command-line option (-n).
The table of pick objects is currently set to a maximum of 1024 items of 80 bytes each, but this can be easily modified in the source code if needed.
To select an item, the user can either click on it with the mouse or move the cursor to highlight it and press the space bar to toggle it on or off. Once the desired items are selected, the user can press the Enter key to confirm the selection and exit Pick.
If "number of selections" (-n) is set to 1, selecting an item will automatically confirm the selection and exit Pick.
Pick can be invoked from within C-Menu or from the command line using the following syntax:
C-Menu View is a utility that allows users to view text files within the C-Menu system, or stand-alone. It provides a simple interface for reading files without the need for an external text editor.
If -L and -C are not specified, View will attempt to use the terminal size. If -L and -C are set, view will open in a box window.
View supports syntax highlighting via tree-sitter. To enable this feature, ensure that tree-sitter-cli is installed and that the appropriate grammar files are available. Alternatively, you can use "pygmentize" or "bat", but tree-sitter is preferred for performance and flexibility.
View uses complex-characters (cchar_t) for rendering text, which allows it to handle a wide range of character sets and encodings including ASCII, UTF-8, multi-byte, and wide-character (wchar_t) formats. View does not write ANSI escape sequences to the display, but instead converts and incorporates character attributes directly into the character data structures.
View displays its output on a virtual pad, which can be larger than the actual display window enabling the user to scroll horizontally and vertically.
View supports extended regular expressions (regex) for advanced text searching capabilities.
Arrow Keys: Move the cursor up, down, left, or right. Alternatively, h, j, k, and l move left, down, up, and right, respectively.
Page Up/Page Down: Scroll up or down by one page. Alternatively, Ctrl+F/Ctrl+B: Scroll up or down by one page.
Home/End: Move to the beginning or end of the line.
You can specify multiple files to view on the command line, and advance to the next or previous file by entering "N" or "P" respectively.
"o" opens a file dialog to select a file to view.
"!" executes a shell command and displays the output in the view window.
"q" exits view
"v" opens the current file in an external editor, such as vim or nvim, based on the value of "editor" in the configuration file (~/.minitrc) or the environment variable, DEFAEULTEDITOR.
"w" writes the contents of the view window to a file. The user will be prompted to enter a file name, and the contents of the view window will be saved to that file.
"/" initiates a forward search for a pattern.
"?" initiates a backward search for a pattern.
"n" repeats the last search in the same direction.
"V" display version
"H" display help
"+" sets a command that will be executed immediately after view opens a file. This can be used to set the initial search pattern, for example.
"-" is a leader key to certain settings in view
"-i" toggles case-insensitive searching
"-s" toggles squeeze blank lines
"-t" set tabstops
"-:" enter command prompt
"-l" set long prompt
"-n" set no prompt"
To search forward for a pattern, press the "/" key, enter the desired pattern, and press Enter. View will highlight the first occurrence of the pattern after the current cursor position. To find the next occurrence, press the "n" key.
To search backward for a pattern, press the "?" key, enter the desired pattern, and press Enter. View will highlight the first occurrence of the pattern before the current cursor position. To find the next occurrence, press the "N" key.
To scroll horizontally, use the left and right arrow keys. You can also use the "h" and "l" keys for left and right scrolling, respectively.
View supports a variety of motion keys for navigating through the text:
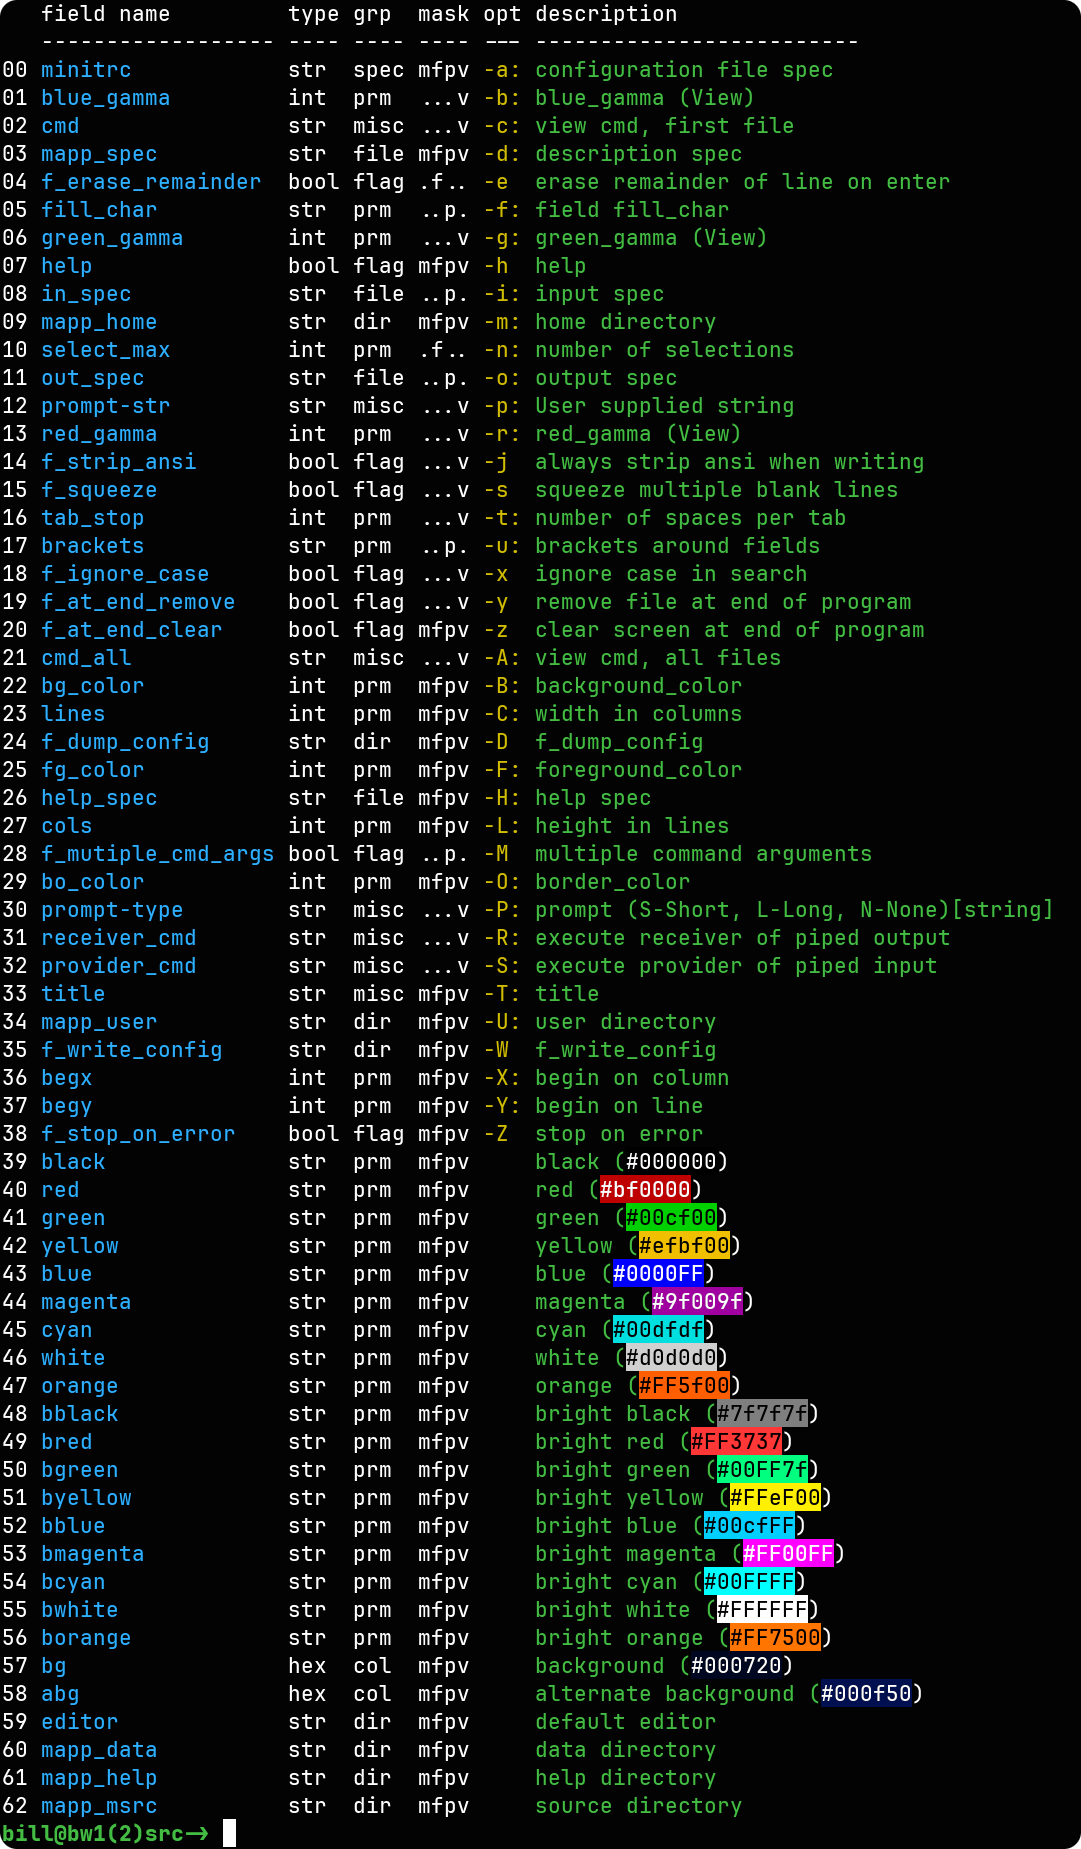
C-Menu Options can be provided by command line arguments or via a configuration file, ~/.minitrc. Command line arguments take precedence over configuration file settings.
The option field names may be specified in the configuration file, one per line, without the leading hyphen (-).
The single letter options in column 6 may be specified on the command line as hyphen[letter], such as (-a). Some of the options, specifically those without a designated letter, may be entered from the command line as hyphen[option]=[value], such as (-mapp_data="My C-Menu_Data_Directory").
(list files)
"lf" is a very lightweight alternative to find. It was designed to provide input to C-Menu Pick, but can be used stand-alone as well. It is similar to the Unix "find" command, but with a much simpler syntax and fewer features.
The syntax for "lf" is different from "find" in that the directory to search is specified first, followed by the regular expression to match file names against. If no directory is specified, the current directory is used. If no regular expression is specified, all files are listed.
The syntax for "lf" is also different from "ls" in that it uses regular expressions instead of shell expansion of wildcards. This allows for more complex matching patterns.
lf does not follow symbolic links as this could result in a circular loop.
lf does not report hidden files, those begin with a dot (.) in Unix-like systems, unless the -a option is used.
Unless depth is specified with the -d option, lf defaults to a maximum depth of 3 subdirectories. This is to prevent excessive searching in large directory trees.
Examples:
List all files in the current directory and its subdirectories ending with .c or .h.
List all regular files in the current directory and its subdirectories that contain the word "report" in their name, ignoring case.
List all files in the current directory and its subdirectories excluding those that end in ".jpg", ignoring case.
Exclude all files and directories that end in ".txt", ".sh", or ".md".
For a great cheat sheet on regular expressions, see
Vitor Britto's Regular Expressions
"whence" is a simple utility that reports the location of a command in the user's PATH. It is similar to the Unix "which" command, but with a simpler syntax and fewer features. It can be used to verify that a command is accessible and to determine its location.
You may be wondering whence "whence", and why it is included in the C-Menu package when there are already commands like "which" and "type" that provide similar and functionality and more. I could tell you that whence was designed to be a lightweight and efficient utility, but that's not the reason for its inclusion in the C-Menu package. The truth is that I wrote which back in the mid 1980's before the "which" command was widely available. I didn't invent it, but after using a version of whence that didn't work as I expected, I wrote my own version, and I have been using it since.
If you will permit a tangential excursion, vi wasn't my first editor. It was the first editor to which I instantly bonded. Barely aware that my fingers were moving, code streamed onto the screen at the speed of thought. I was wired in. What ever happened to Jolt Cola?
Whence is a loyal and trustworthy companion that has served me for many years, and I refuse to abandon it. Of course, if it develops a bug, I'll throw it out like yesterday's garbage. It is just a program. Feel free to delete it and use which if that makes you feel better.
If you encounter issues while using C-Menu, consider the following troubleshooting steps:
On some systems, "/usr/bin/view" may be a link to "/usr/bin/vim" or "/usr/bin/alts". Make sure ~/menuapp/bin is at the front of your PATH. You can check the location of a command using:
