 |
C-Menu 0.2.9
A User Interface Toolkit
|
|
C-Menu 0.2.9
A User Interface Toolkit
|
C-Menu is a toolkit of software components that can be assembled like Legos to create intuitive and responsive applications. C-Menu's building blocks are purpose-built, optimized, and highly customizable, allowing developers to create unique and engaging interfaces with minimal investment of time and effort.
C-Menu's components include Menu, Form, Pick, View, RSH, lf (lightweight find), and C-Keys (a keyboard and mouse diagnostic tool). These components can be used to create a wide range of applications, from simple command-line tools to complex workflows.
Because C-Menu is written in C and terminal-based, it is super-fast and has a minimal footprint. C-Menu requires only a Linux kernel and the standard C library, it is perfect for resource constrained environments such as embedded applications, servers, IOT, and SOC.
C-Menu is designed so that you can build an application on your development machine and deploy it to a production environment without modifications by following a few simple conventions.
All of C-Menu's long options, shown as, –option_name, in the following ../screen can be can be set on the command line or in the C-Menu configuration file, ~/.minitrc. The "--" prefix is omitted in the configuration file. Options commonly used on the command line also have a single-letter short option equivalent. Command line options override configuration file options, allowing you to customize the behavior of your applications on a per-instance basis.
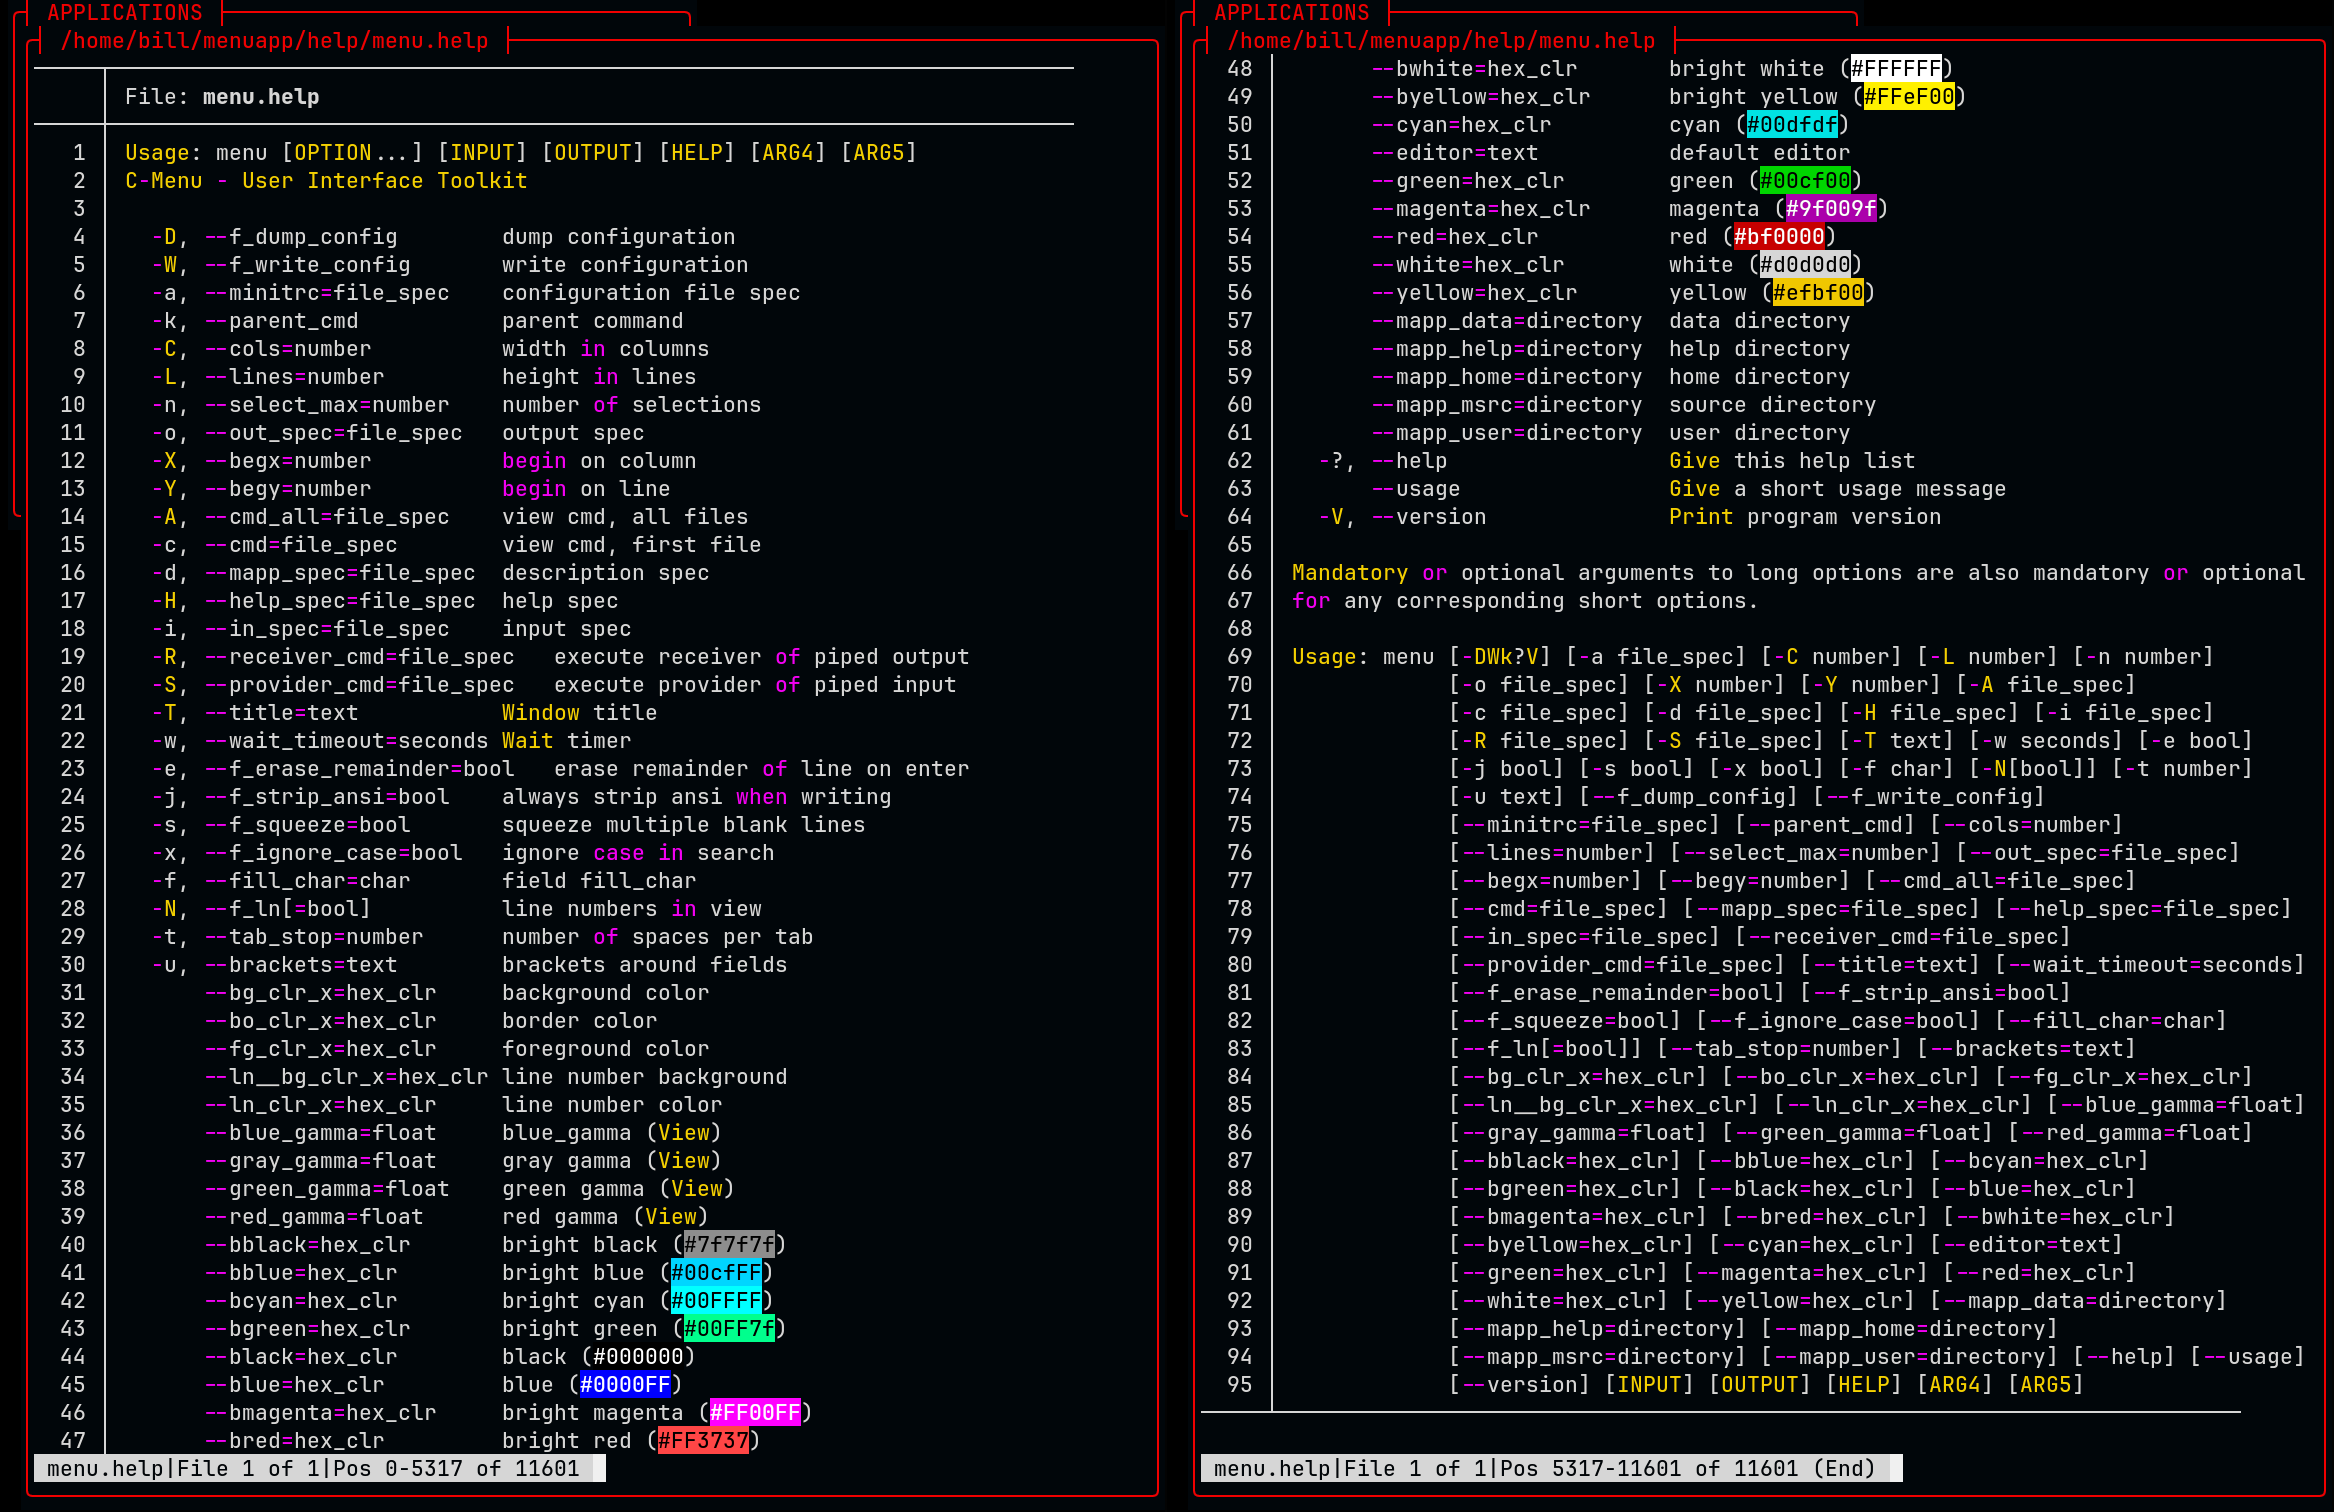
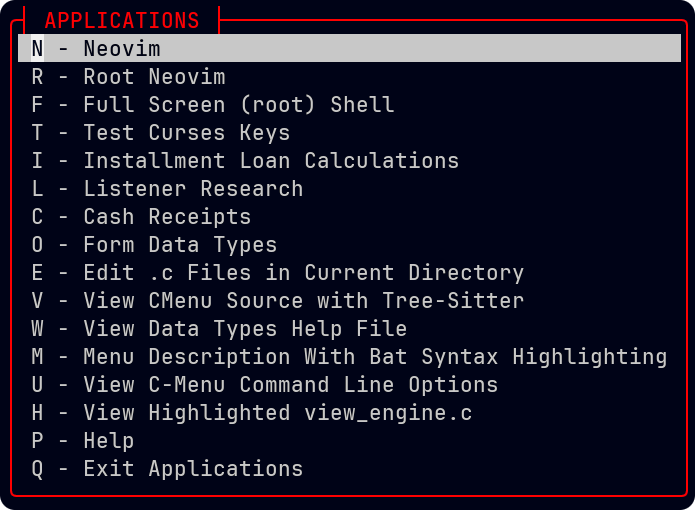
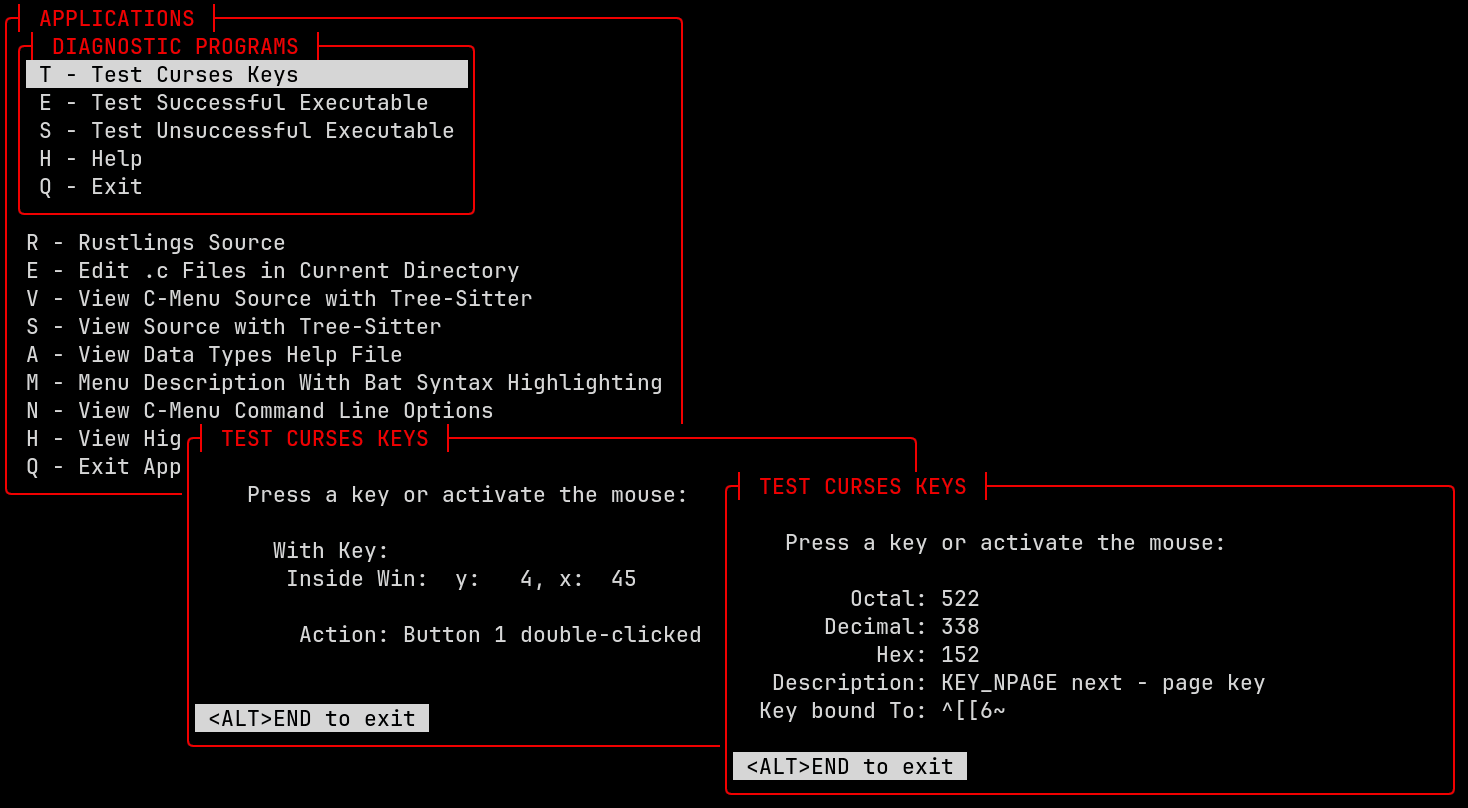
The menu above is intended to demonstrate a variety of features and techniques that can be applied to your projects. It is not meant to be a practical menu for everyday use, but rather a showcase of what is possible with C-Menu. Think of yourself as an artist and C-Menu as your canvas. What will you create?
Below is an example of source defining the above menu. This is the part you design as the top-level framework for your application.
This section will break down the Example C-Menu Applications Menu and explain how it works from the perspective of a developer using C-Menu to build applications. With this understanding, you will be ready to create custom software products with C-Menu.
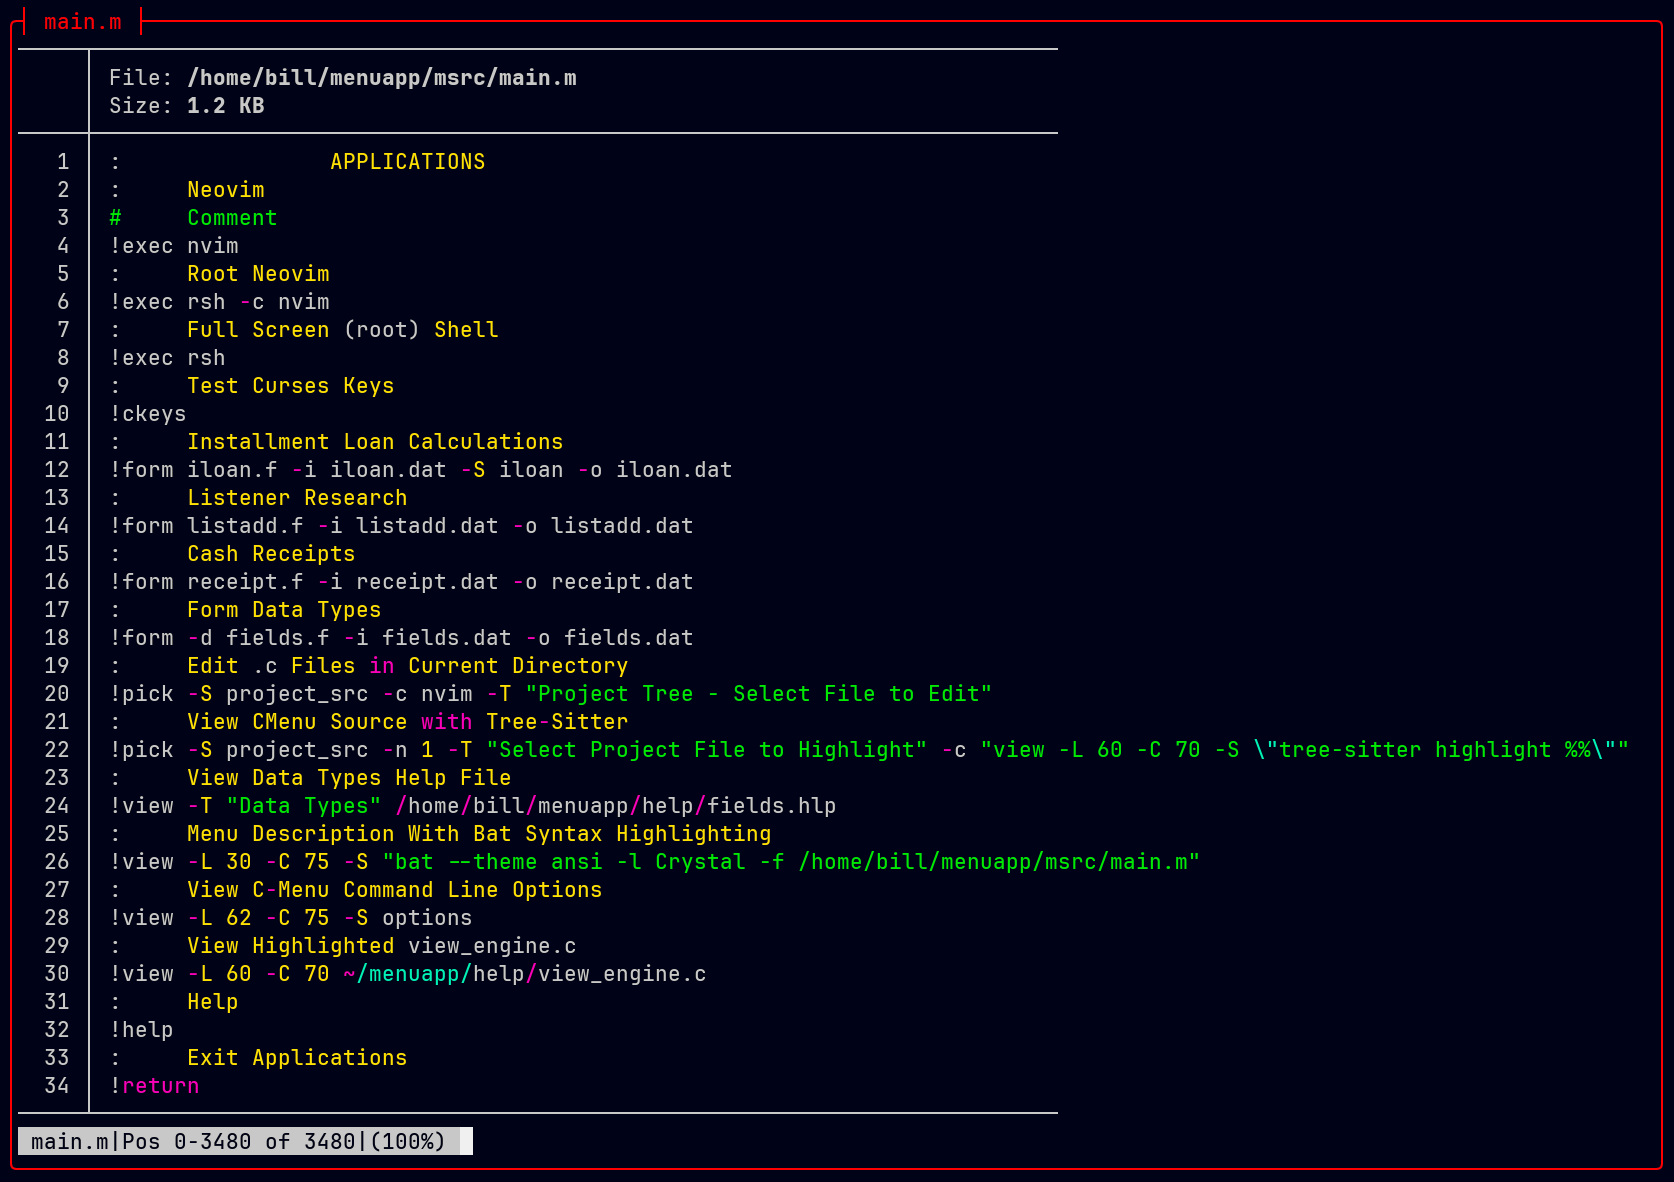
Notice the red highlighted lines in the menu description file above. That is a menu option that demonstrates how to edit the menu description files within C-Menu. You can use C-Menu to edit the menu description files that define your application, allowing you to make changes to your application's menu structure and commands without needing to exit the application. With this feature, you can quickly iterate on your application's design and functionality.
Lets examine the Menu source above and break down how it works. The source file is a simple text file that contains a series of User Choices and Commands.
In the C-Menu application directory, you will find an example, ~/menuapp/msrc/main.m. This example is designed to demonstrate a variety of features and techniques that can be applied to your projects. It is not meant to be a practical menu for everyday use, but rather a showcase of what is possible with C-Menu. Think of yourself as an artist and C-Menu as your canvas. What will you create?
Synopsis: Demonstrates how to use C-Menu to execute an external command, in this case, "rsh", which is a root shell alternative. When the user selects this menu item, C-Menu executes the "rsh" command, providing the user with a full-screen shell with root privileges. This can be useful for performing administrative tasks or troubleshooting issues that require elevated privileges.
Requirements: rsh owned by root, with setuid permissions.
Synopsis: Demonstrates how to create a sub-menu by specifying a menu description file, "workstation_config.m", which will be loaded and displayed when the menu item is selected. This allows you to create a hierarchical menu structure, with multiple levels of sub-menus, to organize your application and provide a more intuitive user experience.
Requirements: A menu description file, ~/menuapp/msrc/workstation_config.m, normally included with C-Menu. Alternatively, you can create this file with any text editor and populate it with menu items and commands relevant to workstation configuration tasks.
Synopsis: Demonstrates how to create a sub-menu by specifying a menu description file, ~/menuapp/msrc/diag.m, which will be loaded and displayed when the menu item is selected. Similar to Workstation Configuration.
Requirements: A menu description file, ~/menuapp/msrc/diag.m, normally included with C-Menu. Alternatively, you can create this file with any text editor and populate it with menu items and commands relevant to diagnostic tools and tasks.
Synopsis: Demonstrates how to use C-Menu Form to create a form-based interface for performing calculations based on form data. When the user selects this menu item, C-Menu executes the form command with the specified description file, "iloan.f". Form opens the input file, "iloan.dat", reads field data, and displays it in the Form window. The user edits the data and presses F10 Accept. Form then executes the "iloan" executable with the form data as arguments. "iloan" processes the form data and writes the resulting data to standard output. Form reads the resulting data from a pipe and displays the updated form data. The user can experiment with the numbers in the form, running as many calculation cycles as necessary. When the user gets the desired results, and presses F10 a second time, ~/menuapp/bin/amort executes with the form data and a loan amortization report is displayed with view.
Requirements: iloan and amort executables: These are simple programs distributed with C-Menu specifically for the purpose of this demonstration. If you don't have the "iloan" executable distributed with C-Menu, you can create a simple version of it in C or any programming language of your choice that accepts the data as arguments, standard input, or file, performs calculations, and writes the resulting data to standard output. You could even create a shell script or awk script to perform the calculations if you prefer. The point is to demonstrate how to use external executables with C-Menu Form, so the specific implementation of "iloan" is not important as long as it can read form data from standard input, perform calculations, and write the resulting data to standard output because that's all you need to integrate an external application with C-Menu Form.
Synopsis: This menu item is a placeholder for a future demonstration of how to use C-Menu to create an interface for conducting research on listeners, such as audio or network listeners. The specific implementation and requirements for this menu item will depend on the type of listener research being conducted and the tools and technologies being used.
Requirements: None.
Synopsis: Demonstrates how to use C-Menu Form to create a form-based interface for entering, editing, validating, processing, and submitting data related to cash receipts. When the user selects this menu item, C-Menu executes the form command with the specified description file, "receipt.f". Form opens the input file, "receipt.dat", reads field data, and displays it in the Form window. The user edits the data and presses F10 Accept. Form then writes the updated data to the specified output file, "receipt.dat". This menu item is not very useful as it stands. It is included here as a challenge in some industrious developer who can write external executables or scripts to provide database interaction and ancillary menu items to track deposit slips and batch numbers and post to general ledger.Synopsis:
Requirements: None
Synopsis: Demonstrates how to create forms using various data types.
Requirements: None
Synopsis: Demonstrates how to use C-Menu to streamline a repetitive work flow using lf and C-Menu Pick to automate the process of navigating to a directory, filtering for specific files, and opening those files in an editor. When the user selects this menu item, C-Menu executes the specified command line which launches Pick with the output of the "rust_src" script as its input. The "rust_src" script generates a list of Rust source files from the "exercises" directory, which is part of the Rustlings project. The user can then filter and select a file from the list, and Pick will automatically open the selected file in nvim for editing.
Requirements:
Synopsis: Instead of typing man commands, this menu item allows you to select from a group of manual pages residing in ~/menuapp/man.
Requirements: A group of manual pages stored in the ~/menuapp/man directory.
: Edit .c Files in Current Directory !pick -S project*src -T "Project Tree - Select File to Edit" -c nvim.sh %% : View C-Menu Source with Tree-Sitter !pick -S project_src -n 1 -T "Select Project Source to Highlight" -c "view -L 60 -C 85 -S \"tree-sitter highlight %%\"" : View Source with Tree-Sitter !pick -S "lf -S -d 5 . \".*\.(rs|c|h|sh|lua|py|cpp|js|html|css)$\"" -n 1 -T "Select Source File to Highlight" -c "view -L 60 -C 85 -S \"tree-sitter highlight %%\"" : lf Help !view -Nf -L50 -C86 ~/menuapp/help/lf.help : View Data Types Help File !view -Nf -L47 -C85 -S "bat --theme ansi -l Crystal -f ~/menuapp/help/fields.hlp" : Menu Description With Bat Syntax Highlighting !view -Nf -L 39 -C 85 -S "bat --theme ansi -l Crystal -f ~/menuapp/msrc/main.m" : View C-Menu Command Line Options !view -Nf -L66 -C75 ~/menuapp/help/menu.help : View Highlighted view_engine.c !view -N -L66 -C85 ~/menuapp/help/view_engine.c : Exit Applications !return
The menu description file is a simple text file that contains a series of User Choices and Commands. The first line of the menu description file is used as the Menu title, which is displayed at the top of the Menu window. Subsequent lines beginning with ":" are user choices that will be displayed in the menu. Lines beginning with "!" are commands to be executed by Menu when the corresponding menu item is selected. Lines beginning with "#" are comments.
There are no requirements for naming menu description files, but it is common practice to use the ".m" file extension for menu description files. The menu description file can be located anywhere in the file system, but it is common practice to store menu description files in a dedicated directory, such as ~/menuapp/msrc. If you follow this convention, you can simply specify the menu description file name without a path when referencing it in a command line, and Menu will look for the file in the ~/menuapp/msrc directory.
Each menu item has a key character that the user can press to select that menu item.
Earlier versions of C-Menu allowed only upper case letters as menu key characters. This became an impediment for larger menus, so we expanded the range of valid menu key characters to "!" through "~" (0x21 - 0x7e).
Menu uses a rudamentary algorithm to determine the key characters for menu items. It scans the menu text for the first character that is not a space, not already reserved, and in the valid key character range. If no such character is found, Menu will select the first unreserved letter in the valid range, even though it may not be in the menu text.
You may specify any character as a key by including it immediately (no space separation) following a dash ("-") as the first non-blank character in the the menu item text.
The above menu item will be displayed as " T - Diagnostic Tools" and the "T" will be the key character for that menu item.
Lower case ("q") is reserved as a key for the hidden "Quit", "Exit", "Return", etc. menu item which is part of every menu.
As an additional visual queue, key characters in the menu text will be displayed using "nt_hl_rev_fg" and "nt_hl_rev_bg" color pair. If you prefer not to use this visual queue, you can set "nt_hl_rev_fg" to the same color as "nt_rev_fg" and "nt_hl_rev_bg" to the same color as "nt_rev_bg" to the same color.
These colors are defined in the C-Menu configuration as six-digit hex RGB values:
Lines beginning with ":" are the User Choices.
Lines beginning with "!" are commands to be executed by Menu when the corresponding menu item is selected. These commands can be used to invoke internal C-Menu functions execute external commands, and run shell scripts.
Lines beginning with "#" are comments.
The first text line will be used as the Menu title to be displayed at the top window border.
Subsequent lines beginning with ":" are user choices that will be displayed in the menu.
The command line, beginning with "!" following each menu choice is executed by C-Menu Menu when the user selects that menu item. The user can click the desired Menu line with the mouse, position the cursor over the desired Menu line by using navigation keys, up and down arrow keys, or j and k, and the pressing enter or pressing the letter on the left of the desired Menu item.
Menu items always consist of the text displayed in the menu and a command to be executed when the menu item is selected. The command can be an internal C-Menu function, an external command, or a shell script. The command can also include options and arguments to customize its behavior.
Example:
The following menu item, Workstation Configuration, demonstrates how to create a sub-menu by specifying a menu description file, "workstation_config.m", which will be loaded and displayed when the menu item is selected. This allows you to create a hierarchical menu structure, with multiple levels of sub-menus, to organize your application and provide a more intuitive user experience.
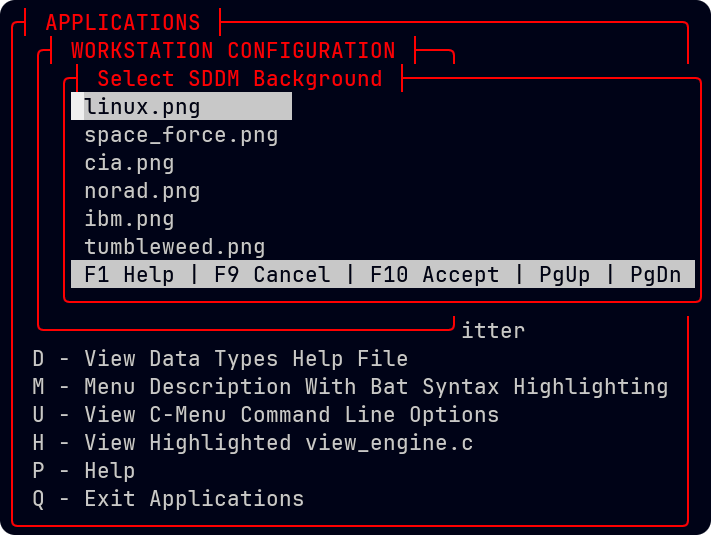
Diagnostic Tools is another menu item that specifies a menu description file, "diag.m", which will be loaded and displayed when the menu item is selected. This demonstrates how you can create multiple menus for different purposes and link them together through menu items.
Use C-Menu Form when you need to enter, edit, validate, process, and submit data.
The C-Menu form command specifies a description file which defines the on-../screen form.
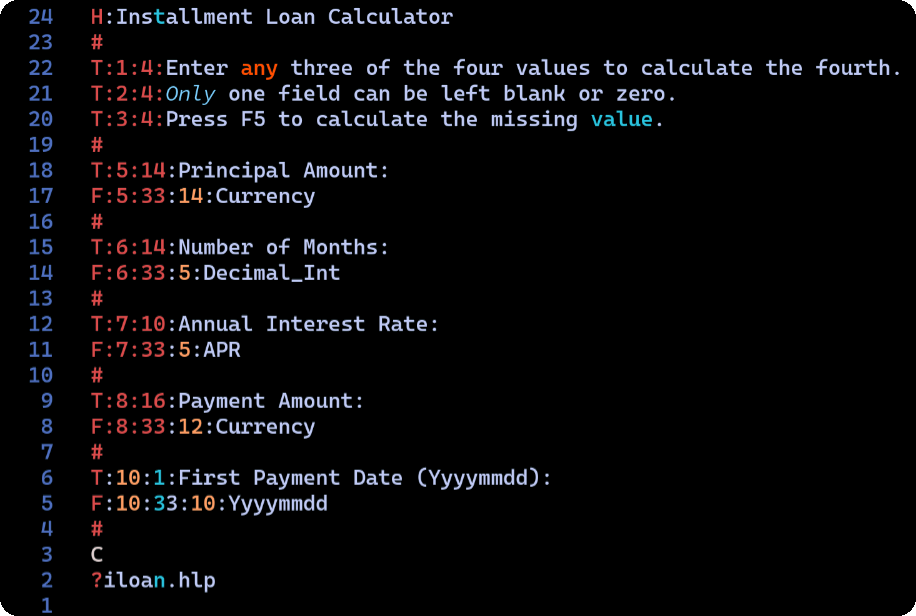
Specification:
Example:
Parameter 1 - "T" designates line type as text
Character 2 - ":" separator used to parse the remainder of the line
Parameter 2 - "5" form window line
Parameter 3 - "14" form window column
Parameter 4 - "Principal Amount" text to display in form window
Specification:
Example:
Parameter 1 - "F" designates line type as field
Character 2 - ":" separator used to parse the remainder of the line
Parameter 2 - "5" form window line
Parameter 3 - "33" form window column
Parameter 4 - "14" field length
Parameter 5 - "Currency" data type
Specification:
"C" - specifies that the field is a calculated field, which means its value will be calculated by an external executable specified with the -S option in the form command line.
"G" - specifies that the field values are to be received from an external program specified with the -S option.
"Q" - specifies that field values are to be provided by an external executable specified with the -S option and parameterized with a key value for a query operation.
Specification:
Example:
The argument specified with option "-d" is the form description file. If no "-d" option is specified, Form will attach the first non-option argument as its description file.
The form description file, "iloan.f", defines text and fields and their data types. See the Form Description File section above for details on how to define text and fields in the form description file.
The argument specified with option "-i" is the input file from which Form will read initial field values. If no "-i" option is specified, Form will attach the second non-option argument as its input file.
-S iloan: specifies that the executable "iloan" will be run as a provider (source) of input to the form. Because iloan.f contains a line with the "G", getter directive, Form will display the form populated from the input file, "iloan.dat".
The first "-S" in the above example belongs to Form, and the second "-S" belongs to View. The first "-S" directs Form to execute "iloan" and read form data from its standard output.
The "-R" option specifies a receiver executable, "view -S \"amort %%\""
The second "-S" belongs to View and directs it to execute "amort %%", substituting "%%" with the form data, and read the resulting data from its standard output to display in the View window.
The user can edit the form data and press F10 Accept or F9 Cancel.
If the user presses F10 Accept, Form will execute "iloan" with form data as arguments. "iloan" will process the form data and write the resulting data to standard output. Form reads the resulting data from a pipe and displays the updated form data.
If a "-o" option was specified on the form command line, and the user presses F10 Accept again, the updated data will be written to the output file specified. The user may alternatively press F5 to go back into edit mode.
After iloan calculates new values for the form, the user may press F10 a second time and Form will dispatch View with the data fields from the form.
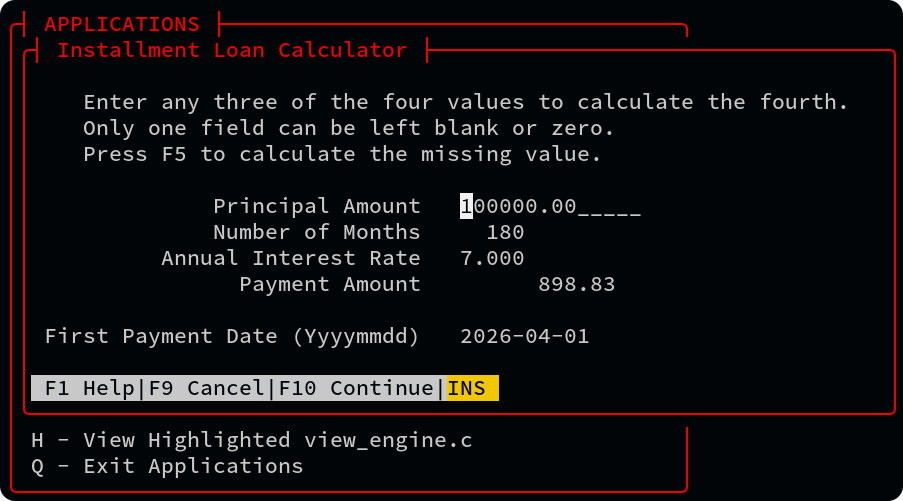
iloan and amort are trivial applications to demonstrate how to use external executables with C-Menu Form. For the purpose of demonstration, we shall designate the images above as 1) upper left, 2) upper right, 3) lower left, and 4) lower right.
Notice in window 4), I have set the field brackets in the configuration file, ~/menuapp/.minitrc. The brackets tend to look good so long as you don't over-crowd the form with 10 or 15 fields on some lines.
Also notice the chyron, the line at the bottom of the form window. It is used to convey state information to the user and to present the user with a set of relevant commands. In the Form windows 2) and 3) above, the chyron highlights the most likely next steps for the user, which are F5 Process and F5 Edit respectively. The user can select commands with the keys indicated or by clicking the command with the mouse. For example, if the user clicks "INS" in the chyron or presses the insert key, the field mode changes from overwrite to insert and the "INS" in the chyron will be highlighted to indicate the current field mode. Press insert or click "INS" again to toggle back to overwrite mode.
Here's the workflow for the Installment Loan Calculations menu item:
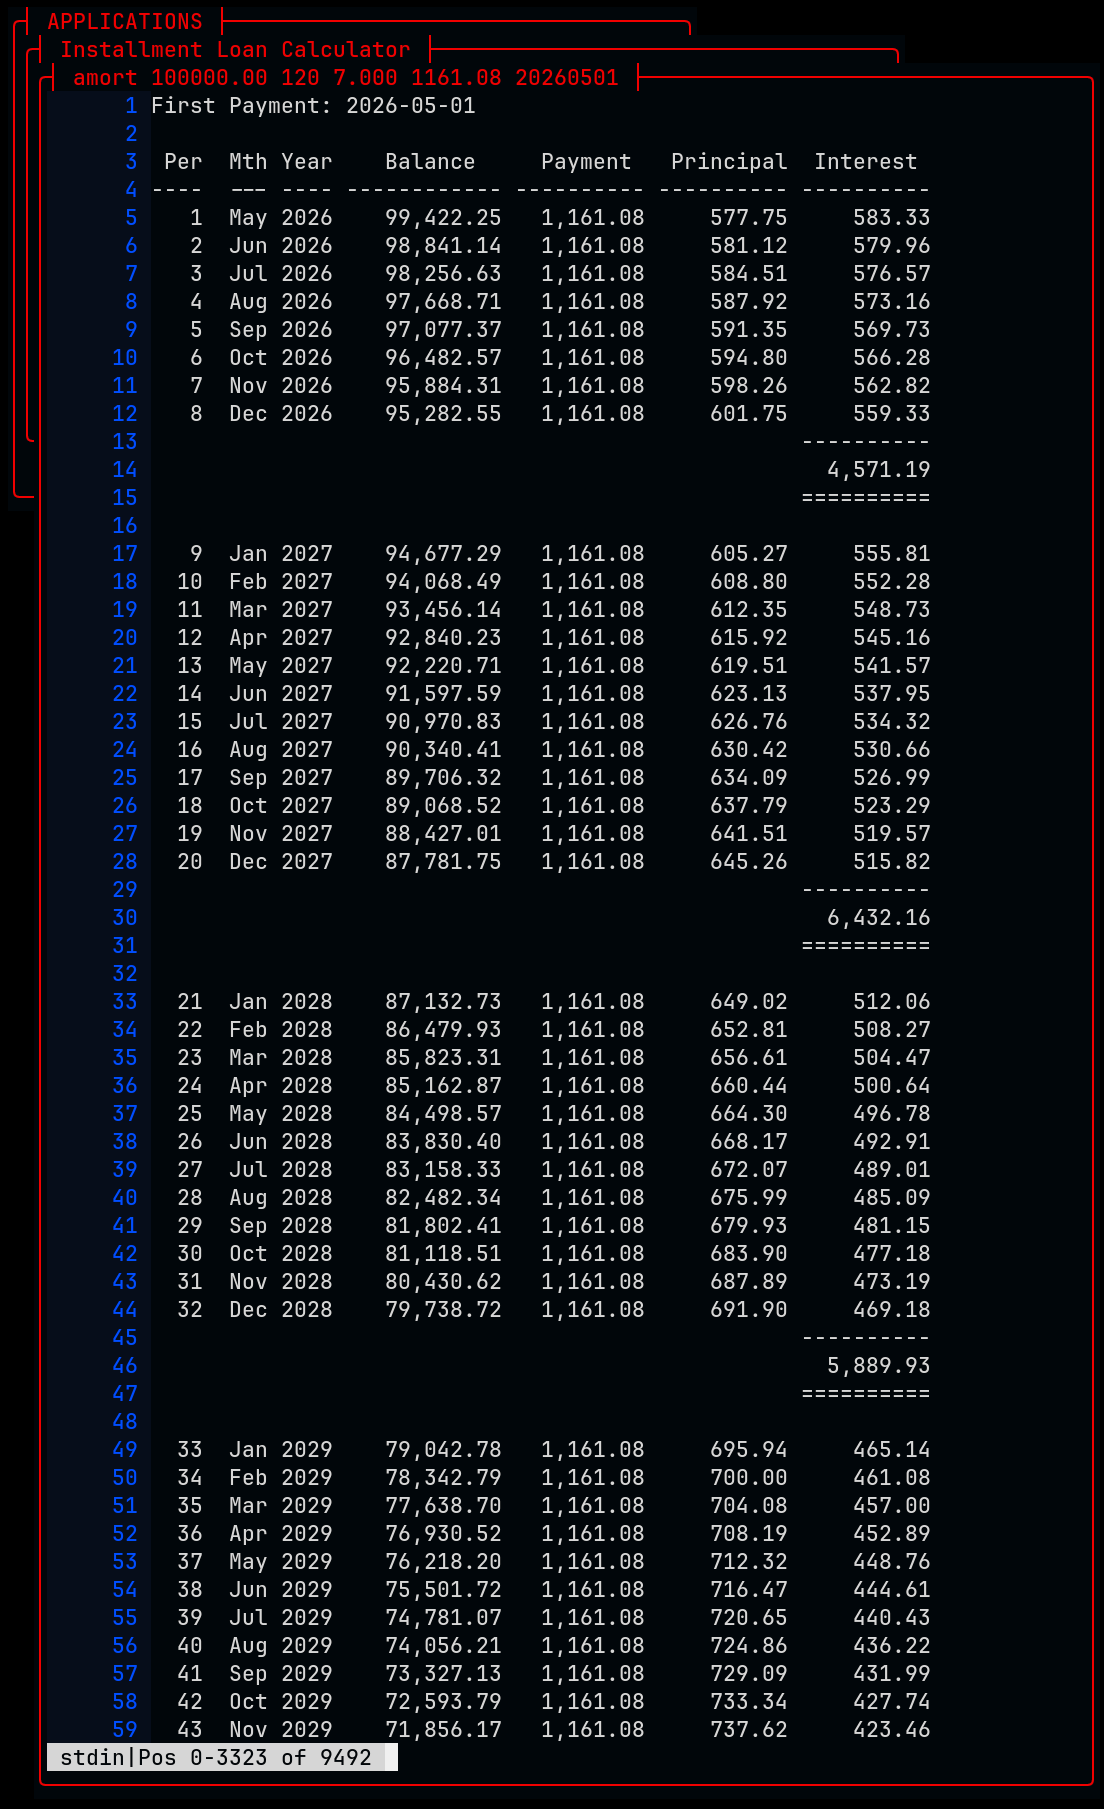
Of course, these are just demonstration programs, and the real magic doesn't start until you start building your own projects with C-Menu.
Cash Receipts also works like Installment Loan Calculations, except no external executable is specified to process data. Obviously, this menu item is not very useful as it stands. It is included here as a challenge in some industrious developer who can write external executables or scripts to provide database interaction and ancillary menu items to track deposit slips and batch numbers and post to general ledger.
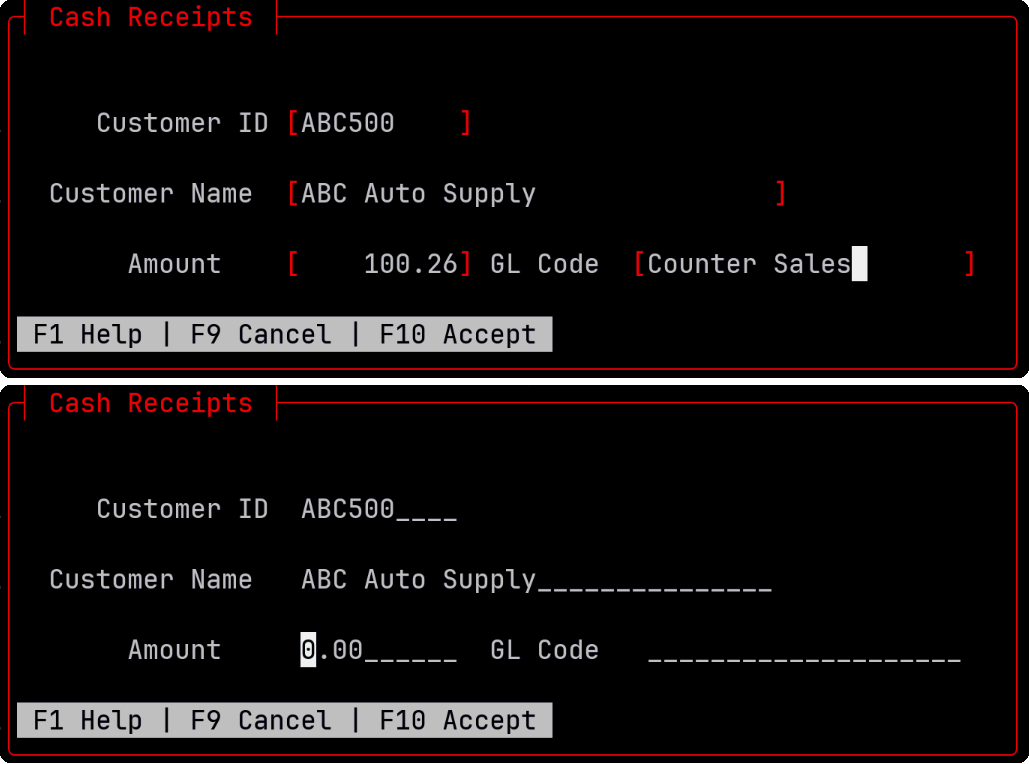
The left hand Form window demonstrates the use of fill characters to signify allocated, but unpopulated field space. This is a setting that can be specified on the command line or in the C-Menu configuration file, ~/.minitrc.
Usage Examples:
The right hand ../screen above demonstrates the use of brackets to enclose the space for entering field data. This is also a setting that can be specified on the command line or in the C-Menu configuration file, ~/.minitrc.
C-Menu Pick displays a list of items from which the user can select.
Specification:
-n maximum_number_of_selections. "-n n" is a convenience which directs Pick to automatically accept selections when the specified maximum number of items, "n" have been selected. For example, "-n 1" is commonly used to direct Pick to automatically accept the first item selected without requiring the user pressing to F10 Accept key. This feature is designed to optimize the user's economy of motion, making the selection process extremely fast and efficient. When "-n 1" is specified, the user can simply select an item and Pick will immediately dispatch the specified action.
-c execute command substituting "%%" with the selected item(s). Whether the command specified with the -c option is executed once per selection or once for all selections is determined by the presence or absence of the "-m option". Without the "-m" option, by default, if multiple items are selected, the command specified with -c will be executed once for each selection with that selection as an argument.
-m multiple_arguments flag. The -m option directs Pick to construct a command line with all selections as individual arguments. The specified command is executed once with all selections combined as individual arguments on a single command line.
An example use case for "-m" would be if you wanted to open multiple files in C-Menu View using View's ":n" and ":p" commands to navigate between files. In that case, you would specify "-m" to have Pick execute View once with all selected files as arguments, allowing you to use View's built-in file navigation features. The same technique works with Vim, nvim, and less.
-i input_file directs Pick to read input from the specified file
-S executable_provider directs Pick to execute the specified external command and read input from the command's standard output. The command specified with the -S option is executed when starting Pick, and its output is used as the list of items from which selections are made.
-o output_file directs Pick to write selected items to the specified file when the user presses F10 Accept.
Pick must have exactly one input method, either -i input_file or -S executable_provider_command. Combining -o and -c options is permissible, and will direct Pick to write the list of selected items to the specified file and also pass the list of selected items to the command specified by -c according to the presence or absence of the -m option. The selections are written to file before executing the specified command, so the command can read the selections from the file if needed.
Example:
-S specifies a script, "rust_src", located in ~/menuapp/bin, which calls lf to create a sorted file list.
Below are the contents of "rust_src", a shell script. We use a shell script here instead of direct execution because we need to pipe the output through sort. It's still fairly quick. The "lf" command generates a list of Rust source files from the "exercises" directory, which is part of the Rustlings project.
The "-n 1" option directs Pick to proceed with executing the command specified by the "-c nvim %%" option after 1 file is selected. If "-n 1" were not specified, Pick would wait for the user to press F10 Accept before executing the command specified by the "-c nvim %%" option.
The -c nvim %% substitutes the "%%" with the selected file and Pick executes
nvim. If the "-n 1" option hadn't been specified, Pick would allow the user to select multiple files and press F10 Accept to accept those selections. In that case, nvim would be executed with multiple files as arguments, and the user could use nvim's ":n" and ":p" commands to open the files selectively. The "-n" option can also be used to specify the maximum number of selections before Pick automatically accepts and launches the specified executable.
The use of "-S rust_src"" would be equivalent to "rust_src | pick" if we were executing pick as a stand-alone executable. In this instance, Pick launches "rust_src" and creates a pipe to receive its output".
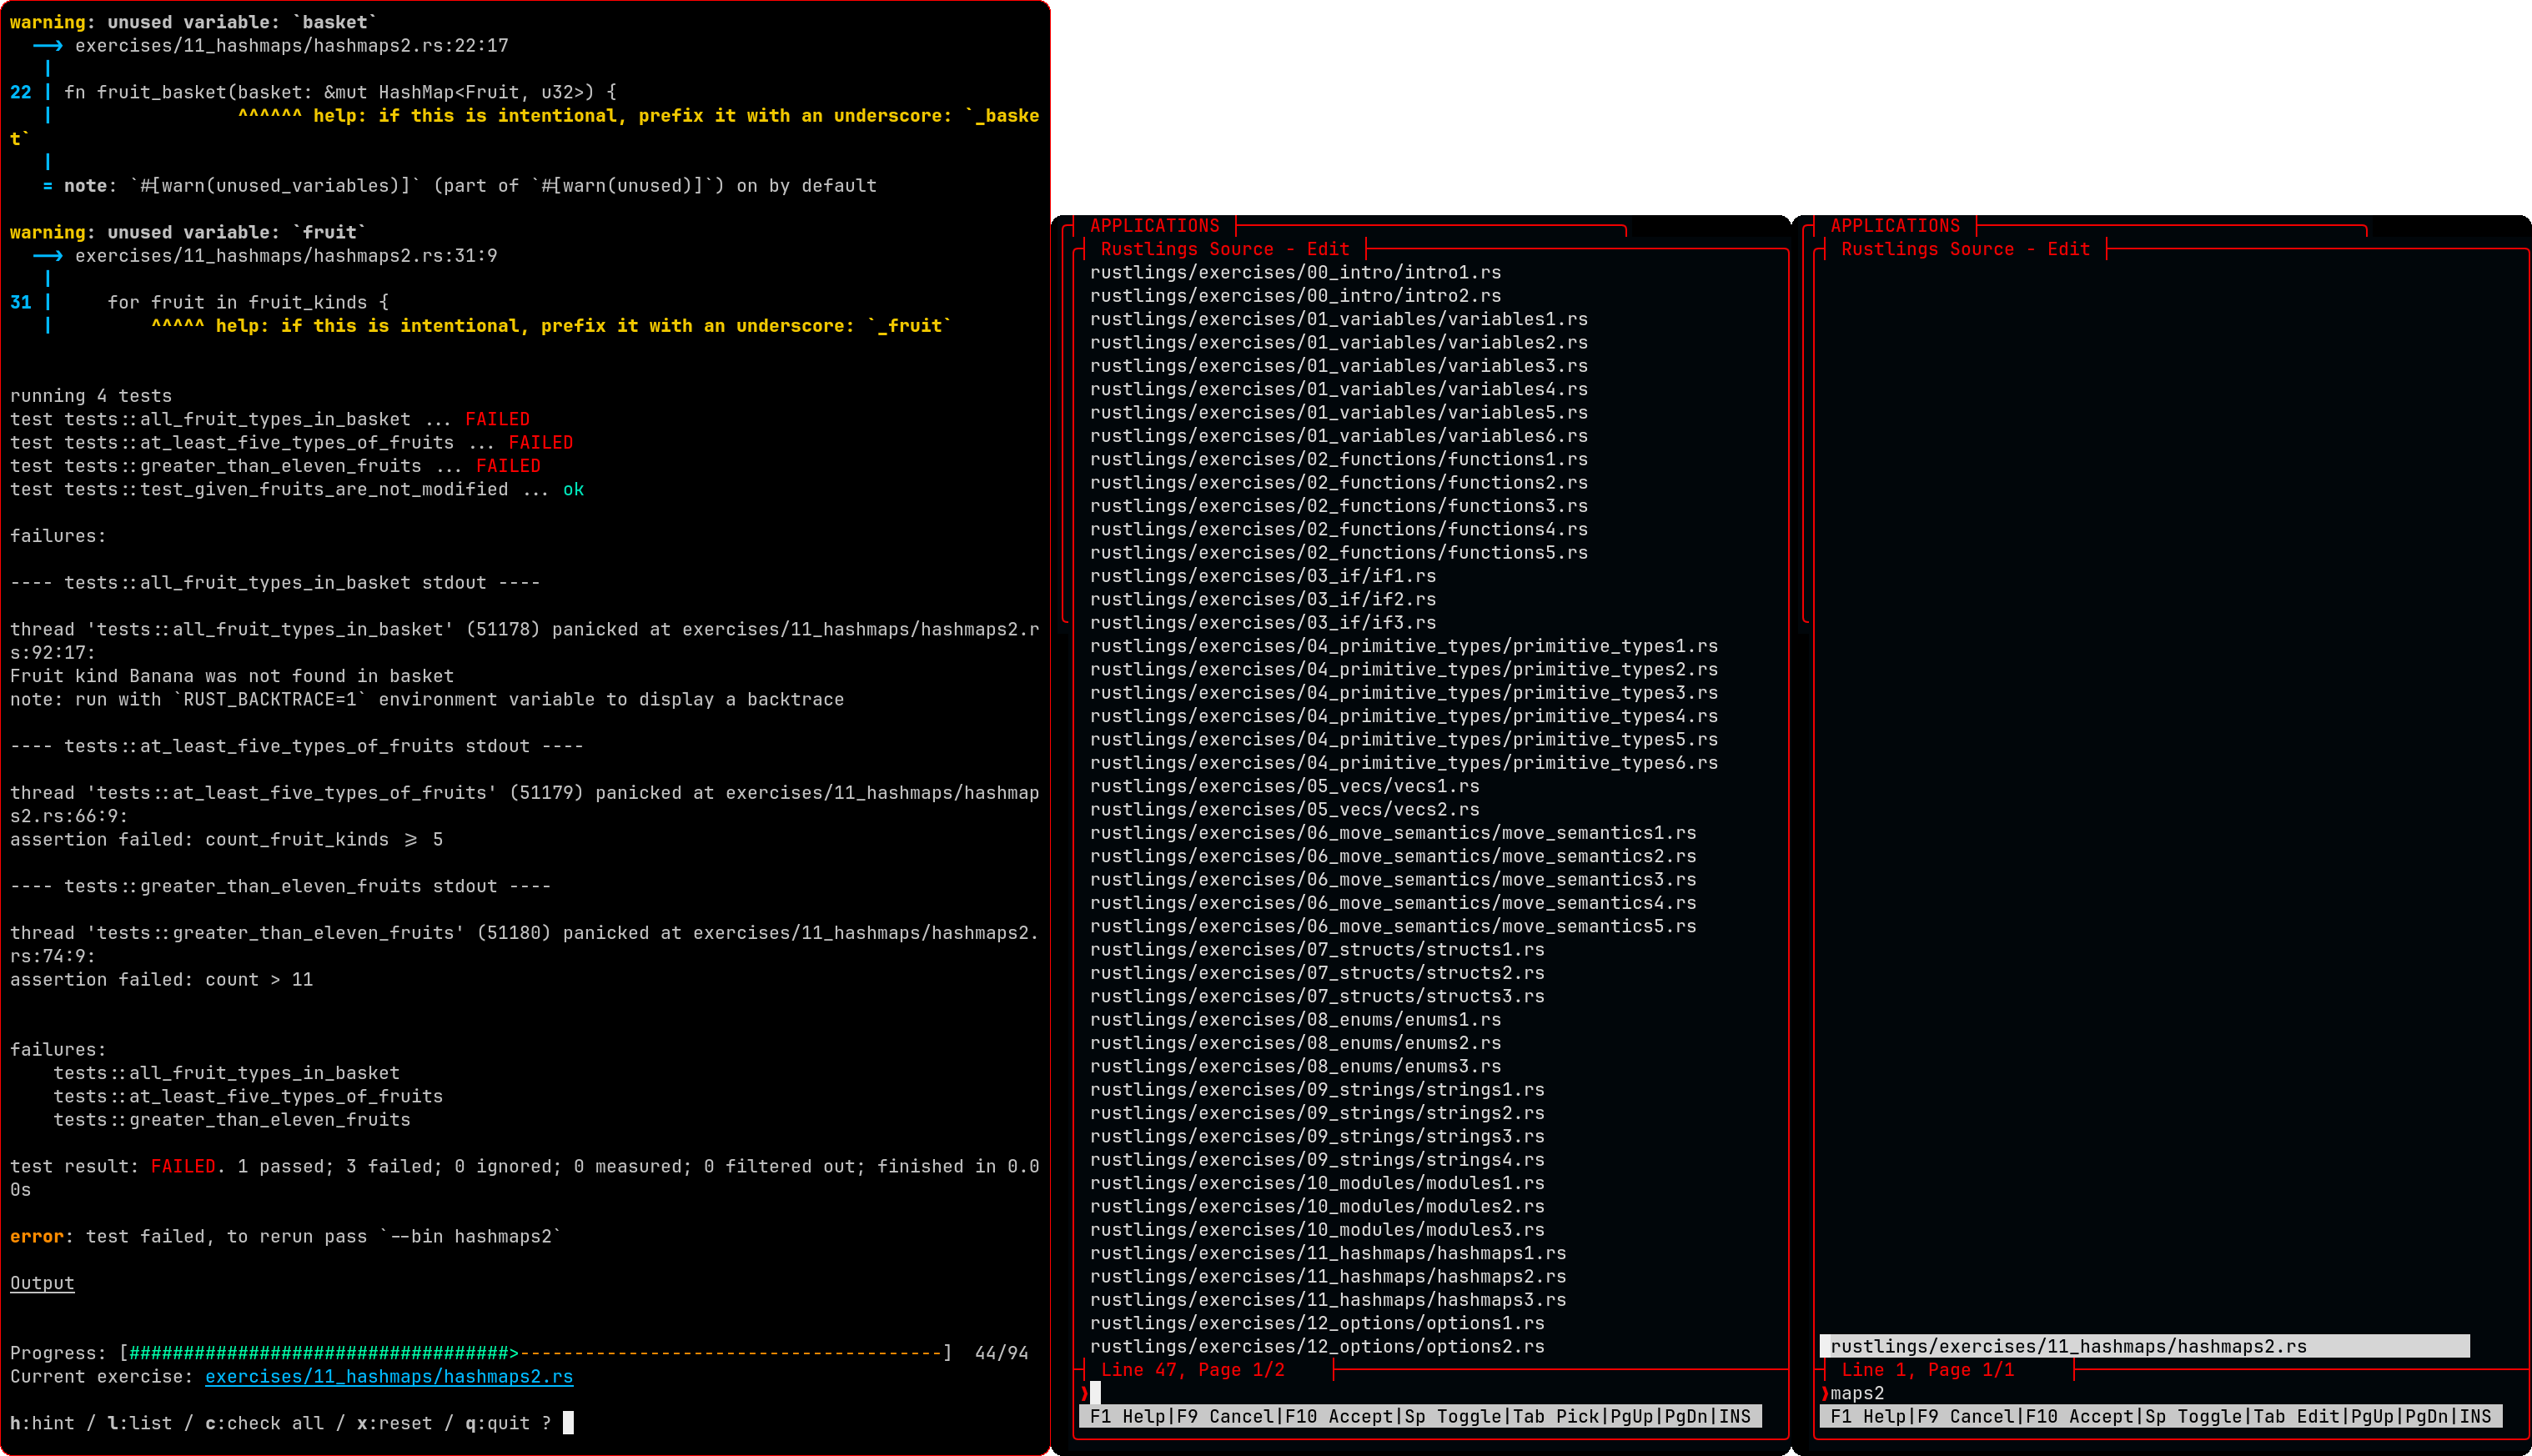
The center window above shows Pick as it appears just after selecting Rustlings Source in the Applications Menu.
The user presses tab to activate the line editor and types "maps2", the last few characters of the exercise name, and the Pick window on the right appears. The "maps2" expression filtered out all but one file name. The user doesn't need to press enter to accept the filter expression because Pick updates the Pick window in real time as the user types.
At any time, the user can press tab to jump back to the selection window, and select the desired file with the mouse or position the cursor on the desired file and press spacebar to select. In this case, there is only one file listed, so the user can simply press spacebar to select the file. Because the "-n 1" option in the Pick command line directs Pick to automatically accept when the user has selected the specified number of files.
So, the user presses tab, the cursor jumps to the only file listed, and the user presses the spacebar to open the selected file with nvim. If there had been more than one file listed, the user could select a file with the mouse, arrow keys, or j for down, k for up, and when the desired file is highlighted, and pressing spacebar to select. When using the mouse to select, it is not necessary to press the spacebar.
When finished editing in nvim, the user can type shift "zz" to exit. nvim closes, and the user is returned to the Pick window as it was before selecting the file. The user can press tab, backspace, 3, tab, spacebar, and nvim opens hashmaps3.rs, the next source file in the Rustlings sequence. This is a very quick and almost effortless way to step through the Rustlings exercises, but it can also apply to many other situations.
Edit .c Files in Current Directory is an example of how to use C-Menu lf and Pick to navigate and select files from a directory. Once a file is selected, it is passed to the nvim.sh script to be opened in Neovim. This demonstrates how you can integrate C-Menu with external applications and scripts to create a seamless user experience.
Actually, the above command line is a good example of how to write inefficient and unnecessary code. That's 100ms wasted each time you select that menu option. (-: :-) The nvim.sh script is not necessary. The command line could be written more efficiently as follows, which eliminates the need for an external script and directly opens the selected file in Neovim.
The command line below demonstrates the preferred method of starting nvim.
Also, if you have a situation in which the script, "project_src" could be replaced by a direct command line, such as "lf -d 5 '.\*\.c$'", that would be more efficient than using an external script. The command line below demonstrates how to directly use the "lf" command to generate a list of .c files in the current directory and its subdirectories, without the need for an external script.
Look Mom! No scripts! Just direct command lines. This is the most efficient way to write your menu commands, but it may not always be the most practical or maintainable way, especially if you have complex command lines that are difficult to read and understand. In those cases, using shell scripts can help simplify your command lines and make them more readable and maintainable.
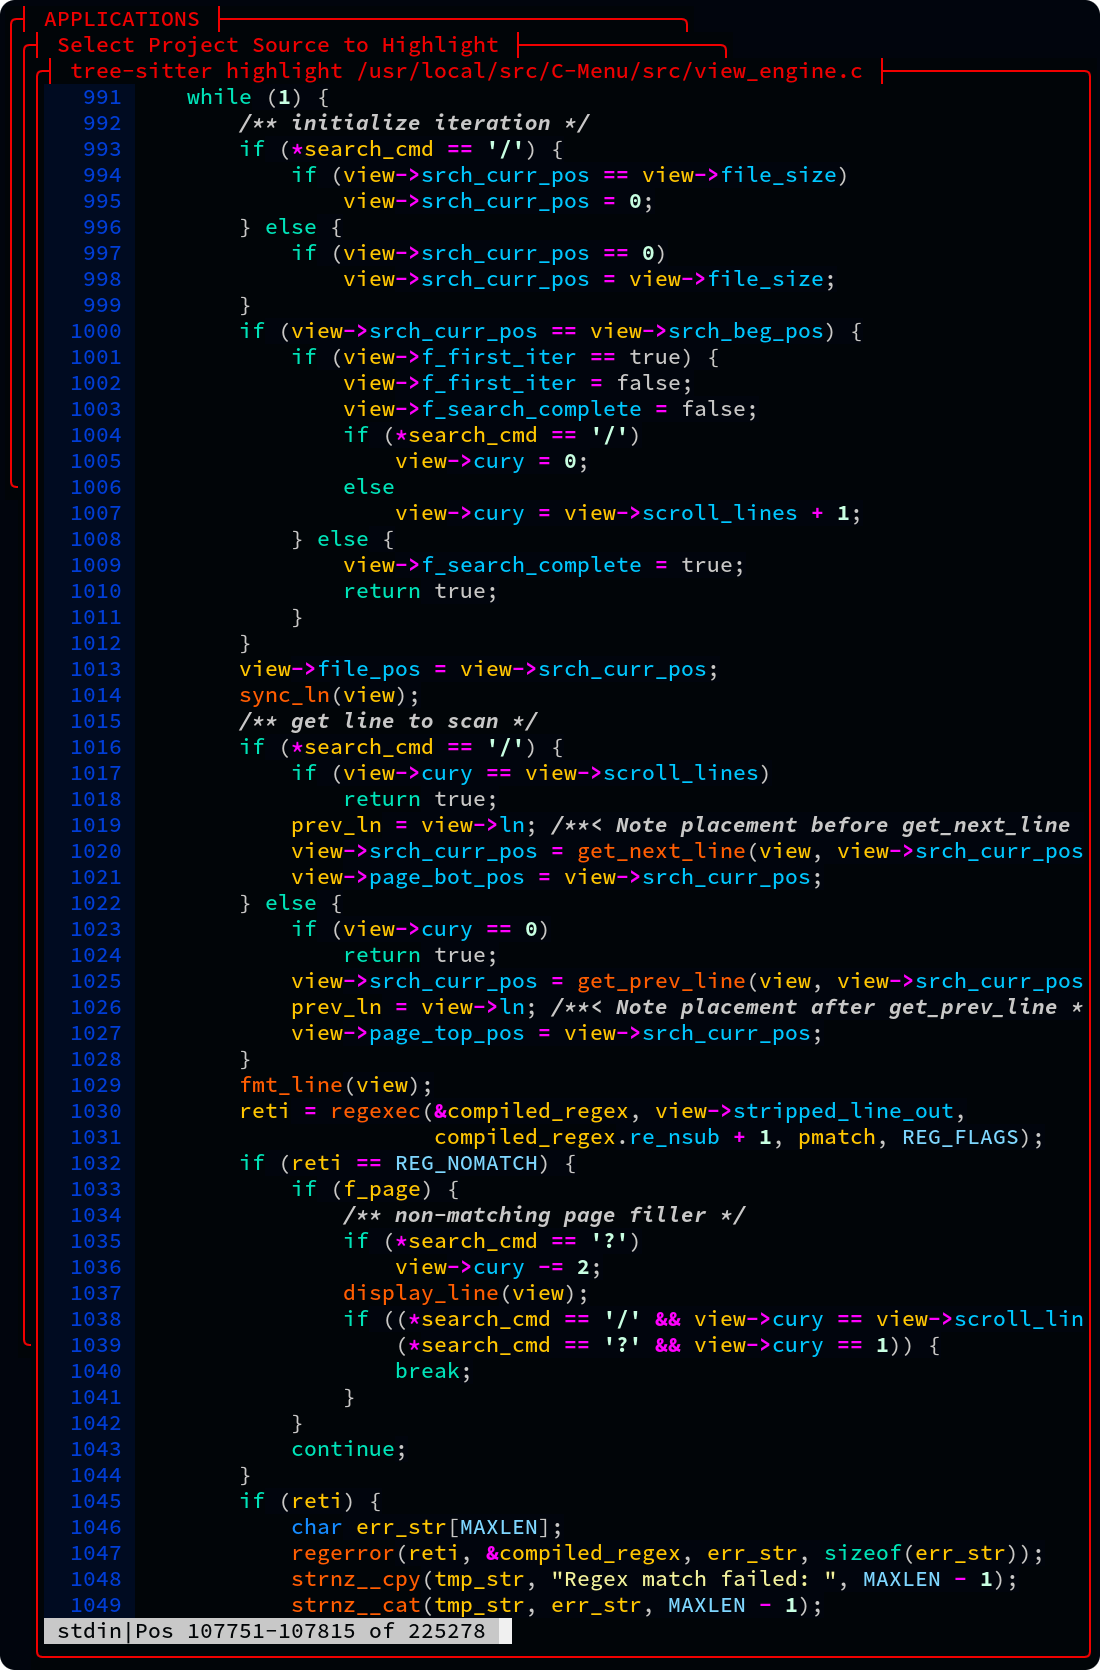
View C-Menu Source with Tree-sitter demonstrates how to use shell scripts to simplify complex command lines. The command line below uses a shell script , "tree-sitter highlight", to apply syntax highlighting to the selected source file using Tree-Sitter.
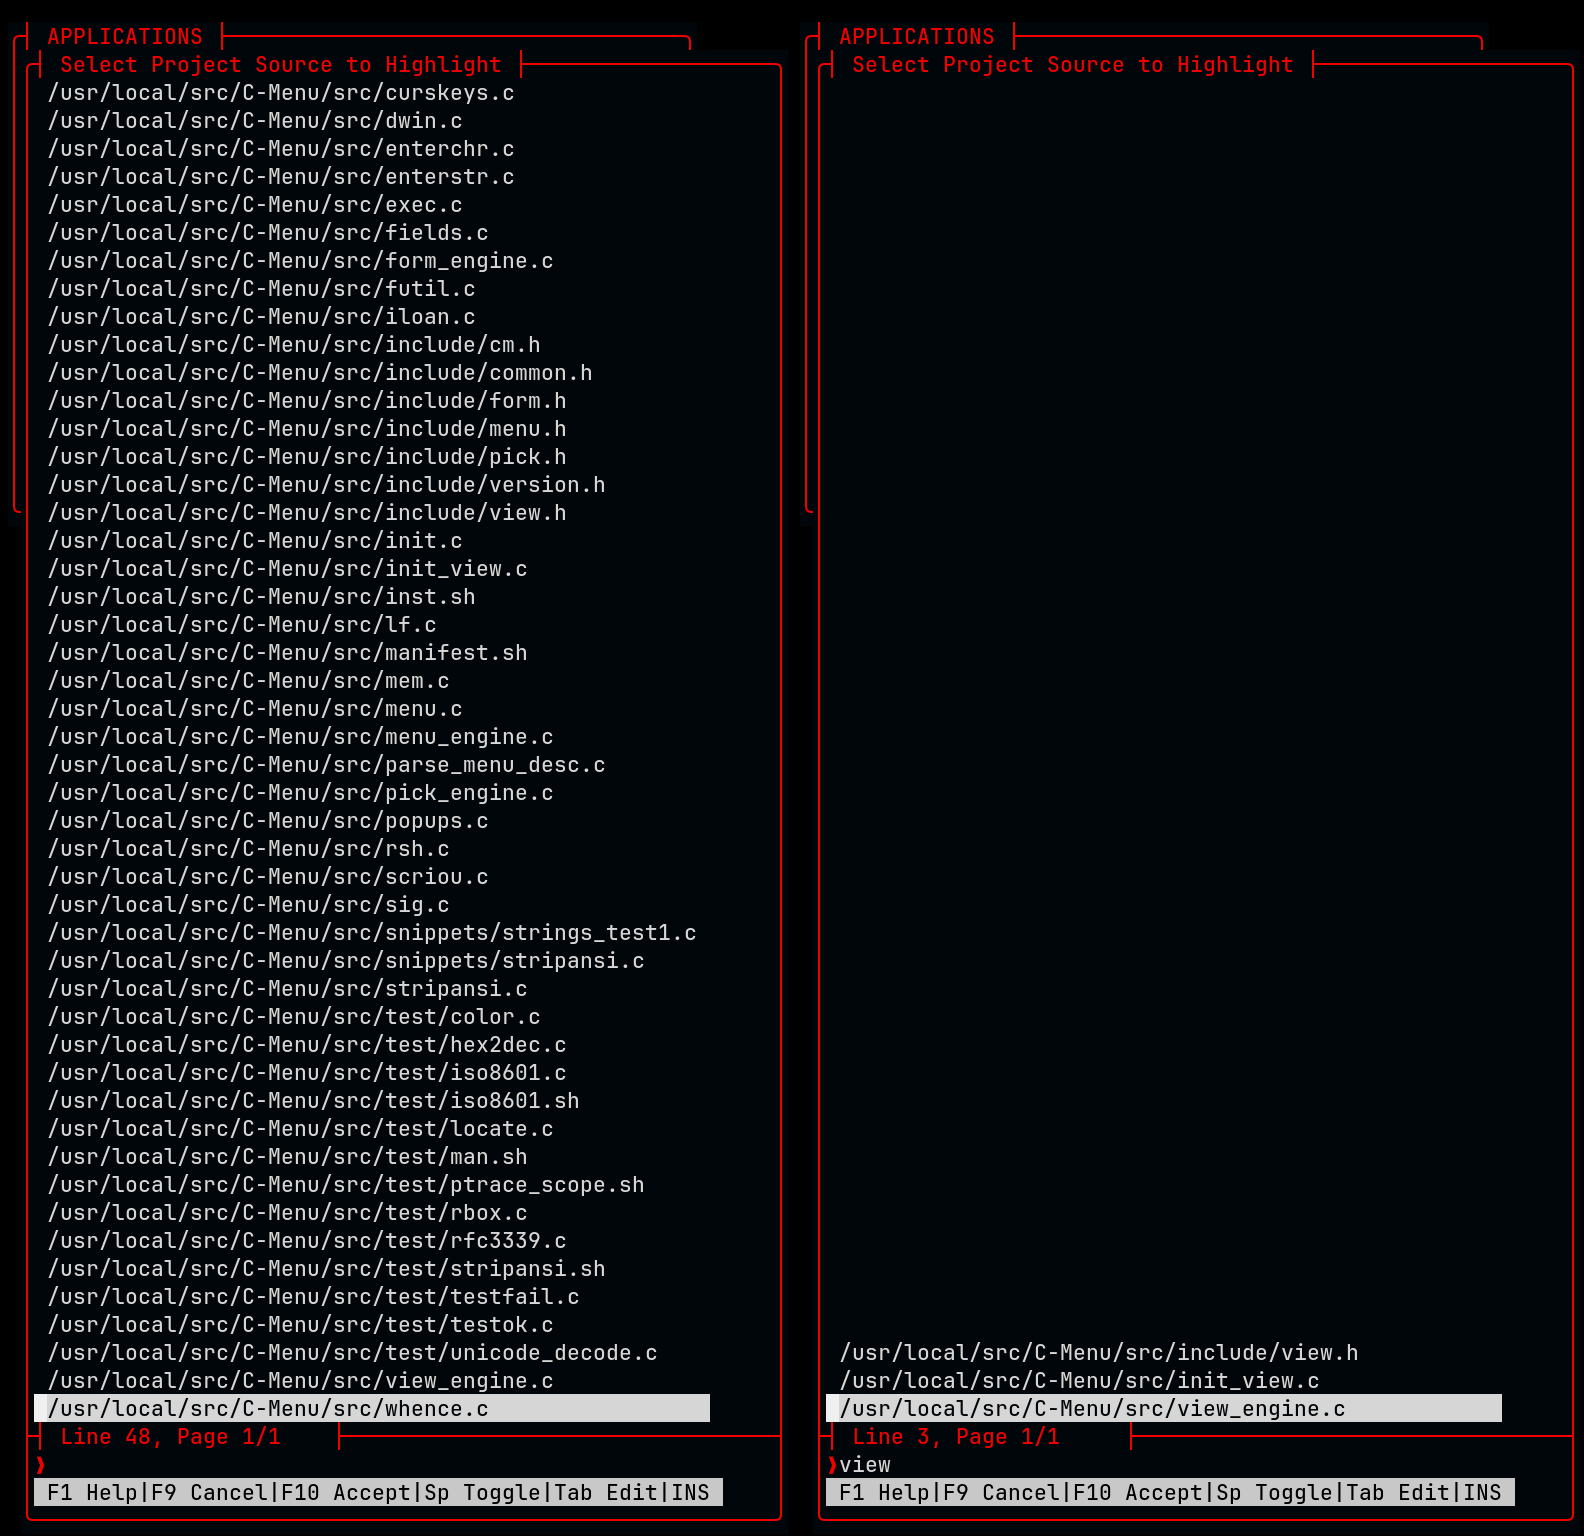
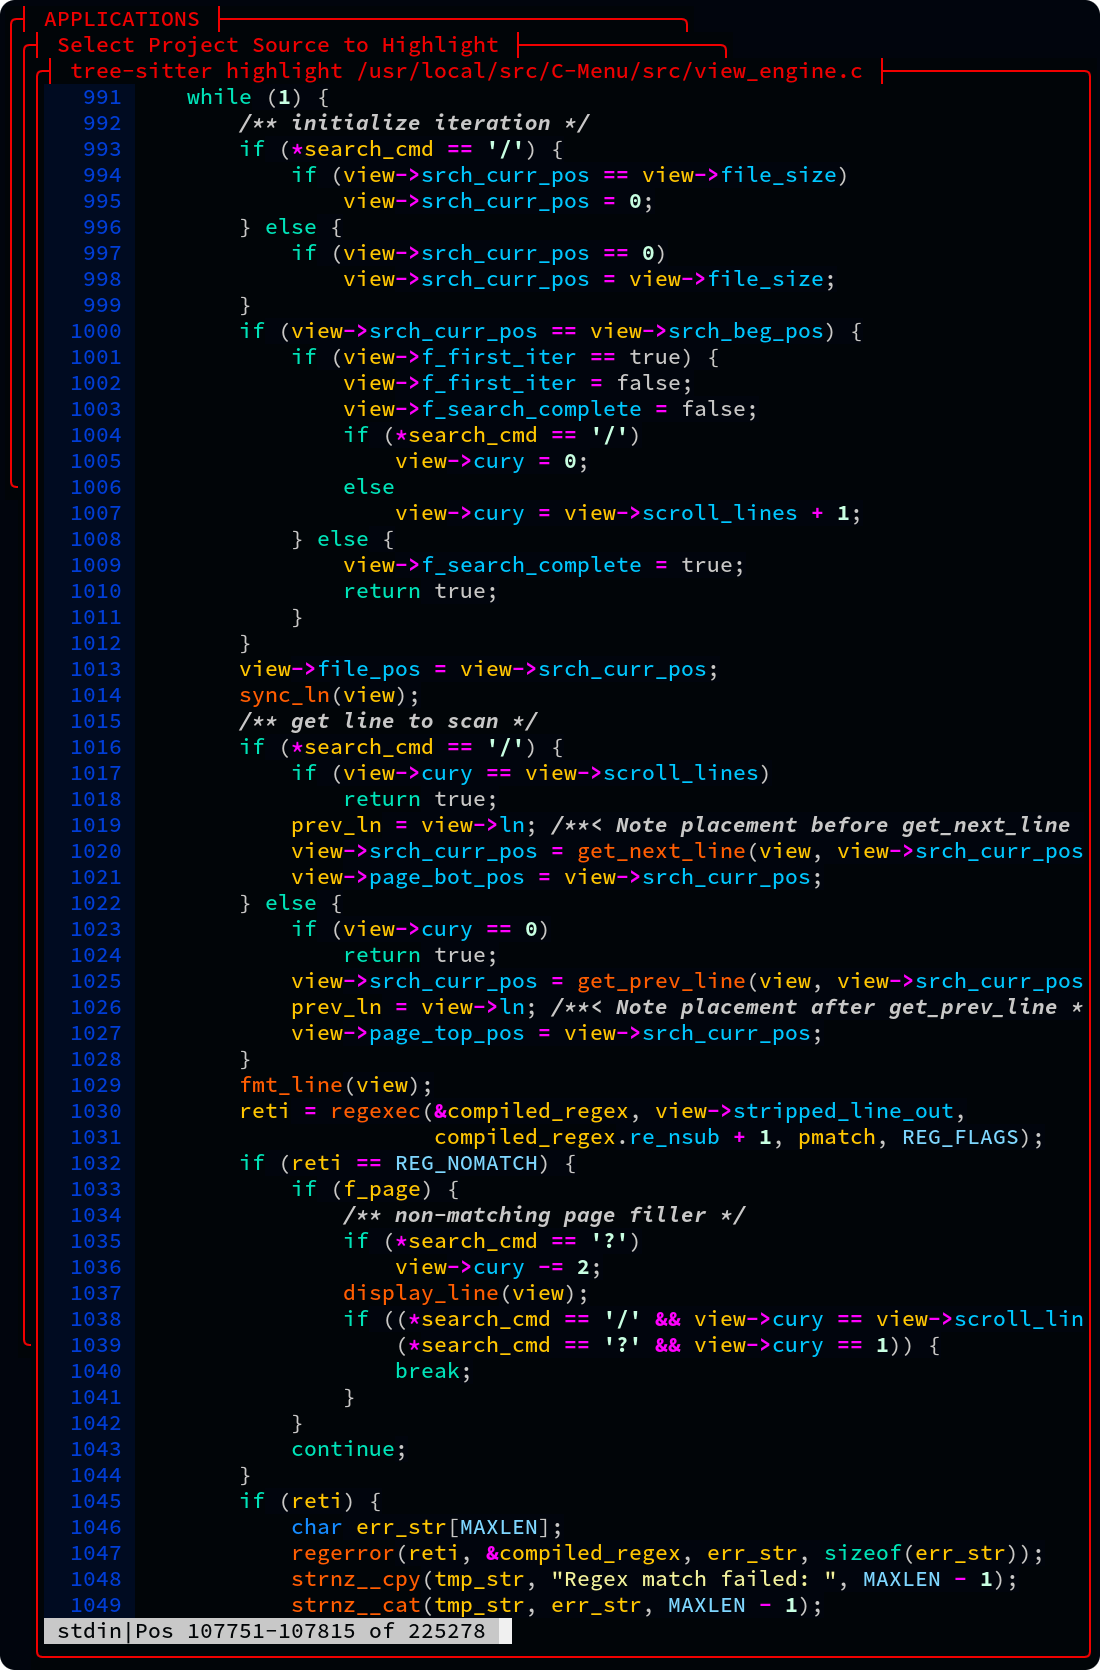
It is not necessary to use a filter expression in Pick. You can just as easily mouse click the particular file you want to select. However, it comes in handy when you have several pages of files.
This image of the View window has line numbers because f_ln is set to true in the C-Menu configuration file. If you don't have f_ln set to true in the configuration file, you can also use "-N" on the command line to enable line numbers. If you have f_ln set to true in the configuration file, and you don't want line numbers, you can specify "-Nf" on the command line to disable line numbers for that particular view instance.
View has Unicode support, line numbering, regular expression searching, and a large virtual pad for horizontal scrolling. View works great with tree-sitter, source-highlight, pygments, bat, manual pages, and other syntax highlighters. View doesn't alter the file you are viewing. It uses the highlighter in a pipe, and reads the output, so the original file is never changed. And, if you happen to have a file that has been highlighted by another application, view can strip the ANSI codes for convenient editing. View is lightning fast, especially with huge log files.
Throughout C-Menu, and especially View, you will find many optimizations that contribute to it's efficiency and speed. Traditionally, large file I-O has relied on user-space buffering schemes in which chunks of data are copied from mass storage into local buffers using seek and read operations. The application must keep track of buffer contents, manage buffer lifecycles, and handle edge cases such as partial reads, end-of-file conditions, and error handling. This approach can be complex, error-prone, and inefficient, especially when dealing with large files or high-throughput applications. C-Menu's view takes a different approach to large file I-O by leveraging the operating system's virtual memory management capabilities to provide direct access to file data through memory mapping. Instead of relying on user-space buffering, C-Menu's view provides a direct-to-kernel, demand paged, memory mapped virtual address space for file access. This eliminates the overhead and complexity associated with user-space buffering, and allows for more efficient and reliable access to large files. With C-Menu's view, applications can access any part of a multi-gigabyte file instantly without the need for copying data into user-space buffers or managing buffer lifecycles. This results in unmatched reliability and performance when working with large files, making C-Menu's view ideal for applications that require high-throughput file access or need to work with large datasets.
If you work with large datasets, you will love view. No fluff, no bloat, no nonsense, just blazing fast performance.
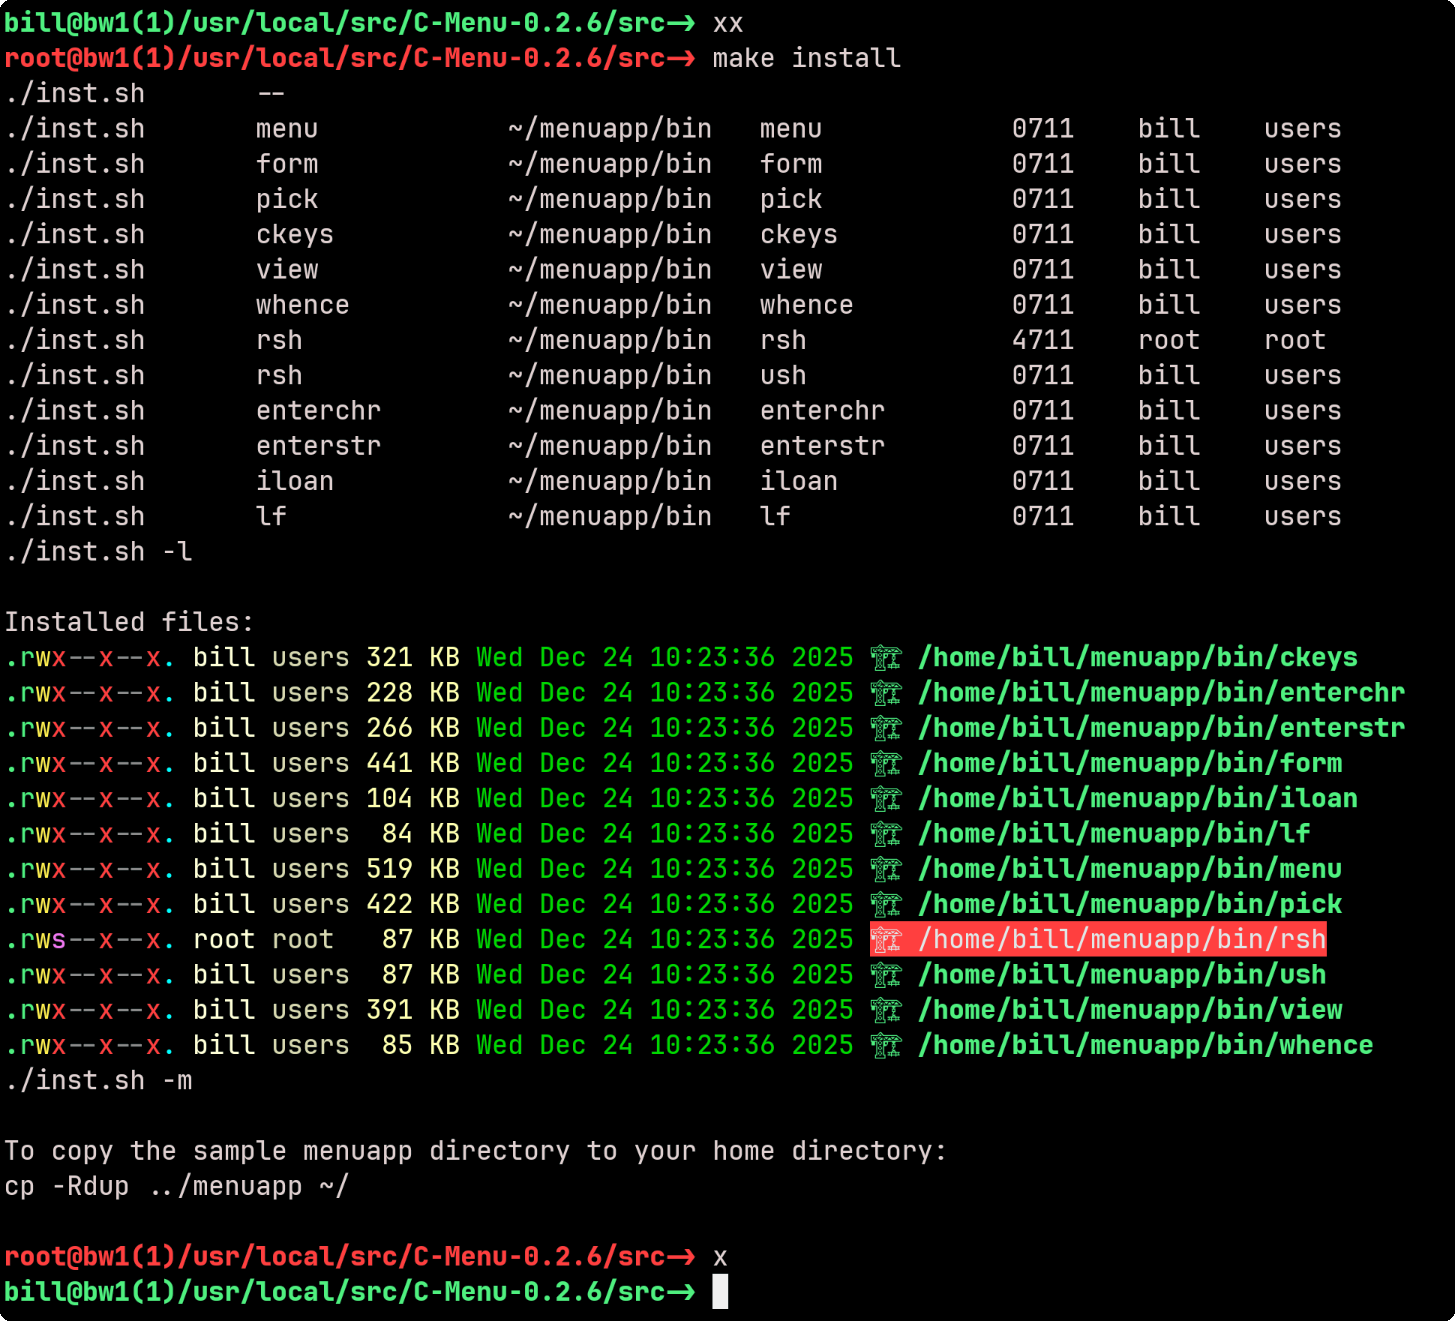
RSH - RSH provides an alternative to su and sudo for executing commands with elevated privileges. It allows developers and system administrators to get in and out of root shells and execute commands with root privileges without the need for a password, for example, by authenticating with an ssh key as you would on gethub.
In the following example, make install requires root privilege, so the user types xx, is authenticated with an ssh key, and then types make install. When the make install is finished, the user types x to exit the root shell and relinquish root privilege.
lf - is a sleek, easy-to-use, and fast file finder. The name, lf, can be thought of in the imperative sense as "list files", or in the noun sense, "lightweight find."
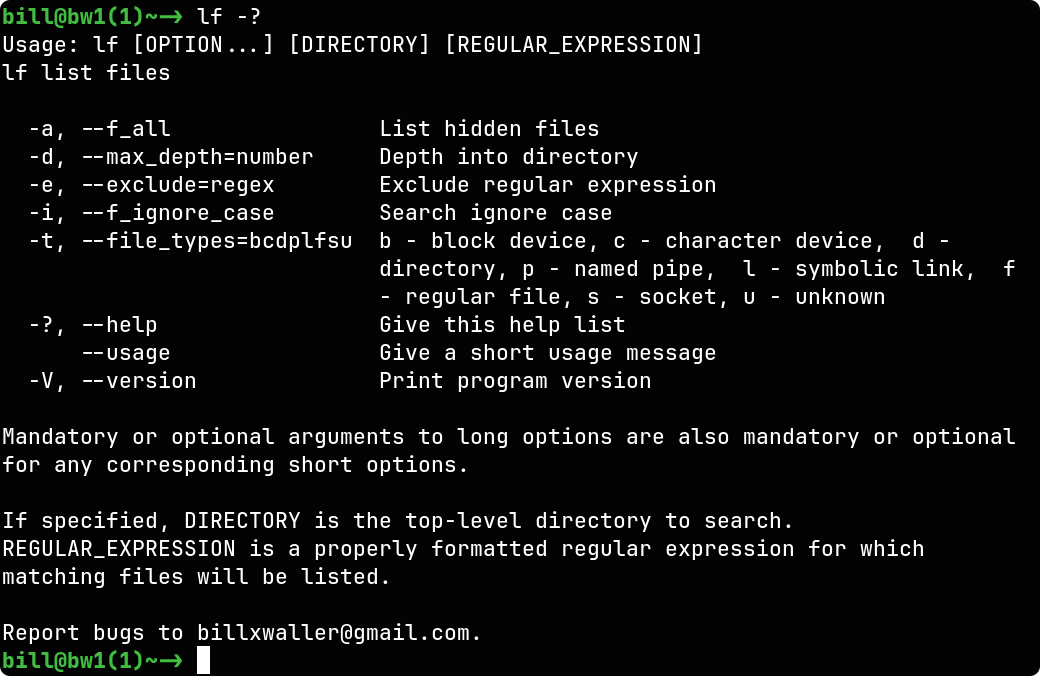
The ../screenshot above is the help output of lf piped through bat and displayed in View.
Note: lf's default behavior of including hidden files has been changed and the default is now to exclude hidden files. Before this update, the "-n" option directed lf to exclude hidden files, but that is no longer necessary and a new "-H" option has been added to direct lf to include hidden files. This change was made to align with the behavior of other popular file finders such as fd and find.
Find's built-in -exec is one of its most often used options and conspicuously, lf doesn't have a built-in -exec option. However, lf achieves identical results in a fraction of the time by piping the output of lf into xargs. There would be no benefit to adding an -exec option to lf because xargs leaves nothing to be desired.
time find . -maxdepth 5 -type f -exec ls -l {} \; >find.out
time lf -d 4 -t f | xargs ls -l >lf.out
| Command | real | user | sys | files found |
|---|---|---|---|---|
| find | 0m0.469s | 0m0.160s | 0m0.288s | 142 |
| lf | 0m0.008s | 0m0.004s | 0m0.006s | 142 |
time find . -maxdepth 4 -type f -exec ls -l {} \; >find.out
time lf -d 4 -t f | xargs ls -l >lf.out
| Command | real | user | sys | files found |
|---|---|---|---|---|
| find | 0m2.123s | 0m0.788s | 0m0.281s | 598 |
| lf | 0m0.014s | 0m0.007s | 0m0.009s | 598 |
The results were unequivocal. lf with xargs is significantly faster than find with its built-in exec option.
The command lines below are simple and straightforward, with no complex options or filters. Benchmark comparisons are notoriously subject to manipulation, so take them with a grain of salt. There are so many variations in hardware, file systems, the actual data, and system caching states that can skew results. You wouldn't buy a new Corvette without a test drive, so take C-Menu for a spin, do your own comparisons, and decide for yourself. (Why does it feel so sneaky to say that? (-: (-: )
time find . -type f | wc
time lf . -t f | wc
time fd . -H -t f | wc
| Command | real | user | sys | files found |
|---|---|---|---|---|
| find | 0m0.793s | 0m0.470s | 0m0.453s | 307440 |
| lf | 0m0.214s | 0m0.036s | 0m0.214s | 307440 |
| fd | 0m0.221s | 0m0.319s | 0m0.821s | 291969 |
Even without its speed advantage, lf would still be a compelling alternative due to its simplicity, portability, and ease of use. With fewer options and a more intuitive syntax, lf is a breeze to learn and use for the most common file searching tasks.
Here's an example of how easy it is to use lf to find files modified between two dates. The command line below uses lf to find files modified after 2024-01-01 and before 2024-06-01, and then pipes the output to xargs to execute ls -l on the found files.
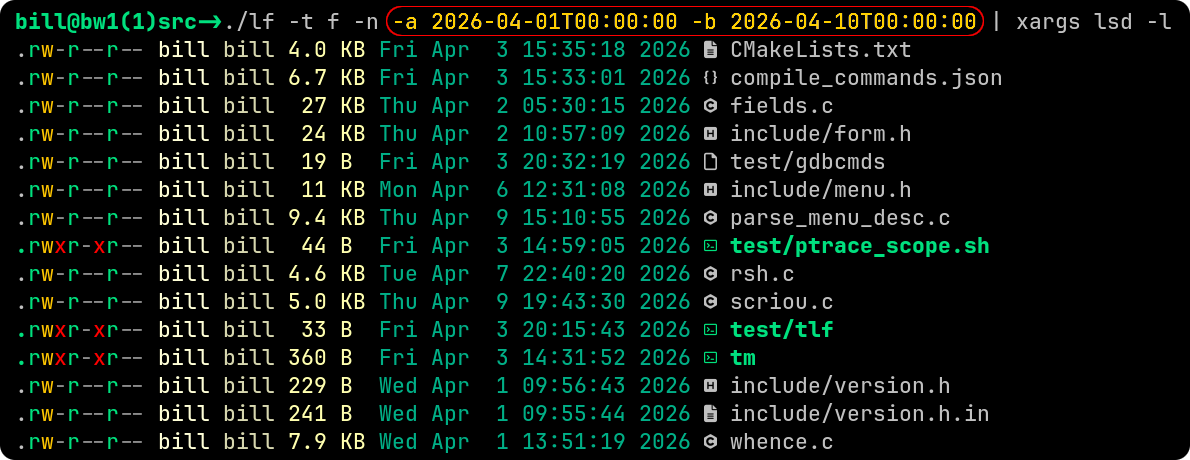
The ../screenshot above shows how you might use the date-time options of lf to list files between two date-times (after and before) and the sample output. We believe you will find this format intuitive and easy to use.
 1.17.0